Custom Search

Friday, January 10, 2014

Kidorable Backpack Review and Umbrella Giveaway


Life should be extraordinary when you are a child. One of the best ways to do so is to allow your child to use their imagination and explore the outside world. Kidorable has adorable items for kids that allow them to explore the world being a fireman, a butterfly as well as the many other themes that are available.

"Kidorable delights both children and the adults who love them by transforming everyday, functional kids accessories into objects that excite their imaginations and enrich their lives at play. From rainwear to backpacks to knitwear and towels, Kidorable speaks to the precious spirit of childhood."


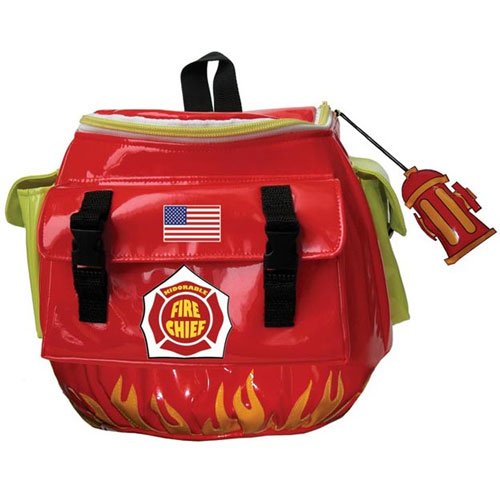
Being allowed to review a product from Kidorable allowed me to explore the many themes and find the perfect one that my grandkids would love. It then was my turn to decide what theme and out of that theme which item to choose. Our youngest grand-son will start preschool around his birthday in February both him and his mommy are very excited about this. Because my son in law is a volunteer fire fighter I know that my grand boy loves to dress up and pretend being a fireman. So for us it was the fireman theme and the product we chose would be perfect to start school in the fireman backpack
Kidadorable is the brain child of Jonathan Domsky and Liping Yang. By inventing a niche of fun, practical unique children's accessories. Domsky and Liping started their journey in a small apartment in Evanston Illinois. In 1998 the company went into business and has grown every since. By the year 2000 the company had shipped to their 2000th retailer. In 2009 the company set up an ecommerce site on www.kidorable.com and became social as well on facebook and twitter.

We loved our backpack so fun and cool looking. I am sure he will love it and be the next cool dude in school. I also love that it is the right size for him. Starting preschool is a bi thing but it does not take a large backpack and one that is bit smaller to carry home those special papers will be the perfect size. The details of the backpack are super cute as well. With colors of red, neon green, black, orange and yellow the backpack becomes one easily seen as well. Easy to wash off surface inside and out allows easy clean up. Firehydrant attached to the zipper pull allows it to be easily zipped as well. I love it and I know sir Gager will as well.


Kidorable would love to offer the readers of Annies Home the chance to win an umbrella from kidorable of their own. Again with so many themes I am sure that you will find jut the perfect one.


To enter: Visit Kidorable and leave me a comment telling me which umbrella you would choose if you win! (This entry is mandatory and must be completed before bonus entries count)

Bonus Entries: (Leave a seperate comment for each bonus entry)

#1) Subscribe to our blog annies home please leave email that used to subscribe ~ 3 Bonus Entries

#2) Grab my Button let me know url where you shared it ~ 5 Bonus Entries

#3) Like Kidorable on Facebook and leave them a comment letting them know annies home sent you~ 2 Bonus Entries

#4) Follow me publically on Google Connect~ 3 Bonus Entries

#5) Follow @shopannies and @kidorable on Twitter and Tweet about this giveaway! You can tweet once per day for an extra bonus entry everyday! Just copy and paste this:  #Win your choice of adorable childrens umbrellas from @kidorable enter @shopannies http://shopannies.blogspot.com/2014/01/kidorable-backpack-review-and-umbrella.html

#6) share a comment on any non giveaway post ~ 1 Bonus entry per comment

#7) Blog about this giveaway and link back to this post and kidorable~ 5 bonus entries

This giveaway will end on 1/24/13 at 11:59pm CST (OPEN TO US ONLY)

Disclosure: Thanks to kidorable for providing the complimentary items mentioned above for review. No monetary compensation was given for this review and all opinions expressed are 100% honest and my own


Peonies offer a Ray of Beauty


Peonies to me are super beautiful. I love the green lush leaves and the big bright show flowers. I plan to plant some in 2014 so that we can once again enjoy their beauty. Peonies are perennial plants that grow quickly and produce colorful showy blooms in late spring to early summer. Peonies come in a wide range of colors to choose from including white, red, crimson, yellow and rose.


Peonies grow best in rich, well drained soil, and full sun. When planting and tending to be sure to add plenty of compost and well rotted manure prior to planting and each fall as well. Bulbs should be planted with eyes 1" - 2" deep. Space plants 2 feet and 3 feet apart. Make sure to water in periods of drought and fertilizer a couple of times a year. If the plant grows to thick and bushy trim and thin to improve air circulation. In the fall trim the plant back Cover with mulch To keep the blooms big and plush peonies normally need thinned. The clump of roots can get too thick and may require digging them up and removing some of the roots.
     

Thursday, January 9, 2014

Hell Has Frozen Over

Hell Michigan that is

I have often heard the phrase I will do it when Hell freezes over
well guess what happened

Comfort Food : Chicken Noodle Soup

With the weather rainy and still snow on the ground I decided to fix a bit of comfort food. The whole family loves it. The flu has also hit this house so many do not have their appetite back yet. So a good bowl of soup hits the spot. I hope you enjoy as well.


My Ultimate Chicken Noodle Soup
(Adapted from a recipe in La Leche League’s Whole Foods for the Whole Family)

8 generous servings

For the chicken:
1 whole chicken
2 cups water
 
For the broth:
1 carrot, cut into 4 pieces
½ medium onion, cut into 4 pieces
1 stalk of celery, cut into 4 pieces
Broth from the roasting pan
8 cups water
1 teaspoon salt
Cheesecloth for straining

For the soup:
2 tablespoons butter
½ pound carrots, chopped (about 4 medium)
1 medium onion, chopped
4 – 5 stalks celery, chopped
Chicken meat, cut into bite-sized pieces
6 ounces noodles


1. Preheat the oven to 325˚.
2. Put the chicken breast-side down in a 9x13-inch baking dish.
3. Add 2 cups water to the baking dish.
4. Roast the chicken uncovered for 2 hours.
5. Pour the broth from the pan into a large pot. Let the chicken cool off until it’s cool enough to handle.
6. Remove the skin from the chicken and add it to the pot with the broth. Take the chicken meat off the bones and add the bones to the pot.
7. Cut the chicken meat into bite-sized pieces; cover and refrigerate until ready to use.
8. Add the carrot, onion, celery stalk (all cut into 4 pieces), 8 cups of water, and salt to the pot. Bring to a boil; reduce heat, cover, and simmer for 1 hour.
9. Remove the vegetables from the broth and discard them. Line a strainer with cheesecloth and strain the broth into measuring cups or other pans.
10. Melt the butter in a large pot (you could use the same one you used for the broth).
11. Add the chopped carrots, onion, and celery. Cook until the vegetables are starting to soften, 5 – 10 minutes.
12. Add the reserved broth and the chicken. Bring to a boil; reduce heat, cover, and simmer for 40 minutes.
13. Add the noodles and simmer for 20 minutes.
14. Season to taste with salt and pepper. (I added another teaspoon of salt.)

shared at Friday Flashblog
Friday Foodie


Miz Helen’s Country Cottage
30 Handmade Days
Dear Creatives

A Little Lesson TO Learn


I simply love this idea so super cute and well a great way to teach or learn a lesson. I learned from the lady the 20 pick up and well I taught that to my kids when they were young. Now that they are grown many things have changed. They learned their lessons when they were young but as they got older I believe that they have grown a bit lazy. Leaving things around has become an everyday event. I love this collect all box because it has the chores in the pocket located on the box. Oh yes believe me we will be enforcing this rule. Good way to help me stay organized. What do you think?

shared at
Weekend Retreat
live laugh love
Frugal Friday
I heart naptime
Thrifty Things Friday
Love 2 Upcycle

Wednesday, January 8, 2014

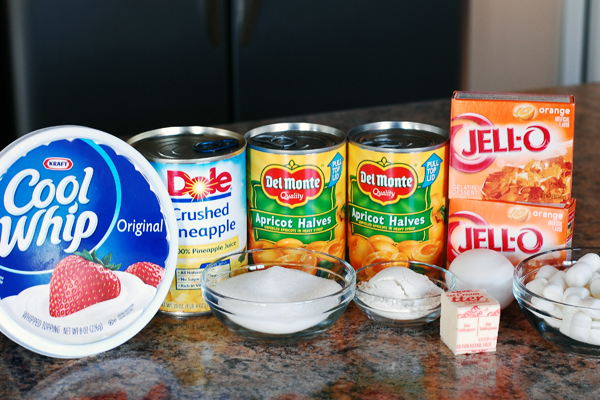
Apricot Delight Jello Salad


2 15 oz cans apricot halves
20 oz can crushed pineapple
2 - 3oz packages orange jello
2 cups boiling water
3/4 cup mini marshmallows
1/2 cup sugar
3 Tbs. flour
1 egg, slightly beaten
2 Tbs. butter
8 oz Cool Whip


Drain apricots and pineapple, reserving the juice. Set juice in freezer to chill while you do the next steps. Chop apricots in bite size pieces. Dissolve jello in boiling water in a large bowl. Add 1 cup of the cold fruit juice, reserve remaining juice. Chill until slightly jelled (about 30 minutes). Add fruit and marshmallows to slightly jelled jello. Pour into 9x13 pan. Chill until firm. In a small sauce pan, combine sugar, flour, egg and 1 cup of saved juice. Cook over low heat till thick. Remove from heat and add butter.
  1. Cool in fridge.
  2. Fold in Cool Whip.
  3. Spread topping on top of jello.
 
shared at
ThePinJunkie
The Answer Is Chocolate

Use Up Wall Space In Bathroom to Aide In Organizing

One room that I feel we never have enough storage room is in our house is the bathroom. With all the towels and lines and beauty products that we need there never seems to be enough room to hold it all.


Love using the wallspace as much as I can. This idea of using baskets on the wall to hold towels and washcloths is a great idea. Out of the way and looks super cute


I love floating shelves on the wall to hole all the little extras that we need. Believe me in this house with 3 girls there is plenty of little extras


To think that my sister had something when we were teens by using her shoe organizer to help her hold her life in line. Each little holder had a reason and a rhyme and the truth is she was on to something. This holds what ever you need to be held and makes so much sense great idea.

Bring The Outside In : Make Snowflakes

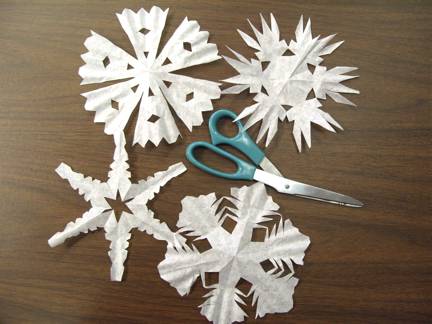
When  I was in grade school I can remember one of my favorite teachers starting a craft that I would never forget how to make. Its as simple as it gets because all you need is a pair of scissors and a piece of paper. Start snipping and you know what you get? A snowflake
 
 
How many points does your snowflake have?  Real snowflakes have six points.  All of them do!  These snowflakes are also symmetrical.  This means that parts of the snowflake are mirror images of each other.


With all the snow and cold air outside thought it might be cool to bring some of the outside inside. It is super easy to do and using coffee filters the job become very simple. No 2 snowflakes need to be alike they are like people each of us is a bit different.

Coffee Filter Snowflakes
 
To make this model of a snowflake, you will need:
1)    Several circular coffee filters
2)    Sharp scissors
3)    Dry, flat surface to fold “snowflakes”
 
 
Here is what you will need to do:
1)    Flatten and smooth out one coffee filter. It will look like a pizza.
2)    Fold the coffee filter in half, like a taco.
3)    Fold one side of the coffee filter so it “looks like” two equal slices of pizza.  This is exactly one third of the “taco” shape.    AppleMark
4)    Fold the opposite side over the top of the folded side to make a “one slice of pizza” triangle shape.  The edges should line up.
5)    Next, fold the “pizza slice” in half.  Again, be as exact as you can.
6)    Press the folds with your fingers to make the “pizza slice” as flat as possible.
7)    Using sharp scissors, cut about 2.5 cm from the point to the end of the open edge (longer open edge).  You can also cut small triangles and other shapes on this edge once you make the first cut.
8)    Cut the folded side of the “pizza slice” with small triangles, etc.
9)    Carefully unfold the snowflake.
10) Flatten it out and admire your beautiful snowflake art!
 
Want to check out some other extraordinary snowflakes? Then head over to this link

shared at
Wow Us Wednesday
Joy Focused Learning

Frozen Soap Bubbles


Well the arctic blast came in and we found our selves shivering and our homes with frozen water pipes and some extra time on our hands. While the outside was super cold it also provided a few moments of fun. One thing we could do that we could not do at other times is make frozen bubbles. Now while for years I have made my own summer time bubble solution you can also purchase bubble solution at the store and use that. We mixed up a solution of 3 teaspoons of dish soap, 1/2 to 1 teaspoon of sugar and 1 to 2 teaspoons of hot water and played with it a bit so that we could actually see bubbles freeze before they hit the ground.

shared at
Wow Us Wednesday
Adorned From Above
Winter Blues Wednesday

Soups On

In the winter time my mother would make up big pots of soup. Yummy soups chilis, stews, veggie soups and so much more. Here are a couple of delicious choices that looked great for this winter


WINTER SOUP
(recipe source here)


1 tbsp butter
2 onions, chopped
1 celery stalk, diced
3 medium carrots, pared and sliced
3 potatoes, peeled, halved and sliced
5 cups light chicken stock, heated
398 ml can black-eyed peas, drained
1 cup elbow macaroni
Salt and pepper
 
Prepare a bouquet garni consisting of : thyme, basil, parsley and bay leaves. Set aside.
Heat butter in large saucepan oven medium heat. Add onions and celery; cover and cook 4 minutes.
Mix in carrots and season with salt and pepper. Cook 5 minutes uncovered.
Add potatoes and chicken stock. Season and drop in bouquet garni. Bring to the boil and cook 12 minutes over medium heat.
Add remaining ingredients. Bring to boil and cook 12 minutes at medium-low.
Serves 4-6
 
Winter Roasted Veggie Soup (recipe source here)
 
 
10 ounces parsnips (about 3 medium) peeled and cut into 1/2 inch pieces
2 medium carrots, peeled and cut into 1/2 pieces
2 lb butternut or any other winter squash, peeled and cut into 1/2 cubes
3 stalks of celery, cut into 1/2 inch pieces
1 medium celery root (about 1 1/4 lbs) peeled and cut into 1/2 inch cubes
3 leeks, white and light green parts only, cut into 1/2 inch pieces
2 shallots, quartered
8 garlic cloves, thinly sliced
salt and freshly ground pepper
1 1/2 T chopped fresh thyme or 2 t dried
2 1/2 T olive oil
5 C low sodium canned vegetable broth
1 Bay leaf
3/4 C dry white wine

 Toss everything but the last three ingredients together and place in a shallow roasting pan Place in oven and roast for 20 minutes Raise the heat to 450 and roast another 10 to 15 minutes or until vegetables are just tender Meanwhile bring broth and bay leaf to a boil in a large pot Remove the vegetable form the pan and deglaze the pan with the wine, scraping any brown bits from pan Pour the vegetables and the liquid from the bottom of the pan into the broth Reduce heat to low and simmer for 10 minutes, partially covered Serve with a hot crusty bread.


shared post at Whats Cooking Wednesday
Raising Homemakers

 
Wake Up Wednesdays

Tuesday, January 7, 2014

Yet another delicious BLT Salad recipe


I shared a post yesterday sharing the recipe of a BLT salad. This is a recipe that sounds as delicious and I love how it uses chicken in the recipe as well as bacon, lettuce and tomato. Oh so yummy I hope you take the time to go check out the Disney inspired BLT salad

BLT Salad

Today we celebrate yet another food holiday. This time it is another of my favorites bacon. Oh my love to eat it just fried up, eat it on my salads, now there are several new imaginative items made with it but on of my favorites is the classic BLT. I wanted to share this salad with you because it is the BLT salad and will feature nothing else than bacon.


1 lb bacon, cooked crisp and crumbled
1 tablespoon bacon drippings
1 cup mayonnaise
1/4 cup sour cream
2 teaspoons white vinegar
1 clove garlic, minced
1/4 cup fresh basil, finely chopped
1/8 teaspoon ground black pepper
1/2 teaspoon seasoning salt (Lawrys)
2 teaspoons sugar
1 head iceberg lettuce, rinsed dried and shredded
2 large Tomatoes, thinly sliced
1 small red onion, very finely sliced
2 cups seasoned croutons
 
In a blender, mix together the reserved bacon drippings, mayonnaise, sour cream, vinegar, garlic, salt, pepper, sugar and basil blend dressing and set aside. Layer lettuce, tomato, onion, in a 9X13 aluminum pan. Spread mayonnaise mixture evenly over tomato,top with bacon. Cover and chill 2 hours. Just before serving top with,croutons
 
recipe source here

Organization Tip : Keep Your Spices Spicy

 
To see if your spices are good or need to be threw the above list is a good standard sheet to go by. Simply always remember to check the bottom of the container. McCormick often uses a code rather than an expiration date you can check this code on the website to see if your spices have expired.
 
If the spices look odd in appearance, if the green herbs like basil and oregano have turned brown, they have likely expired and should be discarded. Powdered spices like paprika and cinnamon which are clumping have most likely been around moisture and may mean that the spices have gone bad.
              
Smell your spices which is what many of us do anyway while we are mixing and cooking. Shake the spice container, let it settle, open the top and take a whiff. Is it a strong scent? If it is then the spice is at the right stage however as the spice ages the scent becomes less powerful. At that time it is a good sign to get rid of the spice.
 
Taste is always something one must have when preparing good food. Spices give flavor to food and if your taste test does not provide you with much flavor then it should be replaced or thrown away
 
shared at
Titus 2 Tuesday

Monday, January 6, 2014

Just A Short Note

This just in , I just heard it anyways. If you felt like you did not want to crawl out of bed today, if you felt you did not want to go to work, if you just felt a bit sad well the great scientist that study things lie that have found the answer why. You see they have studied and discovered that January 6 is the most depressive date of the year Now I am not sure why don't even know if they know why . They simply said it is. But there's good news because Tommorow.... Tommorow .... is only a day away.

shared at
Tuesdays at our Home

Celebrate Beans In Calico Beans

Yeah!!! Bean Monday, that's right I am not sure why but today is the national holiday to celebrate beans. I am curious as to why the day that many of us eat beans is not the bean holiday??? But beans are so versatile there are so many dishes that can be made from them that I think the bean holiday is sort of awesome. This is one of the recipes I grew up with it was one of my moms favorite bean recipes we had it at home several times, she would take it to potlucks and picnics and the best thing is that it was and still is very affordable recipe.


2 pounds Hamburger
1 whole Medium Onion, Diced
1 can Northern Beans (16 Oz.) Drained
1 can Pinto Beans (16 Oz.) Drained
1 can Pork And Beans (16 Oz.) Drained
1 can Kidney Beans (16 Oz) Drained
1 can Lima Beans (16oz.) Drained
¼ cups Brown Sugar, Or More, Add To Taste
¼ cups Ketchup, More Or Less, Add To Taste
1 jar Open Pit Hickory BBQ Sauce (Don't Use The Whole Jar, Add To Taste)
1 dash Salt, Add To Taste
1 dash Pepper, Or Add To Taste

Cook hamburger and onions; drain excess fat thoroughly. Add beans, place all in a large soup pot. Add brown sugar, ketchup, barbecue sauce, salt and pepper. Taste and adjust as needed.  Heat thoroughly. Serve with garlic bread and vegetable or a side salad, if desired 

shared at Melt In Your Mouth Monday
Homestead Barn Hop

>craft blog<
TDC Before and After

Keep Your Dosage on Time

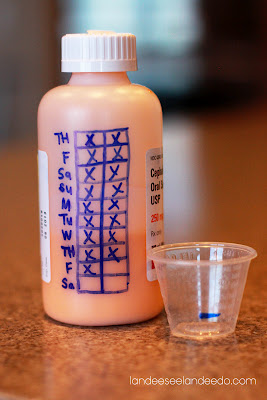
Its that time of year when allergies, colds, and more start to affect our children and family. When we are sick or our child is sick it may and often does get chaotic. Remembering when each dose is given may become a chore of its own. Since most medications that are prescribed come in clear bottles it should be easy to use a sharpie marker and keep track of doses being given. All one would have to do is look at the bottle to see if dose had all ready been given.

shared at Make The Scene Monday
Good Tip Tuesday

Menu Week of January 6-12

Oh my the holidays are over, nearly all the leftovers are gone and the ones that are not will have to be thrown away soon. Today is the day to start the year off on the right foot with good eats and food for the family

Chili and crackers
hotdogs
chees and all the fixings

goulash and cheese
greenbeans
salad
hot rolls (did you know hot rolls can be heated in the microwave)


meatball sub casserole
fries


pulled pork baked potato


soup of choice
grilled cheese sandwiches

family night out

calico beans
salad
rolls

shared at
Mostly Homemade Monday

Orgjunkie.com

Sunday, January 5, 2014

Its Cold Out There Be Ready

Its cold out there. Several saying it is the coldest its been in the past 20 years. All I can say is be ready if you have to go out. Dress right be sure to bundle up and be anticipating how cold it could really be.


It is best to get dressed in several layers of light weight loose fitting warm clothing underneath the outer wear. Your outerwear though should be tight and best if it is water repellant

wear mittens which helps protect your hands. In fact gloves that allow you to move your fingers are even better. But mittens help to keep your hands warmer

wear a hat. It has often been said that heat goes right out from our head if we don't wear a hat so keep the lid on your body temperature and keep a hat on your head. I love to wear a scarf as well a scarf helps to protect the open area where a coat does not always catch and the hat does not go down far enough. It covers your mouth and helps protect your lungs

Be careful if you have to go out and if you can stay in do so because I think it is a Hot Chocolate Day

shared at Project Inspired

party

Epiphany


Epiphany traditionally falls on January 6. It is a day for a Christian feast that celebrates the day the wise men met the baby Jesus.


Remember the days of Hot Chocolate


When I was a kid my grandmother would make us up a hot cup of hot cocoa when the weather was gloomy and not so fun outside. She loved the weather all year round. She made the best of it. I can remember going with her on walks in the winter the same as we did in any other weather. When we would get back she would prepare for us a cup of hot cocoa


1 1/3 cups whole milk
1 tablespoon unsweetened cocoa powder
1 tablespoon sugar
1/8 teaspoon vanilla extract
Mini marshmallows or whipped cream for serving

Warm the milk
Before you start, be sure an adult is nearby to help. In a small saucepan over low heat, warm the milk until tiny bubbles appear around the edges of the pan. Remove from the heat.

Blend the cocoa
Put the cocoa, sugar and vanilla in a mug and stir to combine. Add 1 tablespoon of the hot milk to the cocoa mixture and stir until it is smooth with no visible lumps. Ask an adult to help you pour the remaining hot milk into the mug. Stir well, top with the marshmallows or whipped cream, and serve immediately. Serves 1.
For a more adult style drink try a cup of this spicier style of hot cocoa. The Aztecs of Southern Mexico liked their hot cocoa a bit spicy. While the recipe I share uses milk the Aztecs drink is made with water and is a thinner less rich beverage.

 
2 dried red chilies 
6 Tbs. unsweetened cocoa powder 
2 Tbs. sugar 
1/3 cup water 
1 cinnamon stick, about 1 1/2 inches long, plus more for garnish 
2 1/2 cups milk  
Whipped cream for garnish (optional) 

Open the chilies over a saucepan and release the seeds. Add the chili pods, cocoa powder, sugar and water. Set over low heat and cook, stirring, until the mixture forms a smooth paste, 3 to 5 minutes. Add the cinnamon stick and milk and stir until the paste is completely dissolved. Cook until hot, about 5 minutes. Do not allow the mixture to boil. Strain the hot cocoa into 4 mugs and garnish each with a cinnamon stick or a dollop of whipped cream. Serve immediately. Serves 4.

recipe sources here

shared at
the weekend potluck
happiness is homemade
2 Crochet Hooks
Delineate Your Dwelling

Whipped Cream Lemon Bars

January 5 is the national food holiday of whip cream. I love whip cream on top of my hot chocolate in the winter, ice cream sundae in the summer and always in sweet dishes. The dessert I share today is perfect for any special occasion My daughter loves desserts like this for her birthday, valentines day would be a great time to make it up and Easter while a bit away will be here before we know it. Enjoy!!!

Crust

all purpose Flour (1¾ Cup)
Powdered Sugar (⅔ Cup)
Cornstarch (¼ Cup)
Salt (1 tsp.)
Unsalted Butter (12 Tbs. or 1½ sticks at slightly cooler then room temp.)
Cooking Spray (or an additional Tbs. of Unsalted Butter for the parchment paper)

Filling

Lemon Zest (from 3-4 lemons)
Lemon Juice (1 Cup from 3-4 lemons)
Milk (Whole ½ cup)
Eggs (6 lightly beaten)
Sugar (1½ Cups)
all purpose Flour (4½ Tbs.)
Salt (¼ tsp.)

Whipped Cream

Heavy Cream (1 cup chilled)
Mascarpone (6-8 ounces at room temp.)
Lemon Zest (from 1 lemon)
Powdered Sugar (2 Tbs.)
Salt (⅛ tsp.)
Coconut (Shredded 1 cup)

Crust
Pre-heat oven to 350°F with the rack in the middle position. Lightly butter the baking dish and line with one over-large sheet of parchment paper. Note: use two parchment papers crosswise with butter in between if your parchment paper is not large enough to cover the dish with overlap for handles.
Place the flour, powdered sugar, cornstarch and salt in the food processor and pulse to combine. Add the butter and then process to combine or until the mixture resembles coarse meal (and is a light yellow color). Pour into the prepared baking dish and using hands, press into an even ¼” layer that tampers to ½” tall on the sides (like a wave coming towards you from the shore). Place in the fridge for 30 minutes to solidify. Then immediately place into the oven and cook until golden, approximately 20-25 minutes. Reserve.
Reduce oven temp to 325°F.

Lemon Filling
While the crust is baking, whisk the eggs, sugar and flour in a bowl until combined. Add the lemon zest, lemon juice, milk and salt to blend. When the crust comes out, pour the lemon mixture over to cover then place into the oven to bake for an additional 20-25 minutes or until the center is set (doesn’t giggle). Transfer to a wire rack (or your stove top) to cool for 45-60 minutes.

Coconut
Place the coconut on the baking sheet and bake until slightly golden 5-8 minutes. Reserve.

Whipped Cream
Place the heavy cream in a well-chilled bowl and whip for 30 seconds. Add the lemon zest, powdered sugar, mascarpone and salt and mix until soft peak are formed. Reserve.

To assemble the Lemon Bars
Place the whipped cream and smooth out a small layer over the lemon bar then sprinkle with the toasted coconut to barely cover. Pull the lemon bar out of the baking dish and transfer to a cutting board. Carefully fold the parchment paper down. Using a knife or large pizza cutter, slice the bar into desired sizes. Eat immediately or store covered in fridge for an additional 2-3 days. Indulge.


shared at Great Idea Party
DIY Sunday Showcase
Sunday Showoff Party
One More TIme