Custom Search

Saturday, January 26, 2019

Slow Cooker Meatloaf


1-1/2 pounds Ground Beef (93% lean or leaner)
3/4 cup Panko bread crumbs
3/4 cup ketchup, divided
1/2 cup minced onion
1 egg
1 tablespoon Worcestershire sauce
2 teaspoons minced garlic
1/2 teaspoon salt
1 teaspoon dried thyme leaves
1 teaspoon pepper, divided
12 ounces baby red potatoes, cut in half
12 ounces baby carrots
2 tablespoons unsalted beef broth
2 tablespoons packed light brown sugar

COOKING:
Combine ground beef, bread crumbs, 1/2 cup ketchup, onion, egg, Worcestershire sauce, garlic, 1/2 teaspoon salt, thyme, 3/4 teaspoon pepper, mixing lightly but thoroughly. Form 8 x 4 x 2-inch loaf. Place loaf into 3-1/2 to 5-1/2-quart slow cooker.
Cook's Tip: You may substitute old fashioned oats, ground or quick oats for Panko bread crumbs.
Toss potatoes and carrots with salt and remaining 1/4 teaspoon pepper. Arrange potatoes and carrots around meatloaf in slow cooker. Add broth; cover and cook on HIGH 4 hours or LOW 8 hours until instant-read thermometer inserted into center registers 160°F.
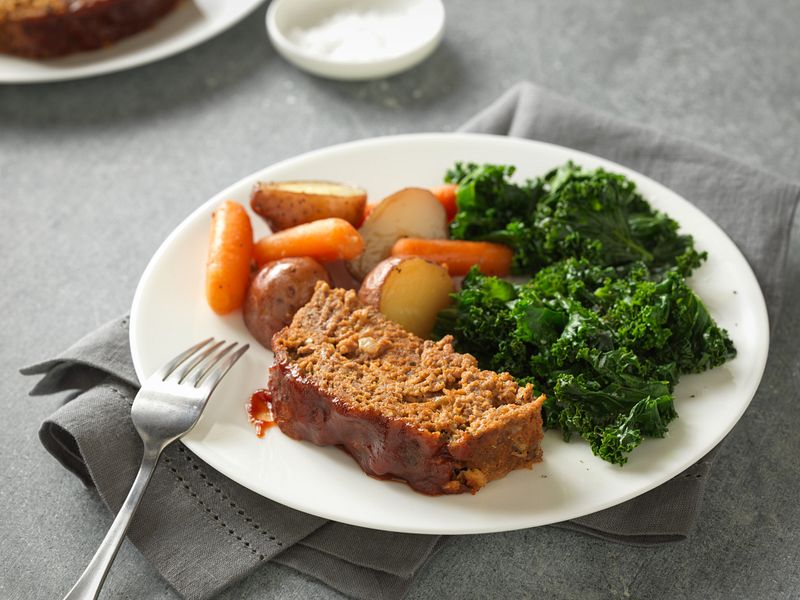
Skim 2 tablespoons of liquid from bottom of slow cooker, if available. Combine remaining 1/4 cup of ketchup, brown sugar and liquid from bottom of meatloaf in small bowl. Spread onto meatloaf. Cover and cook 15 minutes. Remove meatloaf from slow cooker. Cut into slices. Season with salt and pepper as desired. Serve meatloaf with potatoes and carrots.

ALTERNATE COOKING METHOD:
This recipe can be made in a 6-quart electric pressure cooker. Prepare meatloaf as directed above. To make a foil sling, cut a 28-inch piece of heavy-duty aluminum foil (or layer two pieces of regular foil) and punch 6 to 8 holes in it using a kitchen fork or small knife. Form beef mixture into an 8 x 4-inch loaf on the foil sling over the holes. Toss potatoes and carrots with salt and remaining 1/4 teaspoon pepper. Add vegetables to pressure cooker, pour broth over vegetables, add meatloaf sling on pressure cooker rack on vegetables. Close and lock pressure cooker lid. Use beef, stew or high pressure setting on pressure cooker; program 25 minutes on pressure cooker time. Once complete, use quick-release feature to release pressure; carefully remove lid. Remove sling from pressure cooker and remove meatloaf to foil-lined broiler rack. Make sauce as directed in step 3; spread on meatloaf. Broil on high in oven for 2 to 3 minutes, 4 inches from heat source. Rest before slicing. Serve with potatoes and carrots. (This recipe variation was tested in an electric pressure cooker at high altitude. Cooking at an altitude of less than 3000 feet may require slightly less cooking time. Refer to the manufacturer’s instructions.)

retweet post here
shared on facebook here

shared at these blog hops, linkups and parties
funtastic friday

shared at these facebook group linkups
blog and social media ct === 2/3 --- social media ct 

Hawaiian Meatballs #Recipe


FOR MEATBALLS
2 lbs ground beef
About 10 whole sun-dried tomatoes
1/2 teaspoon smoked paprika
1 teaspoon salt
1 teaspoon garlic powder
1 teaspoon dried ground rosemary
optional (for non-paleo meatballs): 1/2 cup gluten free oats or bread crumbs
FOR SAUCE
About 3/4 cup chopped fresh pineapple chunks
1/2 cup chopped mango chunks (optional)
1 cup paleo barbecue sauce  or your favorite barbecue sauce
1/2 teaspoon smoked paprika (skip if you feel your barbecue sauce is spicy enough)


Preheat the oven to 350 degrees F.
Depending on what you want to serve the meatballs with, start either rice or mashed potatoes
For the meatballs, combine the ground beef, seasonings, and breadcrumbs in a bowl and use your hands to mix thoroughly.
Roll the meatballs into 1-inch balls and arrange in ungreased glass baking dish (a pie dish works well)
Sprinkle the chopped pineapple and mango around the meatballs.
Place in the oven and bake until meatballs are slightly brown but not fully cooked (about 20 minutes).
As the meatballs cook, prepare the paleo barbecue sauce (recipe linked to above) and stir in extra smoked paprika (optional).
Pour the sauce over the partially cooked meatballs. Return to oven and bake an additional 10 minutes.
Remove from oven and serve over rice, mashed potatoes, or alongside fries as shown in images.

retweet post here

shared at these blog hops, linkups and parties
friendship friday 

shared at these facebook group linkups
RT  club --- 1/8 ==== 1 rt

Moment in History ::: Prohibition and Bootlegging

January 1920 saw the banning of the manufacture , transportation, importation and sale of intoxicating liquors in the United States with the passing of the 18th amendment. The era of Prohibition would be started with the passing of the amendment. For some it was the finish line for a goal that many temperance organizations strived for. For others it ushered in a new occupation of bootlegging .


The era of bootlegging was accompanied by the "Jazz age". The way the legal system was seen by the population would change as well. Enforcing the prohibition laws would lead to a world of mobsters and notorious criminals. Here in Southern Illinois it was the Shelton Gang that seemed to control part of the area. Thus the era of bootlegging and the romance of it started.


The Shelton Brothers Gang was a prohibition era bootlegging gang based in southern Illinois. Rivals of the group was bootlegger Charles Birger and his gang. The Shelton gang can trace their roots back to Ireland "Hunter" family.

Brothers Carl, Earl, and Bernie "Red" Shelton all lived in Wayne County Illinois. The gang operated in near by Williamson County Illinois. The game of making moonshine and other illegal alcoholic beverages was under way. The Shelton gang would soon dominate the worlds of gambling and alcohol production in Little Egypt. However, Charles Birger would offer competition to the bootlegging gang.


The Shelton Brothers would be defeated when put on trial for an unsolved murder. They would be convicted and sentenced to 25 years in prison. After the brothers went to prison Birger would take over the bootlegging population til he met his end in 1928 when he was hanged for threats of murder.

retweet post here

shared at these blog hops, parties and linkups
grace at home

shared at these facebook group linkups
blog / social media ct --- 2/3 --- ct 

Korean Chili SOup

This soup is not for the weak tongued. It is definitely hot due to

  • gochugaru--- red chili flakes This ingredient is found in many Korean dishes and is made by drying Korean red chili peppers in the sun, de-seeding them and crushing them into flakes. 
  • Kimchi --- fermented napa cabbage with lots of spices including chili powder, scallions, garlic and ginger
  • Chipotle pepper in adobo sauce with seeds in 


1 pound ground beef
Salt and pepper
1/2 red onion, finely chopped
2 cloves garlic, minced
1 cup kimchi
1/8 cup gochugaru
1 tablespoon ground cumin
3 cups vegetable stock, divided
1 (14 oz) can tomato sauce
1 chipotle pepper from a can of chipotle peppers in adobo sauce, minced
1 large sweet potato, diced
Toppings
coconut yogurt
scallions

Brown the ground beef over medium-high heat in a large pot, and season with salt and pepper. Saute until cooked through. Using a slotted spoon, transfer the beef to a bowl and set aside.
Add the onions to the pan with the remaining fat and cook over medium-high heat until soft. Add the garlic and kimchi and cook 2 minutes. Add the gochugaru and cumin – cook another 2 minutes.
Add 1 cup of veggie stock, scraping up any brown bits. Bring to a boil and then reduce the heat to medium-high and cook until reduced and thickened – approximately 10 minutes.
Return the beef to the pot and add the sweet potato, remaining veggie stock, tomato sauce and chipotle pepper, and 1¼ teaspoons salt. Bring to a boil and then reduce heat to medium. Simmer, uncovered for 20-30 minutes – until you have reached the desired consistency.
Serve with coconut yogurt and scallions.

recipe resource here

retweet post here

shared at these blog hops, linkups and parties
feathered nest friday


shared at these facebook group linkups
RT club ==== 2/7 ==== 2 rt

Quinoa === health food with popularity

Quinoa is a health food with lots of popularity. It is gluten free, high in protein and a plant food that contains all nine essential amino acids. Quinoa is also high in fiber, magnesium, vitamins B, iron, potassium, calcium, phosphorus, vitamin E and a variety of beneficial antioxidants. 


Quinoa is a grain crop that is grown from edible seeds. While it starts with the letters Qu it is pronounced Keen-wah. A pseudo - cereal that is more truly a seed is prepared and eaten like grain. The Inca Empire used quinoa like a cash crop and often called it "mother of all grains" This superfood of today found in many places around the world and sold in health food stores and restaurants has been eaten for thousands of years in South America.


There are 3 types of quinoa Red, white and black in color the nutrients in 1 cup of cooked quinoa include:

  • Protein: 8 grams.
  • Fiber: 5 grams.
  • Manganese: 58% of the recommended daily allowance (RDA).
  • Magnesium: 30% of the RDA.
  • Phosphorus: 28% of the RDA.
  • Folate: 19% of the RDA.
  • Copper: 18% of the RDA.
  • Iron: 15% of the RDA.
  • Zinc: 13% of the RDA
  • Potassium 9% of the RDA.
  • Over 10% of the RDA for vitamins B1, B2 and B6.
  • Small amounts of calcium, B3 (niacin) and vitamin E.

All that nutrition with only 222 calories, 39 grams of carbs and 4 grams of fat.

How to easily cook Quinoa


  • Measure the amount of quinoa you want. In this recipe we use 1/4 cup of dry quinoa.  You could certainly make 1 cup and then divide it into fourths for four make ahead breakfasts. 
  • Rinse the quinoa.  I would argue that this is an important step that you don’t want to skip. There is a certain bitterness to quinoa that you get rid of when you rinse it. 
  • Whatever amount of quinoa you are making, add double the amount of water. So if you stick with the 1/4 cup dry quinoa, add 1/2 cup of water.  If you are making more ahead of time and add 1 cup of dry quinoa, add 2 cups of water.
  • In a small saucepan bring the rinsed dry quinoa and the water to a boil.  Once it is boiling, cover it, turn the heat all the way down (but not off) and set your timer for 15 minutes.
  • When the timer goes off, the quinoa should have absorbed all the water.  Remove it from the heat, fluff it with a fork and you are ready to go!

retweet post here
shared on facebook here 

shared at these blog hops, linkups , and parties
friday feature

shared at these facebook group linkups
RT club ---- 2/7 --- 2 rt

Are Dragons Real

Dragons are known worldwide as a mythological creature. They are popular in books, films and on T.V. shows Dragons have been shown in many forms from snake like, winged, and tall fire breathing creatures. But could they have ever truthly lived on the earth as demonstrated??


Whenever dragons are thought of they are always reptilian in nature. Reptiles started out in the Mesozoic era. The era lasted nearly 200 million years and took place around 66 million years ago according to scientist. It was the "age of Reptiles" The most famous among this Mesozoic reptiles were the dinosaurs.


The chinese as well as paleontologist have often thought of dragons when finding dinosaur bones Dragons fabricated appearance and hunger for large prey leaves one to imagine they would have been closely related to predators like the Tyrannosaurus Rex. However, there are many that would not go that far instead pointing out differences that would have placed them into different evolutionary scenarios.


Dragons are like chameleons adapting to the cultural and literary expectations of the era. They are found in mythology as powerful and fearsome opponents that must be slain. Christians have created legends where godly saints battled and vanquished Satan who is in the form of dragons. The knight is the hero of the story getting the girl, killing the dragon and leading the towns people to victory. However, were the medieval dragons real or merely stories passed down through the years.


Komodo Dragons were spotted by sailors a few hundred years ago The monitor lizard which is not only aggressive but deadly and can reach 10 feet tall. In 1910 the Komodo dragon was found by scientists. The average size of a male weighs around 200 lbs. Females are a bit smaller at around 6 feet long These dragons come in a variety of colors including blue, orange, green and gray. Their skin is rough and reinforced with bony plates, their claws are long and their tail is muscular. Komodo dragons can spot from a distance and while speedy they would rather wait until the prey crosses their path. The dragon's tongue is very similar to that of a snake using it for sense of smell as well.

Komodo dragons are rare and only found in the wild on five islands.

  • Lesser Sunda Islands of Komodo
  • Rinca
  • Gili Montang 
  • Gili Dasami
  • Flores
These lizard's live anywhere from the tropical dry forest to a savanna of deciduous monsoon forest. They love extreme dry heat with 70% humidity At nights when the temps lower the Komodos find a burrow to nestle down in. That same burrow helps keep them cool during the day.  

Komodo dragons are carnivores and fierce hunters that eat a variety of animals. These dragons can eat 80% of their body weight in one feeding Komodo dragons will spring up and knock their prey to the ground and use their sharp, serrated teeth to shred their prey to death. In the case the prey escapes the dragon it will still die within 24 hours due to blood poisoning found in the saliva of the dragon. 


So while the dragons found in the mystical atmosphere may not be real, there are still those animals like the komodo dragon that are close enough related or at least for me

retweet post here
pin post
shared on facebook 

shared at these blog hops, linkup, and parties
thursday favorites

shared at these facebook group linkups
blog and social media ct --- 3/10


Michigan Becomes a State

The state of Michigan gained its name from the Indian word "Ojibwa" Yes, I know that is what I thought there are no real similarities. But when you find out that the Indian word means "Large Lake" and that four of the five Great Lakes border Michigan then you will understand how the two words Michigan and "Ojibwa" are related. In deed, it was the great lakes that drew the settlers in forming large towns along the edge of the lakes.


Michigan would become a state in 1837. The states first constitution however was wrote in 1835. The reason for delay was the state line battle it was having with Ohio over the area of Toledo. Eventually on January 26, 1837 President Andrew Jackson signed a bill making Michigan the nation's 26th state. In addition, Michigan would gather land when an area known as Upper Peninsula was added to the state making it the state with the most area.


retweet post here

shared at these blog hops, linkup and parties
TFT party

shared at these facebook group linkups
RT club ---- 2/16 --- 3 rt

Friday, January 25, 2019

Resource Celebrates January Holiday


The latest in a long line of encyclopedias arrived on the internet in January 2001. Encyclopedias have been around for quite some time nearly 2,000 years in fact. Prior to Wikipedia our family had a set of hardback book encyclopedias. However, while the old encyclopedias looked great they were not up to date and could not stay up to date. 


Jimmy Wales and Larry Sanger created Wikipedia in January 2001. Wikipedia is easy to use and offers current information. It was the contributors of Wikipedia created the voluminous Wikipedia became a good reference and an introduction to a subject of interest. Wikipedia has stayed a non profit charitable organization.  

\
]retweet post here

shared at these blog hops, linkups and parties
totally terrific tuesday 

shared at these facebook group linkups


Pepperoni Pizza Bites

My family loves easy to make snacks when they are hungry and in a hurry. Does yours?? If the answer is yes then more than likely they will love these pepperoni pizza bites. These little bites are a cross between a bagel bite and a pizza muffin. Softer than the prepacked variety but still ooohhh so good.


3/4 cup flour
3/4 teaspoon baking powder
3/4 cup 2% milk
1 egg , lightly beaten
1 teaspoon Italian seasoning
1/4 teaspoon crushed red pepper
1/4 teaspoon salt
1/2 cup mozzarella cheese
1/2 cup Parmesan cheese
4.2 ounces pepperoni (Half the pouch, cut into little quarters)
marinara sauce for dipping

Note: click on times in the instructions to start a kitchen timer while cooking.

Preheat the oven to 375 degrees. In one bowl mix milk and eggs, set aside.
In a second bowl mix flour, baking powder, salt, Italian seasoning, and crushed red pepper.
Combine the wet into the dry ingredients and whisk to combine.
Add in the pepperoni and cheese and whisk together.
Spray baking spray or canola oil spray onto two mini muffin tins and using 1 tablespoon scoop, fill all 24.
Alternately make 12 larger Pepperoni Pizza Bites.

Cook for 15 minutes-18 minutes, or until browned.

retweet post here

shared at these blog hops, linkups and parties
creative muster 

shared at facebook group linkups

Dreaming of Basketball

I can recall as a kid on the playground black top shooting around with my friends and pretending that we were one of the great players shooting hoops. My nephew, 14 years old, is no different he loves to play sports and has his own favorite sport players as well. He often pretends as if he is the great Michael Jordan. Perhaps, his love of sports and players is one that is inherited.


Michael Jordan is one of the greatest basketball players of all time. Not only a great player but also one of the most effectively marketed athletes. Jordan not only publicized his name but also helped to popularize the NBA during the 1980s and 1990s. Gallantly helping his team win 6 NBA titles, 5 MVP awards, two Olympic Gold Medals and an NCAA title. Considered by many to the greatest scorer and defender of the entire NBA for over a decade.


Who was your favorite player??

retweet post here

shared at these blog hops, linkups and parties
grandmas briefs

shared at these facebook group linkup

So You Want To Be a Disc Jockey

Do you love music?? Do you love sharing it with others?? Would you like to be paid for spinning the tunes?? If the answers to these questions is yes then you may be the perfect individuals to become a DJ. A musician who works with pre-recorded music in a live environment in order to provide musical entertainment to guests are known as Disc Jockeys. 


DJs love to create playlists, share the tunes on the radio, internet stations, at dance clubs and bars. They must know trivia and facts about the music that they play and share with others as well. Individuals who are successful DJs know and understand how to operate electronic equipment, the art and musical science of blending and balancing transitions to create cohesive song transitions. 


A professional DJ is able to operate on a freelance or contract basis. DJ's are allowed to create their own hours and earning potential. DJ's are found in many different places including public events, weddings, birthdays and sporting events. 


DJ's do not need formal education. The field of education that a DJ must relates to is the art world. There are a variety of art schools that do offer classes to become a DJ. The job of a DJ requires little education or even equipment most professional DJ's possess knowledge as well as equipment to successfully do their job However, if you are committed to the world of sound and music you can earn a Bachelor's Degree in Audio or Sound Engineering . 


retweet post here

shared at these blog hops, linkups and parties
the scoop

shared at these facebook group linkups

Make Ahead Chicken Spaghetti Casserole


This cheesy make ahead casserole is one that can help make your life a bit easier. Prepare it the night before and then cook when needed. The real reason I love this recipe besides the ease is the great taste. Not only will you want to fix it for your family but also take it to any potluck or gathering you need a covered dish for.


  • 1 whole raw chicken, about 5 lbs, cut into pieces
  • 1/2 red pepper, diced small
  • 1/2 green pepper, diced small
  • 1/2 medium zucchini, diced small
  • 1 medium red onion, diced small
  • 3 cloves garlic, minced
  • 1 tbsp olive oil
  • 1 pound spaghetti, broken into 2 inch pieces
  • 2 cans cream of mushroom soup
  • 3 cups grated sharp cheddar cheese, divided
  • 1 tsp season salt
  • 1/4 tsp cayenne pepper
  • salt and pepper to taste

Bring water to a boil, reduce heat and simmer at a low bubble for about 30 minutes, until chicken is cooked through.  Remove chicken from pot and allow to cool.  Once chicken is cool enough to handle, shred enough chicken for a 2 generous cups.
Remove 2 cups of the cooking liquid from the pot and reserve for later.
Bring the remaining liquid in the pot back to a boil.  Cook pasta for about 8 minutes, until al dente.  Drain and set aside.
Meanwhile, heat olive oil in a large skillet over medium heat.  Add green and red pepper, zucchini, onion and garlic.  Season lightly with salt and pepper.  Saute for about 5 minutes until veggies are softened.
In a large mixing bowl, combine, veggies, chicken, pasta, cream of mushroom soup, 1 1/2 cups of the cheese, season salt and cayenne pepper.  Mix until combined.  Stir in 1 cup of the reserved cooking liquid until well combined.  Stir in as much of the remaining liquid as needed to make the sauce creamy.  You don’t want it to be too dry.  Add salt and pepper to taste.


Spoon mixture into either 1 – 9×13 baking dish (that’s been coated with cooking spray) or 2 – 8×8 baking dishes.  Sprinkle remaining 1 1/2 cups of cheese over the top.
Bake for 30 to 45 minutes in an oven preheated to 350 degrees, until bubbly and cheese is golden brown.  Or you can cover with foil and refrigerate for up to 2 days or freeze for up to 6 months.  If you bake this immediately, it will probably take closer to 30 minutes to bake.  If the casserole is cold when you bake it, it will probably take closer to 45 minutes to bake.
Serve immediately.


recipe source here 

retweet post here

shared at these blog hops, linkups and parties
creative muster 

Just A Mocktail Recipe

Dry January requires a special drink. That special drink comes in the form of mocktails. This non-alcoholic cocktail is extremely popular for those wanting to get away from alcohol. Some mocktails go outside the box with new flavour combinations, yet there are those that still desire the same type of flavors of the popular cocktails like pina colada. In addition many bars and clubs now have a space on the drinks menu showcasing the fruit based options with non alcoholic drinks about 1/2 price of the alcoholic counter parts.


Want to try making a mocktail at home for you and friends?? Here is one recipe I think you will like.


5 kumquats, halved
1 oz yuzu
1 oz simple syrup
1 oz brewed chamomile tea
1 cucumber ribbon
1/3 a glass of soda water
Mint and Baby's Breath for garnish
Method: Muddle the kumquats and yuzu in a bar tin. Add chamomile tea, simple syrup and a single ice cube to the bar tin and shake vigorously to combine. Fill a high ball glass halfway with ice and add the soda water. Pour the tin’s contents into the prepared glass without straining. Top any remaining space in the glass with soda water and garnish with a straw, mint sprig and Baby's Breath.

retweet post here 

shared at these blog hops, linkups and parties
the scoop 

3 ingredient strawberry Oreo fudge


1 bag (12 ounces) white chocolate chips, melted
1 can (16 ounces) strawberry frosting
1/4 cup crushed Oreos
2 additional Oreos, crushed (optional topping)

Melt the white chocolate chips in a medium sized bowl according to the package directions.
Once the chocolate chips are melted, stir in the strawberry frosting until combined. Then gently stir in the crushed pieces from the Oreos.
Spread the fudge in a greased 8x8 pan. If desired, sprinkle the additional crushed Oreos on top of the fudge. Refrigerate for 30 minutes to set. Cut into pieces to serve. Store fudge in the refrigerator.

recipe resource here 

retweet post here
shared on facebook 
pin post

shared at
facebook linkup
facebook linkup  
facebook linkup === blog and social media ct === 4/5 === done

Thursday, January 24, 2019

Peanut Butter Ice Cream Cake


Peanut Butter Crunch:
1/2 cup light corn syrup
1/2 cup granulated sugar
1/2 cup peanut butter
1/2 tsp salt
4 cups Rice Krispies
Nutter Butter Crust:
24 Nutter Butter cookies crushed
5 tbsp butter melted
Peanut Butter Ice Cream:
1/2 gallon vanilla ice cream softened slightly
1 cup peanut butter
2 cups peanut butter crunch from above

Peanut Butter Crunch:
Mix together light corn syrup, peanut butter and salt in a saucepan. Bring to a boil and cook for 3 minutes stirring constantly. Pour over Rice Krispies in a large bowl and quickly stir to coat. Spread onto a piece of parchment paper. Break apart the large pieces and allow the peanut butter crunch to cool.
Nutter Butter Crust:
Combine crushed Nutter Butter cookies with melted butter. Press into the bottom of a 9 inch springform pan.
Peanut Butter Ice Cream:
Working quickly, make the peanut butter ice cream by mixing together the slightly softened, vanilla ice cream, 2 cups of the peanut butter crunch and 1 cup of peanut butter. Scrape into the springform pan and spread it out.
Finishing the Ice Cream Cake:
Top with remaining 2 cups of the peanut butter crunch and gently press into the ice cream cake. Cover the springform pan and place the ice cream cake in the freezer for 4-6 hours or overnight to harden. When ready to serve, remove from the freezer and carefully remove the sides of the springform pan. If you have a difficult time removing the sides of the pan, run a thin knife around the edge first. Leave the bottom of the springform pan in place and set the entire thing on a platter or plate. To cut the peanut butter ice cream cake, dip a knife in very hot water, quickly dry it off and use the hot knife to cut the ice cream cake.

recipe resource here

retweet post here

shared on these blog hops, linkups and parties
busy monday

shared on these facebook group linkups

Beware of Radon

January is National Radon Action  month. The Environmental Protection agency is asking homeowners to "save a life" by testing for radon and making any needed repairs.


Radon---- radioactive gas that can cause cancer. Radon can not be seen, smelled or tasted. It may be present in your home and you may not be aware of it. Radon is the second leading cause of lung cancer in the United States. Radon can cause 21,000 lung cancer deaths a year only smoking causes more.


Radon is everywhere the biggest myth is that you live in an area that radon is not present. Other myths include:

  • myth--- radon is not a problem                                                                          The CDC and Prevention, the American Lung Association and American Medical Association estimate that radon can cause thousands of preventable lung cancer deaths each year. 
  • Myth--- Radon testing is difficult, time consuming and expensive                  Radon testing is easy A self test or a professional radon test company can perform the test that only takes a small amount of time and effort. 
  • Myth--- if a home has a radon problem it can not be fixed                                This is not true thousands of homeowners have been able to fix radon problems in their homes with similar amounts to fixing other home repairs. 
  • Myth--- Radon affects only certain kinds of homes                                           Old homes, new homes, drafty homes, insulated homes, homes with basements and homes without basements. It makes no difference what does make a difference is how the house was built, materials that were used, location of where in geology the house is area all factors in having radon in home
retweet post here

shared at these blog hops, linkups and parties

shared at these facebook group linkus 

Time for a Coffee Break

Have you ever stopped and wondered how things got started?? As a full time worker we get 2 coffee breaks and a lunch break. Now days this is nearly a state law to take time out but how did the coffee break get started??     


The coffee break originated in the late 19th century Stoughton, Wisconsin. Immigrant women would take a mid morning and mid afternoon breaks from their shifts to go home and tend to their children. During this time they would enjoy a snack and a cup of coffee       


In the early days of business individuals would gather around a pot of stuff boiling over an open flame or hot coals. Sharing of the news and trading tips would take place as they sipped the drinks in their cups. When mass production entered the work day there was less time to meet around the pot. There seemed to be no time to take a break and so the long days seemed to go on and on.


An American psychologist J.B. Watson and many other behaviorists believed people could be trained to react in predictable ways through repetitive actions. Maxwell House coffee and Watson were able to work together to create Americas coffee break. Today, coffee breaks take place in homes, workplaces or nearly everywhere. No matter how the coffee break originated Americans around the country celebrate break time with or without a delicious cup of coffee.


retweet post here 

shared at these blog hops, linkups and parties
craftastic monday

shared at these facebook group linkups

Clean Out Your Inbox

A full email inbox can be overwhelming. The volume of email that we receive can be more than we can handle. The problem will only get worse if you do nothing about it . So why not get your inbox under control and start the year off free from that tonnage of email.


One group, The Radicati Group, estimates that in 2015 the number of emails sent and received per day total over 205 billion. The problem just increased over time reaching in 246 billion by 2019. For many of us this means that "email hoarding" will take place. However, you can put a stop to the madness by following a few guidelines:


  • Unsubscribe from emails you no longer wish to receive
  • Delete google alerts you don’t need
  • Delete old emails you no longer need
  • Create folders and only file important emails
  • delete 30 to 50 emails a day
These few steps will help to reduce the email pile and help make your social life easier.

retweet post here

shared at these blog hops, linkups and parties
merry monday

shared at these facebook groups 

Keep Teen Drivers Safe On WInter Roads

Most experienced drivers are aware that the roads in winter can often be ice and snow covered making them a challenge. Experience driver may be aware of what to do if they hit a patch of ice or snow but it is still very scary. Wintery conditions can be a nightmare for new drivers who do not have years of driving experience to rely on. Therefore, it is up to the adult in the teen drivers life to help prepare them to drive in all types of weather (rain, sleet, snow and ice)


Inexperienced drivers are more likely to panic when road conditions are less than ideal. Remind them to wear their seatbelt and have their passengers ride them as well. A vast majority of fatal traffic accident are related to drivers and passengers not belted in. Other important tips to teach young drivers are:

  • teach teen how to handle a skidding car. Practice hard braking and steering in skidding situations 
  • how to regain control in event of an emergency 
  • slow speed maneuvers on a wide open snow or ice covered parking lot
  • remind your teen if roads are not clear to drive slow 


Tips to Drive Safe in Winter Weather.

  • When winter weather is unsafe it is always best when driving to leave a bit earlier so that you are not in a rush. If the cars on the road with you seem to be rushing don't be pressured to drive any faster than you are comfortable with
  • The tip of the trick of driving is to leave a car distance between you and the car in front of about 3 seconds. In winter weather it is a better idea to leave more time between you and the car in front of you Icy Roads will slow you to stop fast enough.
  • When using your brakes provide constant pressure to your brakes to give them better braking and steering control. More braking room is often needed in winter weather. 
  • Ice patches may be hidden on bridges, overpasses, shady spots and intersections. Knowing that ice forms more readily in some areas will help you to be more aware. One of the worst hazard in winter is "black ice" While it may resemble a water puddle it is truly ice and very dangerous
  • On snow covered roads drive in the ruts created by tire tracks. The ruts allow traction which allows you to change lanes slower and smoother. All Wheel Drive vehicles offers a false sense of security even four wheel drive does little in slippery conditions. 

retweet post here

shared at these blog hops, linkups and parties
whatd you do this weekend

shared at these facebook group linkups

The Good, Bad and Secrets of Sugar

Scientist have demonstrated that a high sugar diet can lead to some very damaging health risks. This type of diet has been shown to be linked to increased risk of high blood pressure, high cholesterol, reduced "good" cholesterol, inflammation, insulin resistance, obesity, type 2 diabetes and heart disease. However, not all sugars are bad for the body.


Natural sugars that are found in berries and other foods naturally are different than sugars that are added to food. Natural sugars can be found in whole, unprocessed foods. Fructose and lactose are two naturally occurring sugars. These foods are often low in calorie and sodium and high in water content and important vitamins and minerals. In addition the sugar in fruit is slowed by the fiber in fruit slows the sugar not allowing the same sugar spike as when you eat a sugary treat Likewise, food that contains lactose often comes with a healthy serving of protein that helps provide sustainable energy that will stay with you


Even good sugars can be overdone. The USDA recommends that only an average of 2 cups of fruit and 3 servings of dairy a day be in the diets of adults.


 Spot the sweets. You know to avoid sugar, but there are lots of other names for sugars that are lurking on food labels.


Cutting back on sugar may not be easy but is something that needs to be done for your health 

retweet post here

shared on these blog hops, linkups and parties
melt in your mouth

shared on these facebook group linkus

Order The Garden Through Mail Order

Winter time is a time of retreat for many gardeners. After pruning, planting, winterizing, fertilizing, mowing and sowing the time to rest has come. Gardening can be hard work with all the composing, and planting a welcome retreat of winter is almost looked forward to. Gardeners can clean up pretty good both during and season and in winter season as well. However, like most things the rest and retreat comes to an end and that makes gardeners happy as well.

Add caption


Sometime after the first of the year a sort of feeling, you can call it an itch starts to develop. While gardeners have enjoyed the much deserved rest we begin to dream of getting our hands dirty and working in the garden again. Since the weather outside in most location is not preferred gardening weather the dreams become plans. Perhaps this is the reason January is National Mail Order Gardening Month.


Companies are aware that gardening runs deep and that the winter leads to dreams of gardening. Mail order catalogs start arriving in the mail around this time of year bringing with them promises of big blooms, delicious garden plants and award winning plants as well. Using this catalogs will help any gardener create a game plan. Thus allowing an easy way through the internet or telephone to purchase just the right plants to arrive at the perfect time in your area.


Placing orders through an online source or catalog can have some great advantages as well. These advantages include:

  • Design help through award-winning plant collections and pre planned gardens.
  • The wisdom of experienced plant and seed growers, who kindly ship plants at the correct planting time for your region, complete with instructions.


Here are a few tips if you plan to order plants through mail order
  • Be prepared to place your plants in the ground a.s.a.p Know where you will place plants and if possible have that area pre prepared. Will you need mulch or fertilizers?? 
  • Open your shipped plants as soon as they arrive. Providing the plants with air circulation and place in a protected and shady spot until you can plant them. Take note to follow enclosed instructions regarding care, watering, soaking and planting 
    check out this great list of mail order catalogs that may interest you 

retweet post here

shared on these blog hops, linkups and parties
inspire me monday 

shared on these facebook group linkups 

Wednesday, January 23, 2019

Southern Sweet Tea

Sweet Tea is a rich part of history. In 1795 the first tea plantations in the United States arrived in South Carolina and a few tea plantations survive today. One of the earliest, if not the first, sweet tea recipe appeared in the Housekeeping in Old Virginia cookbook by Marion Cabell Tyree in 1879. It is true that sweet tea is richly ingrained in the history of the south. The movie Steel Magnolias has Dolly Parton proclaiming that sweet tea was "the house wine of the south"


One difference that has taken place in sweet tea from the early days is the type of tea used. Green tea was commonly used in iced tea until World War II. After that time green tea that was imported was replaced with Americans black tea from India. Many are not quite sure what sweet tea is. Some refer to sweet tea as a glass of tea that has had a spoonful of sugar to a glass of iced tea which may be sweet tea to some but sweet tea is normally made in large batches and kept chilled in the fridge prepared ahead of time for visitors.


3 family-sized black tea bags (or 12 individual tea bags), such as Lipton or Luzianne
1 cup granulated sugar
Ice
Fresh mint leaves or lemon slices (optional)

Boil the water. Bring 4 cups of the water to a boil in a small saucepan over medium-high heat. Remove from heat.
Steep the tea for 5 minutes. Dunk the tea bags a few times in the water to fully hydrate, then leave submerged with the strings hanging over the side of the pot. After 5 minutes, remove the bags and discard.
Add the sugar to the tea. Add the sugar and stir until completely dissolved.
Pour the tea base into the pitcher. If using multiple pitchers, divide the tea evenly between them.
Top off the pitchers with water. Add 3 more quarts of water to the tea base to make a gallon of sweet tea and stir to combine.
Refrigerate until very cold. Refrigerate for at least 4 hours or, ideally, overnight.
Serve over ice. Pour the sweet tea into ice-filled glasses. Add a sprig of mint or a slice of lemon to each, if desired!


Sweet tea is best kept cold in fridge. Tea will stay fresh for about a week. If you prefer a stronger tea pour the tea and sugar at the same time. Stirring will help dissolve sugar and allow the tea to steep up to 3 hours. Do not remove tea bags but let them remain the entire steeping time.

How sweet is up to the sweet tea drinker. Add a bit of extra sugar 1/4 cup at a time to the full batch of tea before placing in fridge to add sweetness. Stir tea so the sugar dissolves and then place in fridge. If you prefer less sugar that can be done as well.

retweet post here

shared at these blog hops, linkups and parties

shared at these facebook group linkups
RT club ---- 2/9 ---- 1rt


Whole Wheat Bread and recipe to use it all up

So you have decided to eat healthier. That is awesome but some of the choices along the way may be complex. Take for instance bread, wheat bread is meant to be better for the body but which one to select?? There are a number of different  brands, colors and prices in the bread aisle. Take for instance all the names that are present in the wheat bread world


  • 7 Grain
  • 10 Grain
  • 12 Grain
  • Healthy Multi-Grain
  • Wheat
  • Cracked Wheat
  • Split Top Wheat
  • Whole Grain White
  • 100% Whole Grain
  • 100% Whole Wheat
  • Honey Wheat
  • Honey Whole Wheat
  • Honey & Oat
  • Oatnut
  • Health Nut


So many choices and yet which one are you to choose?? There are some things you do not want to find when reading the ingredients of the product Some of these include
  • main ingredient of bread being enriched bleached flour
  • high fructose corn syrup as one of the top 4 ingredients listed
In addition the terms "whole wheat", "whole grain" and "whole grain white" don't mean anything So buying whole grain or whole wheat to us helps us feel like we are doing something good but taking a look at the label some barely meet the minimum. Don't simply buy the 100% whole grain labeled bread as the bread could be made up of bleached white flour. However, breads that carry the label 100% whole wheat is the one to go for. 


When you finally find that wheat bread you trust be sure to use it all up Here is a great recipe to help make sure none goes to waste. 


9 cups of left over whole wheat bread chopped into bite sized pieces. (the end pieces are great too)
1 cup of coconut milk
2 cups of almond milk
1 cup of Sucanat sugar  Buy Sucanat online to save money
1/4 cup of whole wheat pastry flour
7 eggs
2 teaspoons vanilla
1 teaspoon cinnamon
1 teaspoon nutmeg
1 teaspoon baking powder

Preheat oven to 350 F Grease baking dish
Mix cream, almond milk, eggs, sugar, butter vanilla, cinnamon, nutmeg and baking powder, flour.
Put the cut up bread in a pan.
Pour mixture over whole wheat bread and let it sit for 5-8 minutes so the mixture absorbs into the bread.
Spoon entire mixture into your baking pan.
Bake until it is golden brown and firm when you touch it, around 40-45 minutes.

Optional Toppings for the Bread Pudding:
1. Home made whipping cream (Mix whipping cream, with three tablespoons of raw honey, vanilla and cinnamon until it turns into delicious whipping cream.)

2. Fresh fruit

3. A berry puree sauce. (Heat berries with 3 tablespoons of coconut sugar and 1 tablespoon of arrowroot to thicken the sauce. Make sure to mix the arrowroot with water before you add it to the berry sauce.)

retweet post here

shared on these blog hops, linkups and parties

shared on these facebook group linkups
grow your blog ---- ct ---- 2/9