Custom Search

Friday, May 22, 2015

Flag Etiquette

This weekend here in the United States is memorial day weekend. A weekend we pay respect for all those that served us as well as to all those who have gone before us. Most Americans understand that the U.S. flag is an important item and stands for freedom and independence. My grand-daughter says the pledge daily in her class and the teacher has taught her the importance. I believe the first place I learned to properly take care of the flag was in elementary and bible school where we always said the pledge. I learned to fold the flag one year at 4H camp as the proper steps were provided to us.


December 22, 1942 was the date the first public laws to properly treat the flag were approved by Congress. There were codes and rules that were given to properly display the U.S. flag. These rules include:


The U.S. flag should be displayed from sunrise to sunset on buildings and it should fly flagstaff. There are patriotic sites such as memorials, historical sites or cemeteries where the flag will be allowed to fly through the night.


The flag should be hoisted in a brisk manner and lowered slowly. If the weather outside is bad the flag should not be displayed. Encouragement to hang the flag is given on dates such as New Year's Day, Inauguration Day, Lincoln's Birthday, Washington's Birthday, Army Day, Easter, Mothers Day, Memorial Day where it should be hanged half staff until noon. Flag day, Independence day, Labor day, constitution day, Columbus day, navy day, veteran's day, thanksgiving day, Christmas day, and other days tatrare rich in state or U.S. recognition days.



The flag should be displayed on or near the main buildings of public institutions, on or near all school buildings on school days, and in or near all polling places on election day.


When carried with other flags the U.S. flag should be on the marching right side or from a staff when hanging from a display.


The flag should never be displayed draped over the hood, top, sides or back of a vehicle , train or boat. If the flag is displayed on a car it must be fixed firmly to the chassis of the car or clamped tot he radiator cap. No flag should be displayed above the U.S. flag or hung to the right


shared at
project inspired

Great for Garden Time : Beet and Carrot Slaw

Use veggies straight from the garden or farmers market to make this delicious salad.


Beet and Carrot Slaw
Adapted from How to Cook Everything by Mark Bittman
Serves 4-6 as a side salad
8 oz beets (about 2-3 medium), peeled and quartered
8 oz carrots (about 2-3 medium), peeled and chopped into a few pieces
2 medium shallots, peeled
1-inch chunk of fresh ginger root, chopped
1 tablespoon canola or peanut oil
Juice of 1 lime
¼ cup cilantro, chopped (substitute flat leaf parsley if you’re adverse to cilantro)
Salt and pepper to taste

Directions
Place the beet chunks, carrot chunks, shallots and ginger into the bowl of a food processor. Pulse until finely chopped (but not pureed). If you don’t have a food processor you can do this with a hand grater, using the side with the widest holes. Transfer to a bowl; stir in oil, lime juice, and cilantro. Generously season with salt and pepper. Can be made ahead and stored for a few days in the fridge; freshen with a squeeze of lime juice if desired

shared at
love from the kitchen
brag about it

Wednesday, May 20, 2015

found this recipe at one of my all time favorite places fb

Refrigerated pie crust
1 pound ground beef
3 Tbsp homemade taco seasoning (below) or 1 pouch commercial seasoning.
1/2 cup chopped onion
1/2 cup salsa
1 cup lettuce, shredded
1 medium tomato, diced
1 cup sharp cheddar cheese, shredded
Sour cream (optional)

1. Preheat oven to 350 degrees.
2. Pat into pie pan ( preferably glass), sprinkle with a pinch of taco seasoning. Bake 7-10 minutes or until it just begins to brown.
3. In a medium skillet, cook beef and onions until beef is browned and cooked through. Drain.
4. Add salsa and all remaining taco seasoning. Cook 3-4 minutes.
5. Pour into crust and top with cheese. Bake for 15 minutes, or until crust is golden brown.
6. Let cool for 5 minutes. Top with sour cream, lettuce and tomato.

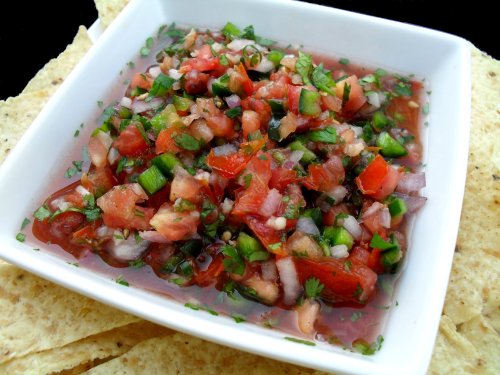
Make your own salsa

Salsa abounds in the month of may and as fresh garden veggies arive on our kitchen tables this recipe I am sure will tickle your taste buds. Oh so yummy 


Fresh Mild Salsa

recipe source here

6 medium fresh tomatoes on the vine
1 poblano pepper, seeded and finely diced
½ large red onion, finely diced
½ a bunch of fresh cilantro, finely chopped
1-2 cloves fresh garlic, minced
Juice from ½ a lime, ½ a lemon, and ½ an orange
1 teaspoon salt
¼ teaspoon freshly grated pepper
Finely dice the tomatoes, removing the seeded pulp as you go, and place them in a wire mesh sieve set over a bowl to drain for five minutes. Discard juice, then stir the tomatoes and all other ingredients together in a large bowl. Store in the refrigerator.

Tuesday, May 19, 2015

Cucumber Watermellon Salad

Cucumber-Watermelon Salad
 
enjoy this delicious recipe alone or along side a delicious meal. Refreshing and perfect for the diet this salad will travel well during the warm months.
 
recipe image


"This cool, refreshing summer salad is oh so delicious! Sweet and tangy at the same time."
Ingredients:
6 cups cubed seeded watermelon
4 cups cubed English cucumber
1 teaspoon salt
1 tablespoon white sugar (optional)
1/2 cup balsamic vinegar
Directions:
1.Place the watermelon and cucumber cubes in a large bowl, and gently toss with the salt and sugar. Drizzle with balsamic vinegar and toss to coat. Refrigerate for 15 minutes, then gently toss one last time before serving

RECIPE SOURCE : ALL RECIPES

Griling Time: Bacon Wrapped Chicken

There are so many great recipes out there that include bacon in the ingredients. Every thing from seafood , vegetables, hotdogs, meat anything that can be wrapped in bacon and oh my the taste it will offer. Now me I consider myself a bacon fan. Love it always have and always will. I love this recipe for grilled bacon wrapped chicken drumsticks as well. I believe that chicken is very economical and there are so many ways to fix it. This recipe allows a great taste of meat to be even better with the flavor of grilling. The bacon offers a great taste with the saltiness and great flavor If you don't have time or like to grill these bacon wrapped chicken drumsticks are easily baked as well.


start with you will need
Chicken drumsticks, skin left on for maximum flavor
Extra virgin olive oil
salt and freshly cracked black pepper, to taste
Any other seasonings you'd like to throw on there: I used a simple mix of garlic and onion powders and just a hint of fresh or dried finger-rubbed thyme.
Thick sliced gourmet bacon: You can use any bacon you like but I prefer a nice thick-cut quality bacon with lots of flavor. Smoked types in particular.
Toothpicks
  1. First of all, let your chicken come up to room temperature. While it is sitting, prepare a simple spice/herb seasoning for the chicken. Really, you can just use salt and pepper if you'd like. I typically use just a few dashes of onion and garlic powder and a hint of a savory herb like thyme, marjoram, or the like to add a bit more flavor. Mix these together in a bowl. Alternatively, you can use a small amount of any poultry seasoning mix you like but I think simplicity is the key here, the bacon and chicken are already a lot of flavor so you don't need to hide it with too complex flavors.
  2. When your chicken is roughly room temp, drizzle them very lightly with extra virgin olive oil and rub into the drumsticks. You don't need a lot, the bacon will throw off fat as it cooks to further flavor and glaze the chicken. Rub a bit of the spice mix into the chicken over all the surfaces and then season generously with salt and pepper (the salt is important to bring out the flavors of all the other ingredients), gently pressing the seasoning into the surface of the chicken.
  3. Finally, wrap each drumstick with a slice of bacon, wrapping around a couple times to cover much of the surface of the chicken meat. You can then secure the ends of the bacon with a tooth pick. If you have smaller drumsticks, you may prefer to use only half of a slice of bacon. Of note, in some bacon wrapped recipes, the bacon is partially cooked first. This is particularly important if you are wrapping a food which cooks quickly and would be done long before the bacon was done and crispy, such as bacon wrapped scallops or asparagus. In the case of bacon wrapped chicken, the chicken will cook for 15-25 minutes or more to be done throughout so the bacon will have ample time to crisp up without having to pre-cook at all.
  4. Prepare a grill set up for indirect heat cooking. You want to adjust your grill to get a nice hot but moderate temp, ideally in the 400-450 degree range. If it is too cool, the chicken will take a long time to cook and the bacon may not crisp up nicely. If too hot, you'll start burning the edges of the bacon wrapped chicken before the inside of the chicken is done fully.
  5. Once your grill is ready, throw those bad boys on there, on indirect heat, add your desired smoking wood and close the lid. For smoking woods, you can use anything really. Bacon and chicken are both great with a sweet smoke like apple wood but the bold flavor of the bacon can easily stand up to hickory or mesquite as well.
  6. Grill the drumsticks approximately 15 to 25 minutes until they are cooked to an adequate temperature throughout. The exact time will vary depending on the temperature of your grill, the size of your drumsticks and other factors. As they cook, only open the lid to check on them periodically, keeping it closed as much as possible to retain heat and that yummy smoke. If they look like the surface is drying out a bit (not too likely since the bacon throws off a lot of fat) you can baste them gently with a small amount of olive oil once or twice.
  7. That is pretty much it! I told you these bacon wrapped chicken drumsticks were easy! Simply take them off, cover then in foil and let them rest 5 minutes or so and then serve them up with your favorite sides; rice, beans, grilled veggies and more all make excellent accompaniment. And don't forget to warn your guests about the toothpick so that they don't stab themselves in the mouth!!!
  8. Enjoy!

    recipe resource here

Monday, May 18, 2015

Custard Cake

I simply love all the awesome recipes that can be found online. So many great individuals can cook up dishes from scratch and share the recipe for those like me who can cook by following a recipe and adding my own flare here and there. This recipe from Mabel's "Tart Magica" is a great and yummy delicious.


1/2 cup (113g) unsalted Butter
2 cups (480ml) Milk
4 Eggs, separated
4 drops White Vinegar
1 1/4 cups (150g) Confectioner's Sugar
1 Tablespoon (15ml) Water
1 cup (115g) Flour
1 teaspoon (5ml) Vanilla Extract
extra confectioner's sugar for dusting
 
Preheat the oven to 325°F. Lightly butter or grease a 8"x8" baking dish.
Melt the butter and set aside to slightly cool. Warm the milk to lukewarm and set aside.
Whip the egg whites and vinegar to stiff peaks. Set aside.
Beat the egg yolks and sugar until light. Mix in the melted butter and the tablespoon of water for about 2 minutes or until evenly incorporated.
Mix in the flour until evenly incorporated. Slowly beat in the milk and vanilla extract until everything is well mixed.
Fold in the egg whites, 1/3 at a time. Repeat until all of the egg whites are folded in.
Pour the batter into the prepared pan and bake for 45-60 minutes or until the top is golden. Allow cake to completely cool before cutting and then dust with confectioner's sugar *see Note 1.
Note 1: For faster cooling you can place the cake in the fridge. Even after fully cooled, it will still be slightly jiggly.

Asparagus snack

Many of my friends are on what I refer to as spring time diets. It is something that they will be doing to look slim and trim this spring. At work there is a group that have a formed a biggest loser club where the winner gets the pot but they all will be winners for getting better health and losing some weight. So here is a great spring time health recipe that I found online


PALEO MUSHROOM AND ASPARAGUS RECIPE


1 Bunch of Asparagus
½ lb Organic Mushrooms
2 Springs of Fresh Rosemary
2 Teaspoons coconut oil
2 Cloves of garlic
Salt and Pepper to taste
Instructions
  1. Preheat oven to 450 degrees
  2. Place mushrooms and asparagus into a bowl
  3. Drizzle coconut oil
  4. Add garlic and rosemary
  5. Roast for about 15-20 min (until tender)
  6. Enjoy!
Recipe by Paleo Recipes for the Paleo Diet at http://paleoaholic.com/paleo/paleo-mushroom-asparagus/

Rose Garden tips

 
I love those old fashioned rose gardens that my grandmother would have. These gardeners have a passion for these gardens of blooming roses. They are simply beautiful and offer a scene that looks awesome. The fragrance in these gardens is nearly as great as the scene itself.


These gardens take trial and practice and experience counts. A few tips to help the roses include
 
Light is always a needed resource. A good 5 to 6 hours of good daylight sun is needed.
 
 
Roses are timid and temperature is always part of their growing. Here in southern Illinois my roses have already started to bloom as the temp has maintained a good 60 to 80 degrees. Summer sun will leave the green here but the flowers will fade. Protecting roses in the fall also makes a difference as cold weather will destroy roses so a good mulching is needed.
 
 
water is another resource needed in great demand. Humid soil but not standing wet soil is what the gardener wants to achieve. Fertilizer is after each flush of blooms is also a great need.


Roses only need pruned one time a year. This will help keep roses healthy. Should be done in late winter or early spring. Consider the shape and height of your rose plants before pruning.


Orange, Anchovy and Olive Salad


Eat a little healthier this month and try the meditranian diet plan. There are awesome dishes that are part of this diet you can read all about it here on Annies Home. This is a recipe that is not only delicious but healthy. Enjoy!!!


  • 4 small oranges, preferably blood oranges
  • 1 small red onion, sliced into very thin rounds
  • 16 salt-cured (or oil-cured) black olives or Kalamata olives, pitted and halved
  • 6 anchovy fillets
  • 1 tablespoon fresh lemon juice
  • 3 tablespoons extra-virgin olive oil
  • 1/8 teaspoon ground pepper, or more to taste
  • 2 teaspoons finely minced fennel fronds for garnish

  • Peel oranges carefully with a paring knife, cutting away all the white pith as well as the membrane that covers them on the outside. Working on a plate to help capture all the juice, slice the oranges into rounds, as thin as you can manage. Arrange the orange slices on a serving platter; reserve the juice. Distribute onion over the oranges, then arrange olives over the top and finally the anchovy fillets. Pour the orange juice and lemon juice over the salad and drizzle with oil. Sprinkle with pepper. Let the salad stand at room temperature for about 30 minutes to let the flavors develop. Serve sprinkled with fennel fronds, if desired.

recipe source here

Saturday, May 16, 2015

Grilled Tomatilla Salsa

Grilled Tomatillo Salsa inspired by Rachel Ray


 1/2 lb. tomatillos, husked and halved crosswise
1 small red onion, thickly sliced
1 fresh jalapeno, halved and seeded
1/2 tomato, preferably yellow, chopped
1/4 cup vegetable oil
1 garlic clove, finely chopped
1/4 cup fresh cilantro, chopped
1 Tbsp. fresh lime juice
1 tsp. apple cider vinegar
1 tsp. sugar
In a medium bowl, toss the tomatillos, onion and jalapeno halves with the vegetable oil and garlic. Season with salt. Refrigerate for at least 30 minutes.
Meanwhile, preheat grill to high.
Remove vegetables from oil and grill until lightly charred. The tomatillos will cook much more quickly than the onion and jalapeno. Remove from the grill.
Chop all the vegetables and mix in a bowl with tomato, cilantro, lime juice, vinegar and sugar.

Spring Pasta with Asparagus & Poached Egg

Spring Pasta with Asparagus + Poached Egg
From The Coastal Table by Karen Covey


1 bunch fresh asparagus, ends trimmed and cut on a diagonal into 2-inch pieces
1 pound spaghetti

Lemon Vinaigrette
1 ½ tablesoons Dijon mustard
juice from 2 lemons
kosher salt, to taste
freshly ground black pepper, to taste
¼ cup extra virgin olive oil, plus extra for drizzling

4 large eggs
2 teaspoons distilled vinegar
1 cup mix microgreens (greens and purples), for garnish, washed and dried 
    1. Bring a large pot of water to boil. Add asparagus and blanch until bright green, about 3-5 minutes (depending on thickness of stalks). Remove with a slotted spoon and place in a bowl of ice water to shock and cool.  Keep pot of water boiling on stove.
    2. To boiling water, add a good pinch of salt. Add pasta and cook until al dente, about 7-10 minutes.
    3. Meanwhile, make vinaigrette. In a medium bowl, combine mustard and lemon juice and season with salt and pepper. Slowly pour in olive oil, whisking until thick and emulsified.
      Fill a shallow pot with water, coming up about two inches on side of pan. Bring to a boil. Lower heat so that water is just barely boiling. Add vinegar to water.
    4. Crack each egg into its own small bowl. (This will help make it easier to transfer eggs to water.) Add one egg into water, taking care not to break the yolk. Wait 1 minute, and then add another egg, adding all 4 in the same matter. (Do this in batches if your pan isn’t large enough to hold all of them at once.) Allow each egg to cook until whites are set, just about 2 minutes (yolks should still be runny). Carefully remove each egg with a slotted spoon in same order each was added, allowing excess water to drain off. Place eggs on a large plate.
    5. When asparagus has cooled, drain and pat completely dry. Set aside.
    6. Drain and transfer pasta to a medium bowl. Toss warm pasta with ½  of the vinaigrette. Divide pasta among serving bowls and top each with equal amount of asparagus. Place one egg atop each bowl followed by a handful of the microgreens. Drizzle top of each serving bowl with remaining vinaigrette. Season with salt and pepper and serve. 

    Friday, May 15, 2015

    Grilling Recipe : Herbed Corn

    Herbed Corn from the Grill
    Grilling entrees is one thing then comes grilling side dishes. These side dishes can be as delicious as the entrée itself. Grilled corn is an all time favorite at our house. Grilled corn is delicious with herb butter and offers an interesting fresh taste in my opinion.

    Herbed Corn on the Cob
    6 ears of corn, cleaned
    olive oil
    1/2 stick butter, softened
    2 Tbsp. minced fresh parsley
    2 Tbsp. minced fresh chives
    1 garlic clove, finely minced
    zest of 1/2 a lemon
    1 tsp white wine vinegar

    Lightly brush corn with olive oil and place on a hot grill. Grill until slightly browned on all sides, turning as needed.

    Combine softened butter, parsley, chives, garlic, lemon zest, and vinegar in a small bowl. Using a fork, mash all the ingredients together until well combined. If the butter gets too melted, place in the fridge until needed.

    Spread the butter mixture on the hot corn and serve.

    Warm Weather Salad : Corn and Black Bean Salad

    The salad that I share with you today is one that is welcome year round but pairs perfectly with grilling days and potlucks.


    Corn and Black Bean Salad
    recipe source Cake Batter and Bowl

     1 tablespoon olive oil
    1 red onion, chopped
    Kernels from 4 ears of corn
    2 garlic cloves, minced
    1 15-ounce can black beans, rinsed and drained
    1 cup chopped roasted red peppers
    Juice of 1 lime
    1 teaspoon ground cumin
    1 teaspoon salt

     Heat olive oil over medium heat in a large nonstick skillet. Add red onion to the pan and sauté for 5 minutes; add corn kernels and sauté an additional 2 to 3 minutes, or until veggies are tender. Stir in garlic and sauté one more minute. Place veggies in a large bowl and stir in black beans and roasted red peppers. Place lime juice, cumin, and salt in a small bowl and mix; pour over salad and stir well. Makes 6 servings.

    Thursday, May 14, 2015

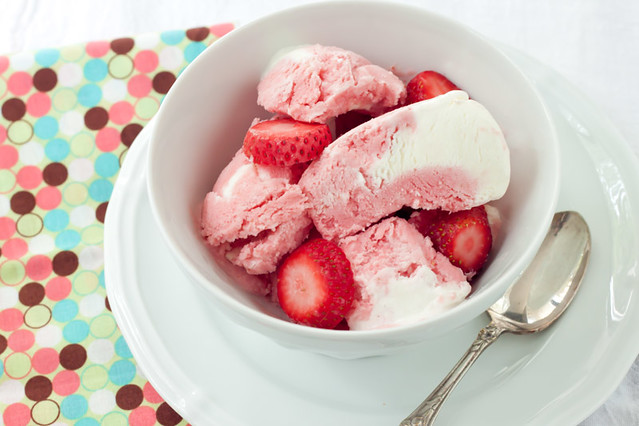
    Strawberries and Cream Frozen Yogurt


    Strawberries and Cream Frozen Yogurt
    recipe source back  to the cutting board


    16 oz. fresh strawberries, sliced
    2/3 cup sugar
    2 tsp. vodka (This is optional, it helps keep the frozen yogurt softer after it’s frozen)
    1 cup low-fat Greek-style vanilla yogurt (you can use regular instead of low-fat to get an even creamier consistency)
    1/2 cup half and half (I’d reduce this to 1/4 cup if using regular yogurt)
    2 tbsp. lemon juice Cream Cheese Sauce
    4 oz. cream cheese (regular or low-fat, not fat free)
    1/4 cup half and half
    1/3 cup sugar (or more to taste)
    Low-fat or Skim milk

    Process In a medium bowl, mix together strawberries, sugar and vodka (if using). Cover with plastic wrap and set aside for at least 2 hours (at room temp), stirring a few times. Pour strawberry mixture into a blender along with the yogurt, half and half and juice. Mix well. Pour mixture through a fine-mesh strainer into a medium metal or plastic bowl, preferably one with a cover. If you don’t have a cover for it, cover with plastic wrap. Place in freezer to chill. After an hour, take it out and use a hand mixer or a sturdy whisk to whip it vigorously (you’ll get the best results with the mixer). Make sure to break up all the frozen sections around the edges. This may seem counter-intuitive, but this helps make it really creamy in the end. Put back in the freeze. Keep checking every 45-60 minutes and whipping/breaking it up. It should take about 4-6 hours depending on your freezer. You still want it to be soft enough to add in the cream mixture. When the frozen yogurt gets to a consistency you are happy with, make the cream cheese sauce. Combine cream cheese, half and half, and sugar in a mixer bowl and mix until smooth. The consistency should be similar to a creamy salad dressing: thick, but pourable. If you need to thin it out, add 1 tablespoon of milk at time until it’s easier to pour. There are few different ways you can add the cream cheese sauce: a. Transfer half of your frozen yogurt to a new bowl and pour half of the cream mixture on top, repeat with the rest of the frozen yogurt and cream cheese. Gently drag a spatula or knife through the mixture to swirl it around. b. Use a spoon or knife to dig out 2-4 holes down through the frozen yogurt to the bottom of the bowl, then pour the cream mixture into the holes. Gently drag a spatula or knife through the mixture to swirl it around. I wanted to have big chunks of the cream cheese when I scooped it out, so I chose the second method and didn’t really swirl it around too much. I also folded some of the cream cheese sauce into the ice cream first, which gives the frozen yogurt a tart strawberry cheesecake taste. You may also want to mix in some sliced strawberries. Put back into the freezer to harden for another hour or so. It’s really good served with graham cracker crumbs sprinkled on top!

    Potato Candy or Peanut Butter Pinwheels

    Peanut Butter Pinwheels
    Originally published in the Liddabit Sweets Candy Cookbook

    1 medium-size (4 to 5 ounces/100 to 150 g) potato, baked, cooled, and skinned (Yukon or russet varieties work best; don’t use any “waxy” potatoes, like the small red ones—it won’t turn out right!)
    2 tablespoons (30 g) unsalted butter, at room temperature
    4 to 6 cups (525 to 775 g) confectioners’ sugar, plus about 1 cup for dusting
    1 teaspoon (5 g) pure vanilla extract
    Cold milk, for thinning the dough if needed
    1 cup (75 g) unsweetened shredded coconut (optional)
    1 cup (180 g) creamy commercial peanut butter, such as Skippy
    1 teaspoon (4g) fine sea salt

    In a medium-size bowl, gently mash the baked potato with a fork, just enough so that there aren’t any big lumps. Add the butter, 4 cups of the confectioners’ sugar, and the vanilla, and mix well with a rubber spatula until smooth. The dough should be very stiff and sticky, almost like Play-Doh. If it’s too thick, add a little cold milk; if it’s too thin, keep adding confectioners’ sugar, 1/4 cup at a time, until it reaches the correct consistency. Add the coconut, if you’re using it, and mix to combine.
    Divide the potato dough in half and form it into 2 balls. Wrap each one tightly in plastic wrap, and allow them to rest in the refrigerator for 1 hour.
    Remove the balls of dough from the refrigerator. Generously and evenly sprinkle confectioners’ sugar over the surface of the prepared cutting board.
    Roll out one ball of the dough into a rough 12-inch circle that’s about 1/2-inch thick. Use the spatula to spread half of the peanut butter evenly over the surface. Sprinkle 1/2 teaspoon of the sea salt evenly over the peanut butter, and starting at the edge closest to you, carefully roll up the dough into a log shape. Wrap the log in a piece of plastic wrap, or parchment or wax paper secured by twisting the ends together (this will help the log hold its shape). Chill in the refrigerator for 30 minutes. Meanwhile, assemble the second log.
    Once the first log is firm enough to cut, use a sharp chef’s knife to slice it into 1/2-inch-thick rounds. Wrap each piece in wax twisting paper. Repeat with the second log. Store the pinwheels, layered between parchment or wax paper, in an airtight container in the refrigerator for up to 4 weeks.

    Salted Caramel butter Bars

    Salted Caramel Butter Bars


    from Sticky, Chewy, Messy, Gooey: Desserts for the Serious Sweet Tooth

    Ingredients
    2 c salted butter (room temp)
    1 c sugar
    1 1/2 c powdered sugar
    2 T vanilla
    4 c flour
    Caramel Filling:
    1 bag (14 oz) caramel candies (about 50)
    1/3 c cream or milk
    1/2 t vanilla
    1 1/2 t coarse sea salt
    Directions
    Crust:
    Spray a 9×13 baking pan with non-stick cooking spray and preheat your oven to 325 F.
    In a large bowl, combine butter and sugars. Beat together on medium speed until creamy. Add vanilla and beat until combined. Sift the flour into the butter mixture and beat on low speed until a smooth, soft dough forms. Press on-third of the dough evenly into the pan to form a bottom crust. Bake until firm and the edges are a pale golden brown, approximately 20 minutes. Transfer to a wire rack and cool for about 15 minutes.
    Caramel filling:
    While the bottom crust is baking and the remaining dough is chilling, make the caramel filling. Place unwrapped caramels in a microwave-safe bowl. Add the cream and 1/2 t  vanilla. Microwave on high for 1 minute. Remove from the microwave and stir until smooth. If caramels aren’t completely melted, microwave on high for 30-second intervals until smooth, stirring after each interval.
    Pour the caramel filling over the crust. Sprinkle salt over caramel layer.
    Remove remaining chilled dough and crumble it evenly over the caramel. Then return the pan to the oven and bake for about 25-30 minutes, or until the topping is firm and lightly golden. Let cool before cutting into squares.

    Hummingbird Cake


    Hummingbird cake is a banana, pineapple, spice cake. It is common in the southern US. Often served with a cream cheese frosting. The hummingbird cake has been a tradition since mid 20th century. The cake first appeared in a publication written by L.H. Wiggin in the 1978 issue of Southern Living magazine. In that same year the cake won the Kentucky State Fair favorite cake award.

    Hummingbird Cake
    12 servings (calorie estimate: 770/serving)
    adapted from The Hummingbird Bakery Cookbook

    Ingredients

    1 1/2 cups sugar
    3 eggs
    1 1/4 cups sunflower oil
    1 1/4 cups mashed banana
    1 teaspoon ground cinnamon, plus extra to decorate
    2 1/3 cups all-purpose flour
    1 teaspoon baking soda
    1/2 teaspoon salt
    1/4 teaspoon vanilla
    1/2 cup chopped canned pineapple
    2/3 cup shelled pecans (or walnuts), chopped, plus extra, chopped and whole, to decorate
    Cream cheese frosting
    3  8″ cake pans lined with parchment paper

    Preparation

    Preheat the oven to 325 F.
    Put the sugar, eggs, oil, banana, and cinnamon in a freestanding electric mixer with a paddle attachment (or a handheld mixer) and beat until all the ingredients are well incorporated (don’t worry if the mixture looks slightly split).  Slowly add the flour, baking soda, salt, and vanilla and continue to beat until everything is well mixed.
    Stir in the chopped pineapple and pecans by hand until evenly dispersed.
    Pour the batter into the prepared cake pans and smooth over with a palette knife.  Bake in the preheated oven for 20-25 minutes, or until golden brown and the cake bounces back when touched.  Let the cake layers cool slightly in the pans before turning out onto a wire rack to cool completely.
    When the cake layers are cold, put one on a cake stand and spread about one-quarter of the cream cheese frosting over it with a palette knife.  Place a second layer on top and spread another quarter of the frosting over it.  Top with the last layer and spread the remaining frosting over the top and sides.  Finish with pecans and a light sprinkling of cinnamon.

    Wednesday, May 13, 2015

    Vinegar Pie

    This is a delicious recipe that my husbands grandmother used to make. As the wife of a minor she learned to use what she had. She was also a terrific cook making many delicious meals. I hope you enjoy!!


    one 9-inch single crust pie pastry
    1 1/2 cups sugar
    1 tablespoon flour
    1/4 teaspoon salt
    3 eggs, beaten well
    1/4 cup butter melted
    3 tablespoons evaporated milk, half-and-half, or milk
    1/4 cup apple cider vinegar or white vinegar

    I used whole milk and cider vinegar but am wondering and wanting to try another version using half-and-half and maybe malt vinegar?

    Oven at 350. Pastry into 9 inch pan, crimp edges. Combine the sugar, flour, and salt in a small bowl, stir together well. In another bowl, beat together the eggs, butter, and milk, mixing well. Then add the first mixture to the second and mix together well. Add the vinegar and combine together into a thick, smooth filling. Pour into the piecrust. Place on the bottom shelf of the 350 degree oven. Bake 10 minutes. Reduce heat to 325 and bake until edges puff and the center is firm with only a very slight wiggle if you softly nudge the pan. Takes about 35 - 45 minutes more. Remove and place on cooling rack.

    If vinegar pie any indication of the tasty treats in Southern Pies than this cookbook is destined to become one of my favorites even if I really don't consider myself a baker. I'm inspired though, by the easiness of the recipes, the permission to not completely from scratch pie crust bake, and the presence of several favorites that I've just not been able to find since I left the south after college. Besides, I want the Bug to want to cook, and the only way that will happen is if she sees mama cooking. I loved coming home to homemade treats that mom somehow found time to make. I want Bug to have similar memories. Nancie McDermott's cookbook will certainly be one passed on down the road. If only for the Vinegar Pie.

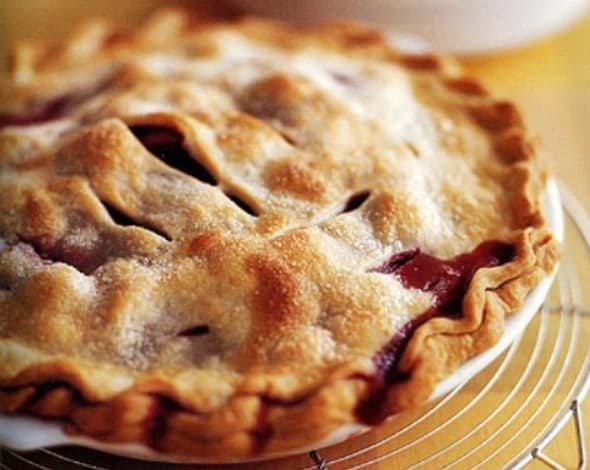
    Strawberry Rhubarb Pie

    My dads favorite pie was very possibly the strawberry rhubarb pie. I know we had it a lot while we were growing up. My mom never had to go far to get ingredients that went in it since we had both a rhubarb plants and a strawberry patch. Want to try this delicious pie? Well here is a delicious recipe we found at Moms Who Think


    Strawberry Rhubarb Pie


    3 tablespoons quick-cooking tapioca
    1 1/4 cups sugar
    2 cups sliced fresh strawberries
    3 cups rhubarb, cut into 1/2 inch pieces
    1/4 teaspoon ground nutmeg
    2 pie crusts
    2 Tablespoons butter

    1. Stir together tapioca, sugar, nutmeg and add a dash of salt.
    2. Add the sugar mixture to the strawberries and rhubarb; coating well. Let stand for 15 minutes.
    3. Line a 9-inch pie plate with one pie crust pastry then fill with the strawberry rhubarb mixture.
    4. Dot with butter. Place the second crust on top, pinch edges to flute. Cover the edge of the pie with foil.
    5. Bake at 375 degrees F for 25 minutes. Remove foil and bake for 25 minutes more or until golden.