

Schools often host a night to meet the teacher take advantage of that and make it an adventure. It is a great time to not only meet the teacher but become familiar with the classroom as well. With the student being aware of their surrounding and teacher it may help to ease their anxieties. My grand-daughter loved the fact that there was a class room roster with the names of other students in the class on the list. It was a great date to see who was present and plan an adventure for her and a friend.

Another Great Idea
Help ease the nerves of kids before school by creating a craft together. Younger students may feel a bit of pressure to start school or starting a new school so a bit of craft time together can help. In addition, finding a good book about starting school can help ease first day jitters as well.
Homemade Modeling Dough in green, yellow, and pink or other colors
Pencils
Toothpicks and plastic knife
Pencil cup or other tall container
Nail polish or varnish
Wax paper
Optional: Black marker and vegetable oil
Modeling Clay Recipe
½ cup (130 grams) salt
¾ to 1 cup (100 to 125 grams) flour, white or unbleached
½ cup (120 ml) boiling water
1½ teaspoons (7 grams) powdered alum (optional)
1½ teaspoons (7 ml) vegetable oil (optional)
Optional: Food coloring, clear nail polish or varnish, acrylic paint
Combine flour, salt, and alum in a mixing bowl. Start with the smaller amount of flour, and add more if needed.
Add vegetable oil and boiling water. Stir with a spoon until the dough is well blended and comes away from the sides of the bowl. Add more flour or water if needed. When the dough is cool enough to handle, knead it with your hands until it is smooth. This should only take a minute or two.
If you want colors of dough other than white, separate the dough into two or three balls. Flatten the ball and make a well in the center. Add 2 or more drops of food coloring to the well—2 drops for a pastel color, more for deeper colors. Knead the dough until the color is even.
Tip: Some food colorings, particularly certain blues, make unexpected colors due to a reaction to the alum. Test a drop of the food coloring on a tiny ball of dough the first time you use it.
Store your finished modeling dough in an airtight plastic bag or container. It will keep for weeks if stored in the refrigerator. Be sure to let it warm to room temperature before using.
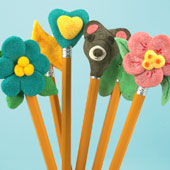
How TO Make Pencil Toppers
Spread a sheet of wax paper on the table so the dough won't stick.
Pinch off enough dough to make a ¾" ball, and leave the rest in the sealed bag or container. Push the ball onto the eraser end of a pencil and start shaping your creation. Attachments like petals, noses, and ears can be shaped from smaller balls and glued in place with a dab of water. See Modeling Ideas below.
To make several balls of dough the same size, roll the dough into a long snake and cut into equal-sized pieces with the plastic knife. To make ¾" (1.5 cm) balls, roll the dough into a snake about ½" (1cm) in diameter and cut into 1" (2 cm) segments.
Dry and Seal Topper
When you have finished molding your pencil topper, put the pencil with pencil topper aside to dry in a pencil cup or other tall container. It should dry in a day or two to a hard finish. Toppers may be left plain or painted with nail polish or varnish for added durability. Be sure to work in a well-ventilated area when using nail polish or varnish.
The modeling dough will dry to a hazy finish. To restore the bright color of the dough, rub some vegetable oil into the dry topper
craft resource found here
No comments:
Post a Comment
I love comments so if you have a minute leave me your thoughts on the above post