The
Symbolism of the Candy Cane
by
Alana Lee
Turned
upside down, the cane makes a “J”
for
Jesus who was born on Christmas Day.
Turn
it upright like the Good Shepherd’s staff
Who
pleads to the Father on your behalf.
At
the top you’ll see the saving crook,
Used
on the lost sheep He never forsook.
The
stripes whisper softly “By his stripes we are healed.”
And
the red represents His blood that was
spilled.
The
white gives us hope to become pure as He,
by
forsaking our sins, white as snow they will be.
The
peppermint oil that flavors this treat,
is
known for its strong healing properties.
Now
each time you see the striped candy cane,
Remember,
dear child, He calls out your name.
Annies Home a place where I love to share tips, recipes and wonderful products that I find for our family along the way.
Custom Search
Saturday, November 30, 2013
Button Candy Cane Ornaments
While out visiting the great WWW I found these super cute ornaments. Simply enough anyone can make. Simply create a candy cane shape on construction paper and glue on buttons of your choice. To create a hanger use a loop of yarn or ribbon.
shared at
Inspiration Monday
shared at
Inspiration Monday
Friday, November 29, 2013
Grinch Pills
These Grinch bags are certainly super cute if nothing else. Know someone being a Grinch this year? Perhaps a Grinch pill will help them.
printable version of topper
Thursday, November 28, 2013
Creating a Veggie Turkey Tray
Start with a layer of red leafy lettuce and celery pieces
Layer of baby carrots over that helps to bring some color to the dish and turkeys feathers
Add some depth to the turkey and his feathers by layering green onions
Colorful feathers are made possible by using bell peppers in a rainbow of shades for the turkeys body
Slices of cucumber helps bring the wobbly turkeys neck a bit of support
Complete the turkey look with a raw potato for the birds head and creating a ring of cherry tomatoes around his head Include a bit of pimento for his beak
Happy Thanksgiving!!!
Wednesday, November 27, 2013
Savory Egg Muffins
1 1/2 cups water
2 tablespoons unsalted butter
1 (6-ounce) package Stove Top lower-sodium Stuffing Mix for chicken
3 ounces bulk pork sausage
Cooking spray
6 large eggs, beaten
1.3 ounces Monterey Jack cheese, shredded (about 1/3 cup)
1/2 cup finely chopped red bell pepper (optional)
1/4 cup sliced green onions
Preheat oven to 400°. Bring 1 1/2 cups water and butter to a boil in a medium saucepan. Stir in stuffing mix. Cover, remove from heat, and let stand 5 minutes; fluff with a fork. Let stand, uncovered, 10 minutes or until cool enough to handle. While stuffing cools, cook sausage in a small skillet over medium-high heat until browned; stir to crumble. Drain. Coat fingers with cooking spray. Press about 1/4 cup stuffing into bottom and up sides of each of 12 muffin cups heavily coated with cooking spray. Pour egg evenly into stuffing cups. Layer cheese, sausage, bell pepper, if desired, and green onions evenly over egg. Bake at 400° for 18 to 20 minutes or until centers are set. Let stand 5 minutes before serving. Run a thin sharp knife around edges of muffin cups to loosen. Remove from pans. Serve immediately.
Tuesday, November 26, 2013
Texas Corn
2 tablespoons olive oil
1 (16 ounce) package frozen corn
1 cup salsa
1/2 cup chopped scallions (about 4 scallions)
(2.25 ounce) can sliced olives (½ cup)
Chicken and Dressing
My husbands mother was like many southern women and could take little to nothing and make a meal of it. Chicken and dressing was one of those dishes the first time she asked me to make it I had no idea how to do it. You see I thought you did it like turkey and dressing not the manner that she would do it and not how it was called for in this recipe. It was still good but when I found out just how to do it was even better. I hope you enjoy and treat those you love to some chicken and dressing.
1 (2 1/2-pound) rotisserie chicken, skinned, boned, and shredded (about 4 cups)
6 cups coarsely crumbled cornbread
8 (1-ounce) firm white bread slices, torn into pieces
2 (14-ounce) cans chicken broth
2 (10 3/4-ounce) cans cream of chicken soup
1 medium onion, chopped
3 celery ribs, chopped
4 large eggs, lightly beaten
2 teaspoons ground sage
1/2 teaspoon pepper
1/4 teaspoon salt
1/2 cup butter, softened
Combine first 11 ingredients in a large bowl. Transfer mixture to a lightly greased 5-quart round slow cooker. Dot evenly with butter.
1 (2 1/2-pound) rotisserie chicken, skinned, boned, and shredded (about 4 cups)
6 cups coarsely crumbled cornbread
8 (1-ounce) firm white bread slices, torn into pieces
2 (14-ounce) cans chicken broth
2 (10 3/4-ounce) cans cream of chicken soup
1 medium onion, chopped
3 celery ribs, chopped
4 large eggs, lightly beaten
2 teaspoons ground sage
1/2 teaspoon pepper
1/4 teaspoon salt
1/2 cup butter, softened
Combine first 11 ingredients in a large bowl. Transfer mixture to a lightly greased 5-quart round slow cooker. Dot evenly with butter.
Cover and cook on HIGH 3 to 4 hours or on LOW 7 hours or until set. Stir well before serving.
Note: Many grocery delis offer baked cornbread; just steer away from the sweet variety for this recipe.
recipe source here
shared at
What We Accomplished Wednesday
recipe source here
shared at
What We Accomplished Wednesday
Sunday, November 24, 2013
BIt of Music While Thawing The Turkey
Safety should be one of your concerns if you are responsible for preparing the feast this Thanksgiving. One of the earliest steps of safety for the dinner begins with thawing the turkey.
Thaw In Your Fridge
Your refrigerator should be 40 °F or below
Allow approximately 24 hours for every 4 to 5 pounds:
- 4 to 12 pounds 1 to 3 days
- 12 to 16 pounds 3 to 4 days
- 16 to 20 pounds 4 to 5 days
- 20 to 24 pounds 5 to 6 days
Keep the turkey in its original wrapper. Place it on a tray or in a pan to catch any juices that may leak. A thawed turkey can remain in the refrigerator for 1 to 2 days. If necessary, a turkey that has been properly thawed in the refrigerator may be refrozen
Thaw in Cold Water
Allow approximately 30 minutes per pound:
- 4 to 12 pounds 2 to 6 hours
- 12 to 16 pounds 6 to 8 hours
- 16 to 20 pounds 8 to 10 hours
- 20 to 24 pounds 10 to 12 hours
Wrap your turkey securely, making sure the water is not able to leak through the wrapping. Submerge your wrapped turkey in cold tap water. Change the water every 30 minutes. Cook the turkey immediately after it is thawed. Do not refreeze
Thaw in Microwave
Check your owner's manual for the size turkey that will fit in your microwave oven, the minutes per pound, and power level to use for thawing. Remove all outside wrapping and place on a microwave-safe dish to catch any juices that may leak. Cook your turkey immediately. Do not refreeze or refrigerate your turkey after thawing in the microwave oven.
shared at
Saturday, November 23, 2013
Match Stick Cross
When I was a kid I admired the match stick crosses that the older kids would make in bible school. Sure the younger kids like me we would make awesome crafts but it was the crosses that always got my attention. When I ran across this one I had to simply share. Want to know how to make your own go here
3 packages (15 tarts each) prebaked frozen mini pastry shells (we used Athens Mini Fillo Shells)
1 (15-ounce) can pumpkin
2 cups (plus extra for garnish) frozen whipped topping, thawed
1 teaspoon (plus extra for garnish) pumpkin pie spice
1 (3.4-ounce) package cheesecake-flavor instant pudding and pie filling
Mint leaves (for garnish)
Remove the shells from the freezer and let them thaw at room temperature for 15 minutes. Meanwhile, combine the pumpkin, whipped topping, and pumpkin pie spice in a medium bowl, whisking until smooth. Add the pudding mix and whisk until smooth and thick. Spoon about 1 tablespoon of the filling into each of the shells (you can also pipe the filling with a pastry bag or a plastic sandwich bag with one corner snipped off), then top the tarts with whipped topping, a sprinkling of the pumpkin pie spice, and a mint leaf, if you like. Makes 45 tarts.
Sale : Charm Factory
Charm Factory is having a sale to thank their customers. Now through November 27th you can save 15% OFF $25. Simply use the code Thanks13 when checking out
Red Gold Tomato recipe and coupon
Red Gold tomatoes coupon for .55/3 would be great to save you money when preparing your favorite dish that includes tomatoes
This seasonal recipe
Pumpkin Chili
This seasonal recipe
Pumpkin Chili
| 2 | tablespoons extra virgin olive oil |
| 1 | medium onion, chopped |
| 1 | pound ground turkey, or 1 1/2 cups cubed cooked turkey |
| 1 | yellow bell pepper, chopped |
| 3 | garlic cloves, minced |
| 2 | (15 ounce) cans black beans, rinsed and drained |
| 1 | (14.5 ounce) can solid-pack pumpkin |
| 1 | (14.5 ounce) can Red Gold® Diced Tomatoes |
| 1 | (14.5 ounce) can Red Gold® Petite Diced Tomatoes W/Lime Juice & Cilantro |
| 3 | cups chicken broth |
| 2 | teaspoons chili powder |
| 1 1/2 | teaspoons cumin |
| 1 1/2 | teaspoons dried oregano |
| Salt and black pepper to taste |
In a skillet, heat oil over medium heat. Add turkey, onion, pepper and garlic; cook and stir until tender. Drain well. Transfer to slow cooker. Add remaining ingredients and stir to combine. Cook, covered on low for 4 to 5 hours,
Option: Top with cubed avocado and thinly sliced green onions
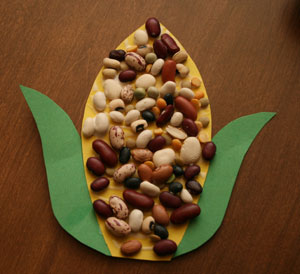
Indian Corn Project
Looking for a cute craft for autumn? Check out this indian corn craft great for little or big hands.
The Colors of Indian Corn Mother Nature paints colors for you and me on all the Indian Corn that we see. Brown is for the beauty that welcomes the fall. Red is Mother Nature's love for us all. Yellow is for the golden sun. White reminds us to be kind to everyone. Orange tells us to be thankful each day, for the beauty of nature and its wondrous ways
Pumpkin Decor
while these may have been shared as a Halloween décor I believe they would look great for Thanksgiving as well.
1-2 pieces of orange construction paper
1 piece of green construction paper
1 piece of brown construction paper
scissors
paper cutter (optional)
paper clips and/or stapler
string
Cut the orange pieces of construction paper into 1″ wide strips (each strip will be 1″ x 11″). Then, shorten some of the strips so that you have (1) 6″, (2) 7″, (2) 9″, and (2) 11″ long pieces.
Gather the strips of paper together (with the ends flush) and place the smallest one in the middle. Order them by size so that the largest strip is on the outside. Secure with a paper clip or staple (I prefer the paper clip so that I can keep adding more elements). Line up the opposite ends so that they are together like the top.
Cut a brown strip of paper 1/4″ by 3″ long for the stem. To make it curl, wrap the paper around a pencil and hold it in place while you count to 20 (or sing the ABC song).
Cut out two leaf shapes from the green paper (ours were sort of like pairs of bunny ears).
Add the stem, leaves, and a piece of string to the paper clip at the top.
Hang up and enjoy!
1-2 pieces of orange construction paper
1 piece of green construction paper
1 piece of brown construction paper
scissors
paper cutter (optional)
paper clips and/or stapler
string
Cut the orange pieces of construction paper into 1″ wide strips (each strip will be 1″ x 11″). Then, shorten some of the strips so that you have (1) 6″, (2) 7″, (2) 9″, and (2) 11″ long pieces.
Gather the strips of paper together (with the ends flush) and place the smallest one in the middle. Order them by size so that the largest strip is on the outside. Secure with a paper clip or staple (I prefer the paper clip so that I can keep adding more elements). Line up the opposite ends so that they are together like the top.
Cut a brown strip of paper 1/4″ by 3″ long for the stem. To make it curl, wrap the paper around a pencil and hold it in place while you count to 20 (or sing the ABC song).
Cut out two leaf shapes from the green paper (ours were sort of like pairs of bunny ears).
Add the stem, leaves, and a piece of string to the paper clip at the top.
Hang up and enjoy!
Thanksgiving
Thanksgiving is to celebrate the Pilgrims who came here from Europe. The Pilgrims came to the United States from England in 1621 and landed on Plymouth Rock Massachusetts. In and around fall, most probably in October the Wampanoag Indians shared a feast with the Pilgrims. While this is the basis of what Thanksgiving is the day of Thanksgiving did not become a federal holiday til 1941. The later date would be much different than the early Thanksgiving and would include turkey and pie.
While we do not know for sure what was served at that first Thanksgiving feast turkey has become a staple along with other traditional dishes. The holiday has become to be know for giving thanks and for gathering family and friends for a large meal. In the 20th century parades have become part of the tradition to celebrate Thanksgiving day.
What will you and your family be doing this Thanksgiving?
Taste of the Season : Apples and Cranberries
| recipe source here |
2 pounds Granny Smith apples, peeled and thinly sliced
2 cups fresh cranberries
3/4 cup sugar
3 tablespoons cornstarch
1 teaspoon grated lemon zest
1/2 teaspoon cinnamon
1/4 teaspoon kosher salt
9-inch basic flaky piecrust, unbaked
1/2 cup granola
4 tablespoons unsalted butter
Preheat oven to 375° F. In a large bowl, toss together apples, cranberries, sugar, cornstarch, lemon zest, cinnamon, and salt. Transfer the mixture to the piecrust. Top with granola and dot with butter.
Bake until the apples are tender, 50 to 60 minutes. (If the top darkens too quickly, tent loosely with foil.) Let cool before serving.
Make Your Own Christmas Snow Globe
I have always loved snow globes. From the tiny ones that we made as kids in bible school to those that are large and elegant that we find at the top of the list gift stores. I simply love these snow globes that we can give as gifts or use as part of our décor and the best thing is they are made at home by hands of those that love them.
To make these awesome snow globes you will need
- mason jars and other jars of various sizes such as salt shakers, spice jars, jam jars, pickle jars
- Christmas trees. I got a pack of 21 at Michael's for sale 50% off
- other holiday items you may want to glue
- mini ball ornaments
- glue gun
- Epsom salts
Rolo Cupcakes
Rolo Cupcakes
Recipe Source: MyBakingAddiction.comCake
1 package Devil’s Food Cake mix
1 large package Instant Chocolate Pudding
1 cup Sour Cream
1 cup Vegetable Oil
4 Eggs, lightly beaten
1/2 cup Warm Water
1 teaspoon Pure Vanilla Extract
24 frozen Rolos, frozen for at least 2 hours
Frosting
4 sticks Butter; room temp
2 teaspoons Pure Vanilla Extract
1/4 teaspoon Salt
1/3 cup Caramel
6 cups Powdered Sugar4 sticks Butter; room temp
2 teaspoons Pure Vanilla Extract
1/4 teaspoon Salt
1/3 cup Caramel
For
the Cake
Preheat oven to 350 degrees F. Line 2
- 12 cup muffin tins with paper liners. In the bowl of a stand mixer, beat
together the cake and pudding mixes, sour cream, oil, beaten eggs, water and
vanilla until well combined and smooth. Evenly divide the batter in the
cupcake liners. Gently push a frozen Rolo into the center of the batter and
smooth the surface covering the candy with batter. Bake for 18-22 minutes. Cool cupcakes
completely.
For
the Frosting
Cream the butter in the bowl of an
electric or stand mixer. Add the vanilla extract, salt and caramel syrup and
combine well. Begin adding in the sugar and mixing
thoroughly after each addition. Frost cupcakes.
Friday, November 22, 2013
Delicious After Thanksgiving Sandwiches
I am not sure if your family is like mine but that Black Friday shopping may leave you all a bit hungry. Whats better than to use the leftovers that are in the fridge from the feast the day before. Yummy and delicious these little guys will hit the spot and make your taste buds happy
6-8 Hearty slices Turkey
4 Tbsp Cranberry relish or sauce
4 leaves Crisp lettuce
8 Tbsp Turkey stuffing
1 Tbsp Butter or margarine or mayonnaise
KING'S HAWAIIAN Honey Wheat Dinner Rolls
Remove the top halves of the rolls and set aside.
With the bottom half of each roll as a base, layer 1-2 slices of turkey.
Spread one Tbsp of cranberry relish (or sauce) on each sandwich, followed by 2 Tbsp of the stuffing. Place a lettuce leaf on the stuffing (this will help prevent the top roll from becoming overly moist).
Spread a sheen layer of butter (or mayonnaise) on the top roll and assemble the sandwich.
Serve immediately, refrigerate or wrap individually in plastic for bag lunches.
With the bottom half of each roll as a base, layer 1-2 slices of turkey.
Spread one Tbsp of cranberry relish (or sauce) on each sandwich, followed by 2 Tbsp of the stuffing. Place a lettuce leaf on the stuffing (this will help prevent the top roll from becoming overly moist).
Spread a sheen layer of butter (or mayonnaise) on the top roll and assemble the sandwich.
Serve immediately, refrigerate or wrap individually in plastic for bag lunches.
Like Kings Hawaiian on facebook and get a printable $1/1 coupon
Subscribe to:
Posts (Atom)