These super cute Christmas tree ornaments are easy to make. Simply use green
felt, a cookie cutter, pencil and scissors trace the cutter pattern onto felt
and cut out. Then to add the colorful beads you can either glue, sew or attach
however you would like
Tissue Paper Snowman face is so very fun. Use construction paper to create the
snowmans feature and glue onto the paper. The top hat can be created using
cardstock You can even have fun create a bonnet for the mrs. Snowman.
shared at
What We Accomplished Wednesday
thank goodness its monday
Sew it cook it craft it
Inspire Me Wednesday
Annies Home a place where I love to share tips, recipes and wonderful products that I find for our family along the way.
Custom Search
Tuesday, December 10, 2013
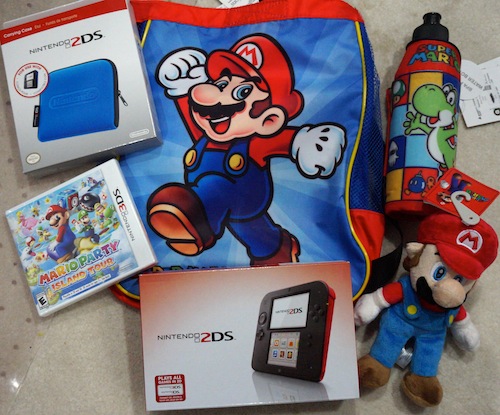
DS2 Prize Pack Giveaway
There is going to be one lucky winner of this DS2 gift package that includes
Enter the giveaway at Mom and More
Giveaway ends 12/23/13
Spicy Sausage Dip
This would be a great dish to bring to that next get together holiday party. It would also be great to serve along with Christmas breakfast buffet. Yummy I found this recipe while doing a bit of blog hopping on the blog Cassie Craves. As always trying to bring you the best I find
Spicy Sausage Dipsource: Annie's Eats
1 pound spicy/zesty sausage
1 15-ounce can diced tomatoes with green chiles, undrained
2 8-ounce packages cream cheese
Hot sauce, to taste
1. In a
large skillet over medium-high heat, cook the crumbled sausage until browned.
Drain off any excess fat.
2. Reduce the heat
to medium and mix in the tomatoes, cream cheese, and hot sauce. Continue to
cook, stirring frequently, until the mixture is warmed through and the
ingredients are well blended. Taste and adjust seasonings as necessary. Serve
warm.
Monday, December 9, 2013
Snowy Days
The schools are closed again tomorrow in our area. It seems the snow and ice have made it a winter wonderland for the children. My niece and nephew had a great time getting out and playing in the snow the other day. Simply take a look and see if you can find their smiles. Building memories :)
with all the fun they are having I truly would have only one wish and that is that we have a bit of the white stuff at Christmas
Sunday, December 8, 2013
Keeping Kitchen Cleaned During Holidays
The holidays makes it very hard to keep the house organized and looking good. One thing that I hate is having guest over and my kitchen not being tidy. Here
are some tips that may help you be prepared for guest with a clean
kitchen:
One of my dreaded jobs that seems like I do it more than my fair share is mopping the kitchen floor. I now can see why grandma would get so mad at us for spilling on the kitchen floor right after she got done mopping it.
How to Mop a Floor:
The best way to mop a floor is to start with the cleanest pallet possible so go ahead and sweep or vacuum that floor. Fill a bucket with hot water and add a small amount of cleaner to the water. Cleaners you can use include detergent, ammonia, or floor cleaner. The cleaner choice is up to you just read the directions on the container prior to using Now after the floor is clean and the water is ready it is time to start mopping the floor. First dip your mop into the bucket. Wring out the mop using your hands or if you have a mop that has a wringer you can use that as well. The best way to scrub (mop) is to go in a straight line if you are using a sponge mop or if you are using a rag mop then swirl the mop head in figure eight shapes. To remove hard stains you will have to apply pressure to the mop. Now that you have started mopping you will want to occasionally wring the pop out in the bucket One of the most important steps one that is not always possible for me is to let the floor dry before walking on it.
Tips to help while mopping the floor
1. Flip your mop over often to expose a clean side. If you use only one side you will have to rinse it more, wasting time.
2. Before you mop your floor be sure to vacuum or sweep it first. Remove soil when it is dry before it turns into sticky mud.
3. Use the correct amount of floor cleaner. If you try to be cheapo and use too little it will not work as quickly. if you use too much you will leave a residue on the floor making it get dirty quicker.
4. Make at least two passes over each area. On your first pass you will wet the floor with cleaner. Give the cleaner time to work and then remove the soil on your second pass.
5. Rinse your mop often to keep from spreading dirt around. If your floor is very soiled you may need to dump your mop water one or two times.
Well having shared this information with you I am off to mop my floor. Hope you all have a great day.
shared at
- One great idea to help keep the top of fridge from getting cluttered is to create a display on top of your fridge that takes up the entire space or placing a decorative item up there that does the same. I love vintage items so on top mine I have a beautiful old pitcher and glass set that I have spaced out to cover the top
- Were you aware that the top of your microwave works better if not covered with mic... items? Well it does. If you insist on items being on the microwave or they end up there somehow then one thing that you can do is place a pedestal bowl on top of the microwave as sort of a catch all. this allows the microwave to still breathe as well
- Organizing pantry space will not allow them to look neat but also help you put groceries away as often make it easier to find that ingredient when cooking. Separating items by use or variety are two great ways to set up your pantry.
- One idea to keep counter space clear is to attach appliances such as coffee pot, can opener, etc... on the under neath side of the cabinet
- One tip that I use all the time is to clean as you go. This takes less time because you have it all done as you cook and also makes kitchen look much better
- One pet peeve of mine is when we save leftovers but for one reason or another do not label them. The best thing to do with left overs is to label them with date, and what it is. Remember these items have shelf life as well.
One of my dreaded jobs that seems like I do it more than my fair share is mopping the kitchen floor. I now can see why grandma would get so mad at us for spilling on the kitchen floor right after she got done mopping it.
How to Mop a Floor:
The best way to mop a floor is to start with the cleanest pallet possible so go ahead and sweep or vacuum that floor. Fill a bucket with hot water and add a small amount of cleaner to the water. Cleaners you can use include detergent, ammonia, or floor cleaner. The cleaner choice is up to you just read the directions on the container prior to using Now after the floor is clean and the water is ready it is time to start mopping the floor. First dip your mop into the bucket. Wring out the mop using your hands or if you have a mop that has a wringer you can use that as well. The best way to scrub (mop) is to go in a straight line if you are using a sponge mop or if you are using a rag mop then swirl the mop head in figure eight shapes. To remove hard stains you will have to apply pressure to the mop. Now that you have started mopping you will want to occasionally wring the pop out in the bucket One of the most important steps one that is not always possible for me is to let the floor dry before walking on it.
Tips to help while mopping the floor
1. Flip your mop over often to expose a clean side. If you use only one side you will have to rinse it more, wasting time.
2. Before you mop your floor be sure to vacuum or sweep it first. Remove soil when it is dry before it turns into sticky mud.
3. Use the correct amount of floor cleaner. If you try to be cheapo and use too little it will not work as quickly. if you use too much you will leave a residue on the floor making it get dirty quicker.
4. Make at least two passes over each area. On your first pass you will wet the floor with cleaner. Give the cleaner time to work and then remove the soil on your second pass.
5. Rinse your mop often to keep from spreading dirt around. If your floor is very soiled you may need to dump your mop water one or two times.
Well having shared this information with you I am off to mop my floor. Hope you all have a great day.
shared at
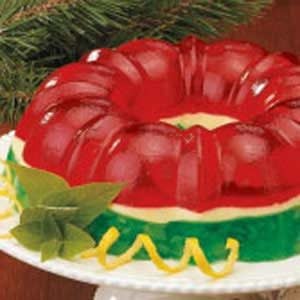
Christmas Jello Recipe
-
This recipe helped bring back awesome memories of my childhood Chrstmas' My mother loved recipes that included jello. This taste of home recipe would have been right there in the list of favorites I am sure
3 cups boiling water, divided
1 can (29 ounces) sliced pears, undrained
1 package (3 ounces) lemon gelatin
1 package (8 ounces) PHILADELPHIA® Cream Cheese, cubed and softened
1 package (3 ounces) lime gelatin
1 can (20 ounces) crushed pineapple
shared at

Saturday, December 7, 2013
Tiny Tim Christmas Cookies
These are a favorite at our house. My oldest sons name is Tim so of course he loves the fact that he has a famous character with his name. However he is not very tiny any more. Yet these little bites are. They are bite sized and colorful making them a favorite of ours
1 cup sugar, divided
2 to 3 drops red food coloring
2 to 3 drops green food coloring
1/2 cup butter, softened
1/2 cup shortening
1/4 cup confectioners' sugar
1 teaspoon almond extract
2-1/3 cups all-purpose flour
FROSTING:
2 cups confectioners' sugar
3 tablespoons butter, softened
4-1/2 teaspoons heavy whipping cream
3/4 teaspoon almond extract
Red and green food coloring, optional
In a small bowl, combine 1/2 cup sugar and red food coloring; set aside. In another small bowl, combine remaining sugar with green food coloring; set aside. In a large bowl, cream the butter, shortening and confectioners' sugar until light and fluffy. Beat in extract. Gradually add flour and mix well. Shape into 1/2-in. balls. Place 1 in. apart on ungreased baking sheets. Coat bottom of two glasses with cooking spray, then dip one in red sugar and the other in green sugar. Flatten cookies alternately with prepared glasses, redipping in sugar as needed. Bake at 375° for 8-10 minutes or until edges are lightly browned. Remove to wire racks to cool completely.
For frosting, in a small bowl, combine the confectioners' sugar, butter, cream and extract. If desired, tint half of the frosting red and the other half green. Frost the bottoms of half of the cookies; top with remaining cookies. Yield: 5 dozen.
source: Taste of Home
Cheesy Bacon Dip In Bread Bowl
So yummy can be served with soup or stew or shared at a party. Yummy!!! Enjoy a delicious tasty treat with a warm at home taste
1 Round Loaf (1 pound)
1 Package (8 ounces) Cream Cheese
1-1/2 cups Sour Cream
2 Cups shredded Cheddar Cheese
1 1/2 c. sour cream
1-1/2 tsp Worcestershire Sauce
3/4 Pound Bacon, cooked and crumbled
Assorted Crackers
Cut the top fourth off the loaf of bread. Hollow out bottom, leaving a 1-inch shell. Cut the removed bread into cubes to use with dip.In a bowl, beat the cream cheese. Add the sour cream, cheddar cheese and Worcestershire sauce. Stir in bacon. Spoon into bread shell. Wrap in a piece of heavy-duty foil. Bake at 325 for 1 hour or until heated through. (or microwave while still in bowl and spoon into bread). Serve with crackers and bread.
1 Round Loaf (1 pound)
1 Package (8 ounces) Cream Cheese
1-1/2 cups Sour Cream
2 Cups shredded Cheddar Cheese
1 1/2 c. sour cream
1-1/2 tsp Worcestershire Sauce
3/4 Pound Bacon, cooked and crumbled
Assorted Crackers
Cut the top fourth off the loaf of bread. Hollow out bottom, leaving a 1-inch shell. Cut the removed bread into cubes to use with dip.In a bowl, beat the cream cheese. Add the sour cream, cheddar cheese and Worcestershire sauce. Stir in bacon. Spoon into bread shell. Wrap in a piece of heavy-duty foil. Bake at 325 for 1 hour or until heated through. (or microwave while still in bowl and spoon into bread). Serve with crackers and bread.
Friday, December 6, 2013
If you are out there on the roads that are snow and ice covered my prayers are with you. Local county has considered the entire area to be dangerous and has ordered everyone not having to be out to not be on roads. I know that there are others that have no choice but be careful , take your time. I hate accidents this time of year so near the holidays
All The Snow Leads to Some Musical Thoughts
Today the weather hit, well actually it started yesterday afternoon but when we got up we could tell for sure that the weather was a bit different than the day before. In fact the whole world looked a bit different. The weather outside was frightful but it was a work day and I went to work. I wish I could have just sat at home and listened to this song
Getting stuck in the parking lot at work was not something that I much enjoyed but I must say all the snow does make for a beautiful sight. The Christmas lights just simply seem to glow in them and perhaps you to feel as if you are walking through a winter wonderland
But even with all the beauty we must all say a prayer for all those that are not so blessed to be in a warm place. Because baby its cold outside with all the snow on the ground
Taco Chip Dip
Every year there are a few places that we go that we need to take a dish to. We normally need an easy recipe due to our busy schedule. We also love to share something delicious with those that we love. This taco dip recipe adapted from allrecipes.com is always a pleaser.
(1) 8 ounce package cream cheese, softened
(1) 16 ounce container nonfat sour cream
1 package taco seasoning mix
Iceberg lettuce - rinsed, dried, and shredded
1 cup shredded Cheddar cheese
3 chopped tomatoes
1 green bell pepper, chopped
(1) 2.25 ounce can black olives, drained (optional)
Tortilla Chips
So good! I love taco dip and this was no exception. Serve it at a party and it will be gone in no time.
(1) 8 ounce package cream cheese, softened
(1) 16 ounce container nonfat sour cream
1 package taco seasoning mix
Iceberg lettuce - rinsed, dried, and shredded
1 cup shredded Cheddar cheese
3 chopped tomatoes
1 green bell pepper, chopped
(1) 2.25 ounce can black olives, drained (optional)
Tortilla Chips
So good! I love taco dip and this was no exception. Serve it at a party and it will be gone in no time.
Thursday, December 5, 2013
Tonight as the weather is cold and not so nice I begin to think of all the simple things that I am thankful for. I am thankful for a family that is loving and one that loves to talk so the conversation is always changing. I am thankful that we have a roof over our house and heat to keep us warm. Even though we like to sleep with the house just a bit cool I am thankful for blankets and a soft bed to lay. The meal that we prepare tonight I am thankful for as well, something warm to put in my belly and to know that the meal was bought on the super thrift using coupons at different times. I am thankful for the knowledge that I have learned through many different sources older women in the family, bloggers that have shared many awesome tips.
My prayer tonight is for all those that are not as blessed as myself. I pray that with all my heart that all stay warm and comfortable.
shared here
My prayer tonight is for all those that are not as blessed as myself. I pray that with all my heart that all stay warm and comfortable.
shared here
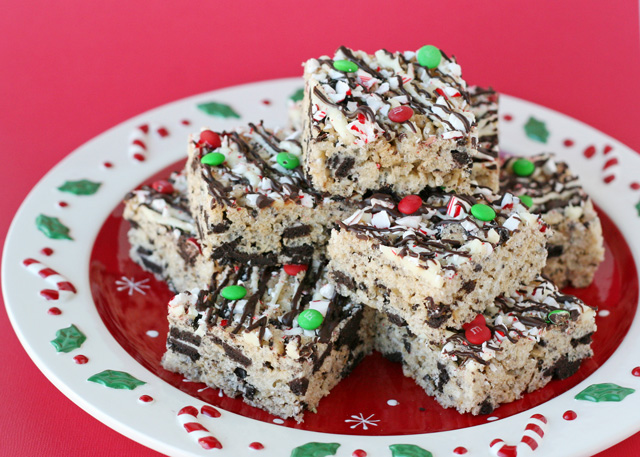
Peppermint Oreo Krispie Treats
This festive recipe brings together some delicious treats. Peppermints, oreos and rice krispie treat. Oh so yummy. They will be the hit of the party
Peppermint Oreo Krispie Treats
Yield: 24 squares (aproximately 2" square)
6 cups Rice Krispies cereal
20 Candy Cane Joe Joe's, or oreos, crushed/chopped (about 2 1/2 cups crushed)
6 cups mini marshmallows
4 Tablespoons Challenge butter
2 or 3 regular sized peppermint candy canes
2 oz. white chocolate
2 oz. semi-sweet chocolate
1/4 cup mini M&M's
20 Candy Cane Joe Joe's, or oreos, crushed/chopped (about 2 1/2 cups crushed)
6 cups mini marshmallows
4 Tablespoons Challenge butter
2 or 3 regular sized peppermint candy canes
2 oz. white chocolate
2 oz. semi-sweet chocolate
1/4 cup mini M&M's
Directions:
Directions-
In a large bowl, add cereal and crushed cookies. Mix to combine.
In another large, microwave safe bowl, add marshmallows and butter.
Microwave 2 1/2-3 minutes, or until the marshmallows are super fluffy, and melt together when stirred.
Stir together, until the marshmallows and butter are fully combined.
Pour melted marshmallows on top of the cereal and cookie mixture. Use a spatula that has been sprayed with cooking spray to quickly mix the marshmallow cream and cereal together. Stir until combined.
Quickly, pour/scoop the sticky mixture into a prepared 9"x13" pan. Spread the mixture around, and press down with spatula.
While the cereal treats cool, crush 2 or 3 candy canes in a small ziplock bag. Sprinkle crushed candy on top of krispie treats.
Melt the white chocolate by placing chocolate in a piping bag or heavy ziplock type bag, and microwave at 50% power until nearly melted. Kneed the bag a little in your hands (careful- it will be hot!) Snip off the end of bag and drizzle chocolate on krispie treats
Repeat as above with semi-sweet chocolate.
Top krispie treats with mini M&M's or festive sprinkles.
Allow chocolate to set before cutting into squares.
recipe source Glorious Treats
In a large bowl, add cereal and crushed cookies. Mix to combine.
In another large, microwave safe bowl, add marshmallows and butter.
Microwave 2 1/2-3 minutes, or until the marshmallows are super fluffy, and melt together when stirred.
Stir together, until the marshmallows and butter are fully combined.
Pour melted marshmallows on top of the cereal and cookie mixture. Use a spatula that has been sprayed with cooking spray to quickly mix the marshmallow cream and cereal together. Stir until combined.
Quickly, pour/scoop the sticky mixture into a prepared 9"x13" pan. Spread the mixture around, and press down with spatula.
While the cereal treats cool, crush 2 or 3 candy canes in a small ziplock bag. Sprinkle crushed candy on top of krispie treats.
Melt the white chocolate by placing chocolate in a piping bag or heavy ziplock type bag, and microwave at 50% power until nearly melted. Kneed the bag a little in your hands (careful- it will be hot!) Snip off the end of bag and drizzle chocolate on krispie treats
Repeat as above with semi-sweet chocolate.
Top krispie treats with mini M&M's or festive sprinkles.
Allow chocolate to set before cutting into squares.
recipe source Glorious Treats
Christmas Crunch Bark
1 package (24 ounces) vanilla -flavored almond bark, coarsely chopped (in the baking aisle of the supermarket)
¾ cup whole or slivered almonds, coarsely chopped
¾ cup sweetened dried cranberries, coarsely chopped
2 cups crisp rice cereal
1 Cup Christmas M&Ms
10 oz dark/semi sweet chocolate, melted for drizzling
Line a baking sheet with parchment paper, place into the freezer at least 1 hour.
Place almond bark into a double boiler bowl, heat and stir until melted, being sure NO water gets into the chocolate bark.
Heat a small frying pan and toast nuts at a medium low temperature until golden brown. Keep an eye on the nuts so they don’t burn. Just takes a few minutes, be sure to stir them.
Remove from heat and add cranberries to the pan. Stir until combined.
Stir cereal and half of the nut mixture into melted bark.
Pour bark mixture onto cold tray, spreading evenly. Immediately sprinkle with remaining nut mixture and M&Ms, press lightly onto surface of bark.
Drizzle with melted dark chocolate, let stand 7-10 minutes or until bark is set. You could also place in the fridge for a bit to set quicker.
Bring edges of parchment up over bark and break into various size pieces.
Yield: about 1 cookie tray full
Tips:
•You can use two packages (12 ounces each) premium white or chocolate-flavored confectionery coating candy wafers instead of the almond bark.
•When melting almond bark, make sure your bowl and utensils are completely dry. Even one drop of water will cause almond bark to harden and clump.
-Instead of a dark chocolate drizzle, you could also melt white chocolate and color it red or green with food coloring, festive for Christmas!
1 package (24 ounces) vanilla -flavored almond bark, coarsely chopped (in the baking aisle of the supermarket)
¾ cup whole or slivered almonds, coarsely chopped
¾ cup sweetened dried cranberries, coarsely chopped
2 cups crisp rice cereal
1 Cup Christmas M&Ms
10 oz dark/semi sweet chocolate, melted for drizzling
Line a baking sheet with parchment paper, place into the freezer at least 1 hour.
Place almond bark into a double boiler bowl, heat and stir until melted, being sure NO water gets into the chocolate bark.
Heat a small frying pan and toast nuts at a medium low temperature until golden brown. Keep an eye on the nuts so they don’t burn. Just takes a few minutes, be sure to stir them.
Remove from heat and add cranberries to the pan. Stir until combined.
Stir cereal and half of the nut mixture into melted bark.
Pour bark mixture onto cold tray, spreading evenly. Immediately sprinkle with remaining nut mixture and M&Ms, press lightly onto surface of bark.
Drizzle with melted dark chocolate, let stand 7-10 minutes or until bark is set. You could also place in the fridge for a bit to set quicker.
Bring edges of parchment up over bark and break into various size pieces.
Yield: about 1 cookie tray full
Tips:
•You can use two packages (12 ounces each) premium white or chocolate-flavored confectionery coating candy wafers instead of the almond bark.
•When melting almond bark, make sure your bowl and utensils are completely dry. Even one drop of water will cause almond bark to harden and clump.
-Instead of a dark chocolate drizzle, you could also melt white chocolate and color it red or green with food coloring, festive for Christmas!
Wednesday, December 4, 2013
Build A Snowman Without Getting Cold
Oh my it may be super cold where you are. There may be lots of snow or ice. Then again you may be in a warm tropical area (where I would love to be at times) and want to be a bit cooler. Whatever the case this snowman is super easy to build and the secret is something that many of us have our bathrooms.
This little snowman is made up of balls just like every other snowman but he is wearing lots of q-tips Check out this cute craft here
Tuesday, December 3, 2013
Fritter Day
Today is a day to celebrate that tasty treat the fritter. Fritters may be savory or sweet. Today though I am sharing my hub's favorite fritter the Apple Fritter
Apple Fritters Recipe:
1 heaping cup all purpose flour
1/3 cup sugar
1 tsp. baking powder
dash salt
1 - 2 tsp. cinnamon (depending on how much you love cinnamon)
1/4 tsp. nutmeg
1/2 tsp. vanilla
1 T. butter, melted
1 egg
1/3 cup milk + plus more if needed
1 - 1 1/2 cups chopped apple, your favorite kind for eating, peanut sized or smaller
oil for frying
milk and powdered sugar glaze for dipping or just powdered sugar for dusting
(About 1 cup pwd. sugar + 1 T. milk or more)
Mix all dry ingredients together, slowly add the wet ingredients minus the apple. Carefully mix until well combined but not overly beat,gently fold in apple pieces. The batter should be the consistency of a light cake mix. Once the oil is read (when a test drop of dough floats to the top of the oil) then using a cookie scooper or soup spoon, place a few balls of dough into the oil. Be careful not to overcrowd and watch carefully for the underside to turn golden brown, then gently flip over and continue frying until done. I cooked mine about 45 seconds per side, but they were the size of golf balls - adjust cooking times based on size of fritters and temperature of your oil. It is always a good idea to test one to ensure it comes out like you are expecting.
shared at
What We Accomplished Wednesday
Whats' It Wednesday
Apple Fritters Recipe:
1 heaping cup all purpose flour
1/3 cup sugar
1 tsp. baking powder
dash salt
1 - 2 tsp. cinnamon (depending on how much you love cinnamon)
1/4 tsp. nutmeg
1/2 tsp. vanilla
1 T. butter, melted
1 egg
1/3 cup milk + plus more if needed
1 - 1 1/2 cups chopped apple, your favorite kind for eating, peanut sized or smaller
oil for frying
milk and powdered sugar glaze for dipping or just powdered sugar for dusting
(About 1 cup pwd. sugar + 1 T. milk or more)
Mix all dry ingredients together, slowly add the wet ingredients minus the apple. Carefully mix until well combined but not overly beat,gently fold in apple pieces. The batter should be the consistency of a light cake mix. Once the oil is read (when a test drop of dough floats to the top of the oil) then using a cookie scooper or soup spoon, place a few balls of dough into the oil. Be careful not to overcrowd and watch carefully for the underside to turn golden brown, then gently flip over and continue frying until done. I cooked mine about 45 seconds per side, but they were the size of golf balls - adjust cooking times based on size of fritters and temperature of your oil. It is always a good idea to test one to ensure it comes out like you are expecting.
shared at
What We Accomplished Wednesday
Whats' It Wednesday
National Roof Over Your Head Day
National Roof Over Your Head Day is celebrated every December 3. Today is also give back day in many areas. What is more special during the holidays than the day to celebrate what we have and to give to those that are less fortunate. While many of us will be sitting in our comfy home when reading this post there are many that are less fortunate. Think about getting out there and doing for others and if not able to do that then how about those local charities that could use a boost financially or from volunteer work. NO better time to get started than now.
Happy National Roof Over Your Head Day!
Snowmen Treat
SnowMan Trail
Mix
•1 large container of black raisins (16 ounces)
•1 jar of peanuts (16 ounces)
•1 bag of natural almonds (16 ounces)
•1 bag of roasted soy nuts (16 ounces)
•1 bag of natural sunflower seeds (16 ounces)
•1 bag mini marshmallows (8 ounces)
•1 bag of mini chocolate chips (dark chocolate) or dark chocolate (at least 70% cocoa) bar broken into pieces (4-6 ounces)
Yield: 11+ cups
•Mix all of ingredients in a very large bowl.
•Measure into individual bags, cups or other containers
I located this recipe at http://parentingtweens.suite101.com/article.cfm/healthy_trail_mix_recipies_for_tweens#ixzz0dv6giPoU
Monday, December 2, 2013
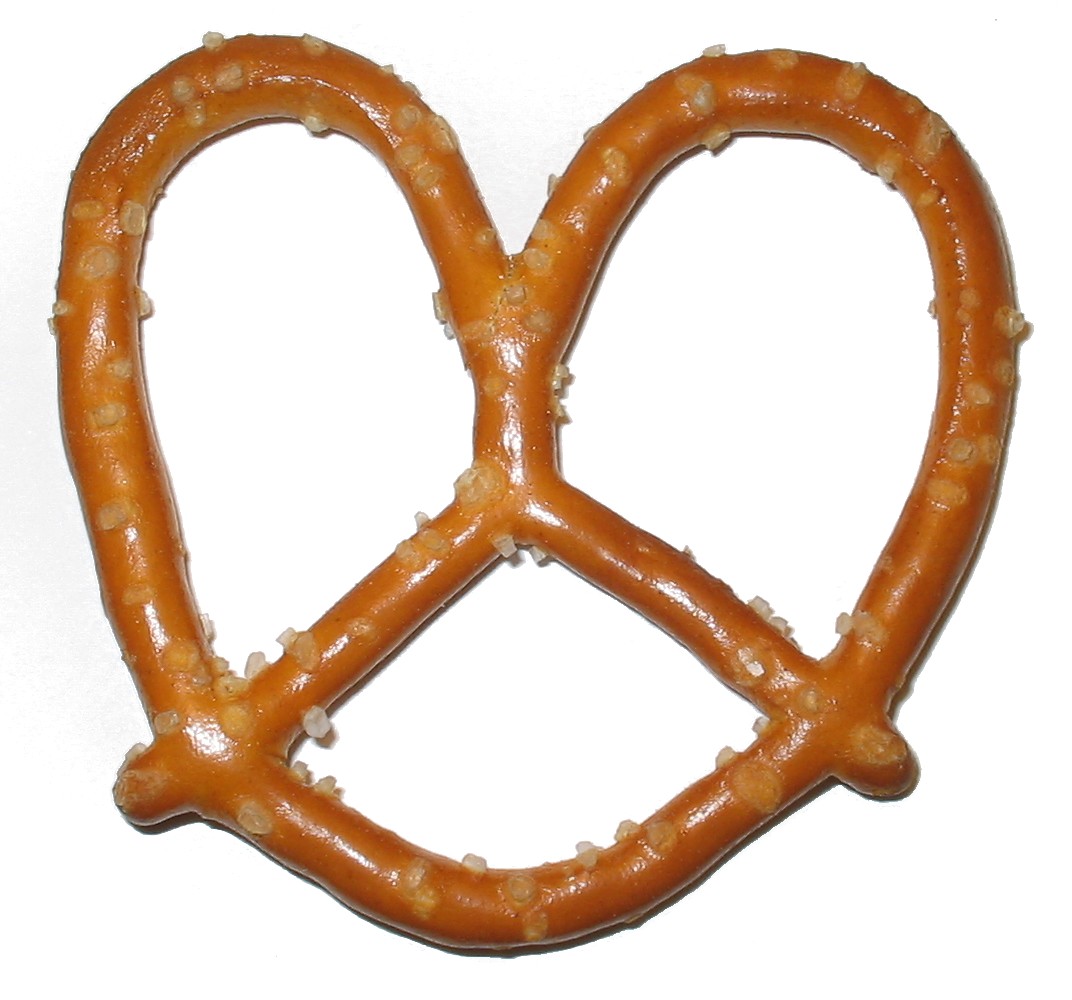
Peaceful Prayerful Pretzels
Did you know that there is a prayer in every pretzel??? The first pretzels were created in France in 610 A.D. Yes they have been around for many years. The pretzels would be given to children by priest as a learning tool. The pretzel would help teach them how to pray properly. You see each part of the pretzel symbolizes part of a prayer The twist in the pretzel represents the arms of children in prayer. Each of the three holes represents the father, son and holy ghost. So why not share a pretzel with those that you see this season and say a little prayer tor them as well.
Currently Our Top Recipe On Pinterest
Don't miss out on it.... Our top recipe on Pinterest.... A delicious Christmas Recipe that looks great as well.
Colorful Christmas Slice and Bake Cookies
Subscribe to:
Posts (Atom)