Custom Search

Saturday, December 21, 2013

Busy Day Crockpot Meal


If you find yourself busy during the holidays and there seems no time to cook a great meal then you may want to try this easy to prepare and fix meal. It simply cooks in the crockpot and takes up little time. Perfect for that busy day.


Great for Busy Days : Crockpot Meal

Love this recipe that I just located. It is perfect for those nights where one is busy during the daytime and wants to enjoy a great meal before heading out for some fun in the evening
So Yummy!!!
  
Complete Steak Dinner in CrockPot

Use a thick 3/4 inch steak
Pour a 1/2 cup A1 or Heinz 57 sauce over meat
cover with a layer of foil
add foil wrapped potatoes
... and foil wrapped frozen corn cobs
cook on low for 6 hours
Full steak dinner any night of the week! This can also be done with thick pork chops or chicken breasts and BBQ sauce. The whole meal cooks in the slow cooker.


shared at
funky junk interiors
super Saturday
Be Different Act Normal
 
Too Much Time On My Hands

Friday, December 20, 2013

GIfts From The Kitchen -

When I was a kid my mother did not have a lot of money but she always wanted to give those she fondly of something for Christmas. So she often used her talent in the kitchen to give all she knew included friends, family, those who served and taught us something sweet to eat. This recipe is a new one to me but I just wonder .... just wonder if it would not have wound up on the list to make for those she knew and loved.


1 1/4   cups cups Whole grain pastry flour, divided
1   tsp. Brown sugar
1/2   cup Chopped walnuts, divided
1/2   tsp. Baking soda
1   tsp. Baking powder
3/4   cup Sugar
1/2   cup Dried cranberries and/or apricots, chopped
1   Egg
2   ripe Chiquita Bananas, peeled
1/4   cup Greek non-fat plain yogurt
1/2   cup Applesauce     

Preheat oven to 350 degrees F. Spray a loaf pan with nonstick baking spray or line with nonstick foil; set aside. Place 1 tsp. of the flour in a small bowl and stir in brown sugar; stir in 2 Tbsp. of the walnuts and reserve for topping. In a large bowl combine remaining flour, remaining walnuts, baking powder, baking soda and sugar; set aside. Beat the egg in a medium bowl. Peel the bananas and gently mash into the egg. Stir in the yogurt and applesauce, then fold in the dried fruit. Pour the fruit mixture into the dry ingredients and stir until moistened. Place the batter into the prepared loaf pan and sprinkle with the reserved topping. Bake in the center of the oven for about 40 to 45 minutes. A toothpick inserted in the center of the loaf will come out clean when done. Remove from oven and cool before slicing. To store wrap tightly in foil or plastic wrap.
 
recipe source here

Adult Treats : Boozy Chocolates

Holidays are made better with children in my opinion. There is always a need of adult time as well. These little bites will offer you the treat that you are looking for during adult time.
 
 
Parchment paper
3/4 cup sugar
1/4 cup water
1 tablespoon fresh lemon juice
1/3 cup heavy cream
2 tablespoons butter
2 (14-oz.) cans sweetened condensed milk
2 (12-oz.) packages semisweet chocolate morsels
1/4 cup dark rum
2 1/2 tablespoons butter
1/4 teaspoon table salt
Wax paper

Line a 9-inch square pan with parchment paper; grease paper. Bring sugar, water, and lemon juice to a boil in a small saucepan over medium-high heat. Boil 8 to 10 minutes or until sugar begins to brown. (Do not stir.) Stir in cream and 2 Tbsp. butter; remove from heat. Let stand, stirring constantly, until no longer bubbling. Microwave sweetened condensed milk and semisweet chocolate morsels in a large microwave-safe bowl at HIGH 3 minutes, stirring at 1-minute intervals. Stir in rum, 2 1/2 Tbsp. butter, and salt. Immediately pour into prepared pan. Immediately pour caramel over chocolate mixture; gently swirl with a knife. Chill 2 to 4 hours. Cut into pieces; wrap in wax paper. Store in refrigerator up to 1 week. Let stand at room temperature 15 minutes before serving.

recipe source here

Hamburger Pie

Hamburger Pie Casserole


One of the earliest recipes I shared on my blog several years ago is one of my families favorites. This casserole is so easy and tasty to make.

Hamburger Pie Casserole
1 lb hamburger or sausage
1 can corn
2 c cheese
2 c instant potatoes

Brown hamburger Drain and then layer in order given Bake 400 degrees for 20 minutes It is so good

shared at
Be Inspired This Christmas
Frugal Friday
Romantic Home
Home Sweet Home


Thursday, December 19, 2013

Caramel Pretzel Blondies


1 cup all-purpose flour
1 teaspoon baking powder
1/2 teaspoon salt
8 tablespoons (1 stick) unsalted butter
1 cup firmly packed light brown sugar
1 large egg
1 teaspoon vanilla extract
1/2 cup unsalted dry-roasted peanuts
1/2 cup pretzels, chopped (20 small pretzel twists)
1/4 cup jarred dulce de leche

 Preheat oven to 350ºF. Line an 8-inch square baking pan with heavy-duty aluminum foil, leaving a 1-inch overhang on at least 2 sides. Mist with cooking spray. In a small bowl, whisk flour, baking powder and salt. Melt butter in a medium saucepan over low heat. Remove from heat and whisk in brown sugar until no lumps remain. Whisk in egg and vanilla. Stir in flour mixture until just incorporated. Stir in peanuts and pretzels. Pour batter into baking pan and smooth with a spatula. Drop spoonfuls of dulce de leche on top; swirl decoratively with a knife. Bake blondies until lightly browned and a toothpick inserted into a solid part comes out clean, about 30 minutes. Let cool fully in pan on a wire rack.  Grasping overhanging foil on either side of pan, lift out blondies and place on a cutting board. Carefully peel off foil before cutting into 16 squares. Serve.

 
shared at
 
52 Mantels
How I Found My Style
Rooted In Thyme


Recently I shared a recipe that our family loves. Pickle rolls are often served at parties that we host
They are always a big hit. You can find the recipe on our blog. If you want an easier recipe with all the same great taste then you may want to check out this recipe for Pickle roll dip


16 oz cream cheese, softened
12 oz deli sliced ham, chopped
16 oz baby dill pickles, drained and diced
ritz crackers

In a large mixing bowl, combine cream cheese, chopped ham, and diced pickles; mix well. Place mixture in the refrigerator for 1 hour, before serving. Serve


shared at Feathered Nest Friday
Jennifer Rizzo
weekend linky party

Tuesday, December 17, 2013

Grandpa Waltons Christmas Wish


I loved the Waltons as I was growing up. I have a sister named after two of the characters Erin Elizabeth. You see my mother loved the show as well. As I listen to Grandpas Christmas wish I begin to think of all the past Christmas memories of those I spent with my own parents and grandparents as well as those that I spend with my children and grandchildren. I look forward to those that are still to come and know that even though the members of the family may change the memories will always be there. I hope you listen to his wish and do some thinking of your own.

Buckeye Bark Recipe

Do you love those little balls of peanut butter and chocolate they call buckeyes? Well me to. The only problem is trying to find enough time to get it all done. The presents wrapped, the tree and house decorated, and all the goodies baked. That's why when I see an opportunity to save some time I take it. With this Buckeye bark the same chocolate peanut butter taste is present with out all the time it takes to roll up all those little balls


Buckeye bark recipe

Yields 9 x 13-inch pan


1 stick unsalted butter
1 pound creamy peanut butter
2 cups powdered sugar
2 pounds semisweet morsels or chocolate candy coating

Line a 9 x 13-inch pan with parchment paper and set aside until ready to use. Melt butter and add to a bowl of an electric stand mixer. Add in peanut butter and mix to combine. Slowly incorporate powdered sugar until everything is combined and you get a thick peanut butter mixture. It will remind you of really soft fudge and should hold together if rolled into a ball. Melt 1-1/2 pounds of chocolate and spread into the bottom of the parchment-lined pan. Let cool and harden and then press peanut butter butter mixture evenly on top of the chocolate. Melt remaining chocolate, spread onto peanut butter, let harden, then cut into squares and enjoy!


recipe source here

Monday, December 16, 2013

Breakfast Ideas

 
With the winter weather here and the holiday breaks many of us will be preparing more breakfast than we normally do. We all want to please our families but there may be times that we just want something different. For those times here are a few tasty recipes.


Denver Style Breakfast Burritos
 
8 eggs
1 tub (10 oz.) PHILADELPHIA Original Cooking Creme, divided
1/2 cupeach chopped green peppers and onions
1 cup chopped OSCAR MAYER CARVING BOARD Slow Cooked Ham
8 flour tortillas (6 inch), warmed


WHISK eggs and 1/2 cup cooking creme until well blended; set aside.
COOK and stir vegetables and ham in large skillet sprayed with cooking spray on medium heat 2 to 3 min. or until vegetables are crisp-tender. Add egg mixture; cook 3 min. or until set, stirring occasionally.
SPREAD tortillas with remaining cooking creme; top with egg mixture. Fold in opposite sides of each tortilla, then roll up, burrito-style


recipe source Kraft


Spread a banana with peanut butter, slice into bite size pieces, roll in rice krispie cereal (cocoa krispies would be great too!)
 
recipe source Mommy Im Hungry


uncommondesignsonline.com

2 Red Hens and Tortle Giveaway ------ Giveaway Over Winner Selected

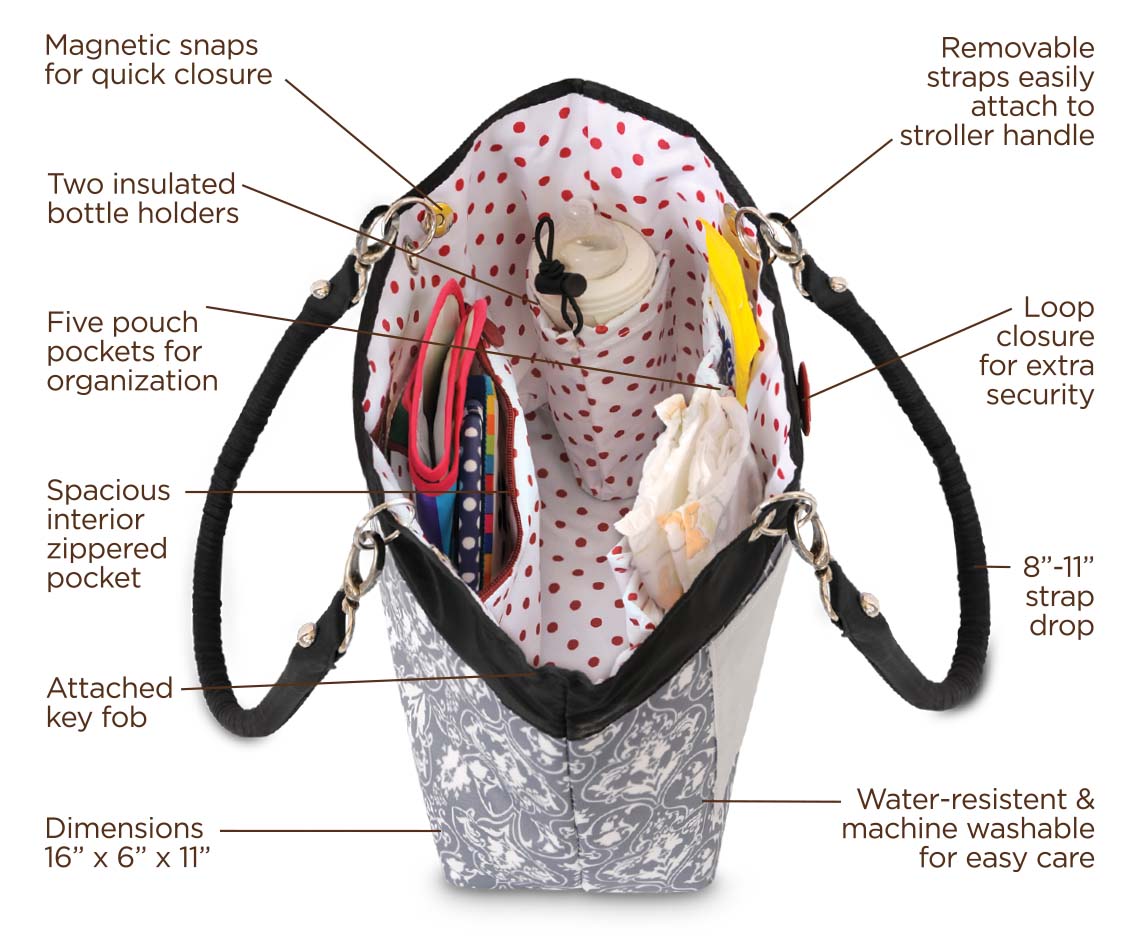
I have a few friends that are expecting little blessings to be born soon. To me life is made even more when you have a little one in the picture.  As I have been looking for the perfect new baby gifts I have fallen in love with products that are perfect for the baby and mama to. Take for example diaper bags and the room and organization that they give mama for all the baby needs. One great place to find diaperbags such as these is 2 Red Hens.


The Mama Hen behind 2 Red Hens Studio is Lori Holliday. Lori has a style that combines modern day renaissance gal with a knack of fashion and the love of domesticity. As a young girl Lori grew up with the love of a huge family on a large farm in rural Arizona. Her days were filled with playing school,  drawing pictures making sure to use all the colors and organizing the house. She learened at an early age how to organize, make needs list and make do with what you have. She incorporates these ideas using her design with 2 Red Hens to offer beauty to mom and baby alike. Designing products that are not only pretty but functional and make life a bit easier. Moms have so much to focus on if the bag she carries can help make life a bit easier how wonderful is that.
 
 
The bags are designed to look fashionable and the inside is even nicer
 
 
Zipper pocket, bottle holder & 2 elastic pockets
Removable stroller straps- Easy to hook on any stroller handle
Attached key fob
 Magnetic snap & button for extra security
Water-resistant backing - Easy to wipe clean
PLUS- Extra-long polka-dot changing pad (26” x 12.5”) included


Another awesome product that I shared in the prior post is the Tortle. After having a child with flat head syndrome I so appreciate the advantage that the Tortle offers new parents. To celebrate the fact that the Tortle is now available at Target.com we have been allowed the chance to offer our readers a giveaway where a lucky winner will receive a Tortle beanie and a diaper bag from 2 Red Hens.


Giveaway: 2 Red Hens diaper bag and Tortle
 
Giveaway ends : December 30, 2013
 
To enter giveaway visit 2 Red Hens and let us know something else that gains your attention
 
Extra Entries:
  • follow me on twitter @shopannies
  • follow @TortlebyDrJane on twitter
  • follow @2redhensstudio
  •   Tweet : @TortlesbyDrJane Helping Prevent Flat Head Syndrome & @2redhenstudio Diaper Bag from @shopannies http://t.co/APGb5Ugwg9 leave link in comment (may do 2 times daily)
  • friend me on facebook
  • like my fanpage on facebook
  •  like 2 Red Hens Studio on facebook
  • like Tortle by Dr. Jane on facebook
  •  share this giveaway on facebook leave link in comment
  • like me on pinterest leave user name in comment

  • Good Luck remember to include your email in comment so that I can contact you if you are the lucky winner


    Tortle Review


    Flat Head Syndrome (Plagiocephaly) is a condition that occurs when infants spend long periods of time laying on the back of their heads or in a favored position and a flat spot develops. Infants can spend up to 16 hours laying on their backs when traveling in car seats, in swings, in bouncers and strollers. Some babies may be born with Plagiocephaly because of restricted in utero positioning, during the birth process or from extended stays in a neonatal intensive care unit. In 1994, the American Academy of Pediatrics began the “Back to Sleep” program to reduce the risk of SIDS (Sudden Infant Death Syndrome) an unexpected result of this program is the epidemic rise in Flat head Syndrome.


    As a young mother I tried the best that I could to do al that I could for my new baby. The one thing that I did not know about but now I am very aware of is flat head syndrome. The doctor diagnosed my baby with flat head syndrome on my oldest daughter. The back of her head then as it is now was flat as if there was no groove at all. Tortle is trying to make all aware of flat head syndrome and do something about it. Tortle Products, LLC, manufacturer of Tortle, the lightweight knit beanie that helps prevent and treat Flathead Syndrome


    Tortle will now be available at Target.com .
    Target.com will carry three Tortle designs; Blue Elephant, Pink Flowers and Solid White.  The Tortle beanies are available in medium and large sizes at a suggested retail price of $19.99.
     
    The Tortle developed by Dr. Jane Scott, a Board Certified Pediatrician and Neonatologist  is recognized as an expert in the areas of Plagiocephaly and Torticollis Dr. Scott has counseled and educated hundreds of parents in her nearly 30 years of a practicing physician. She offers parents ways to prevent and treat the many problems associated with Flathead Syndrome an epidemic affecting the babies across the world.
     
    The Tortle beanie is an FDA cleared patented class 1 medical device that promotes proper head and neck movement which is essential for appropriate development. Tortle works by gently deflecting a babys head from side to side when they are sitting or lying on the back of their head. The American Academy of Pediatrics recommends regular head repositioning of babies younger than six months.
     
     
    “Every baby is at risk of developing Flat Head Syndrome with one out of two babies being diagnosed with the Syndrome,” said Dr. Jane Scott.  “Through Target.com we will have an opportunity to further increase awareness of Flat Head Syndrome and the ease in which it can be prevented or treated.”
     
    The incidence of Plagiocephaly and Torticollis (or Flathead syndrome) has increased to epidemic proportions since 1992 with more than a million babies being diagnosed with the condition each year in the U.S. alone.  This is due to their lack of movement and the amount of time infants spend on their back (the safest place for them to be).  If left untreated, there can be long-standing problems.  Treatment is frequently expensive and can be somewhat uncomfortable for a baby.  Plagiocephaly and Torticollis are almost 100% preventable with repositioning and Tortle makes this safe and easy.  It is recommended that all newborns wear a Tortle for the first 6 months of life to support healthy development.
     
    Tortle was founded by Dr. Jane Scott in 2012 and is located in Denver Colorado. The stylish knit beanie prevents and treats Flat head Syndrome a condition most prevalent in babies 0 to 6 months of age. Every baby is at risk for developing Flat Head Syndrome with one out of two babies being diagnosed with the syndrome. Tortle is available in a variety of colors and designs and retails around $19.99  For more information visit www.tortle.com.
     

    Sunday, December 15, 2013

    Snack Idea : Santas Hats (easy recipe)


    1 bag of regular or caramel Bugles (typically near the ChexMix at the store)
    Red candy melts (the kind you usually use for cake pops)
    1 tablespoon shortening
    Mini marshmallows (just a handful is enough)
    White nonpareil sprinkles

    Melt the candy melts and shortening together in 30 second intervals in your microwave until melted. As soon as everything is melted, start dipping the Bugles into the chocolate, letting the excess chocolate drip off. Let them set up until firm on parchment or wax paper. When the Bugles are set, remelt the red chocolate if necessary and dip just the bottom of the Bugles into the white sprinkles. Then flip the Bugle over and dip the top in red chocolate and firmly press a mini marshmallow on top. Let set again on the parchment or wax paper

    Gum Drop Christmas


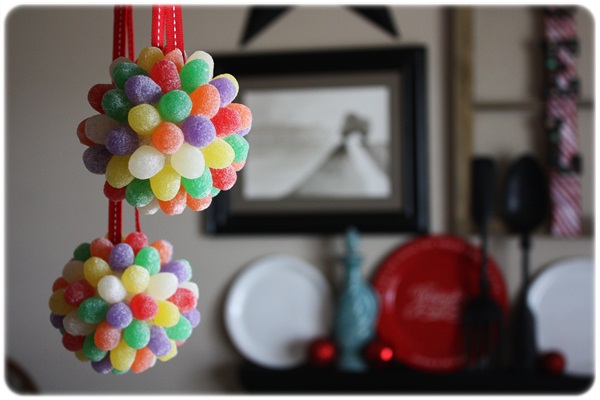
    I have long associated gumdrops with Christmas. My mother had a gumdrop tree that was considered very special. Yes that gumdrop tree held gumdrops that you got when and if you were well behaved. So to celebrate that gumdrop tree I wanted to share a few ideas of how to use gumdrops during the holidays.
     
     
    Gum Drop Cookies


    2 cups firmly packed brown sugar
    4 eggs, separated
    2 cups all-purpose flour
    1/4 teaspoon salt
    1 teaspoon ground cinnamon
    2 tablespoons water
    1 cup assorted miniature, colored gumdrops, chopped
    1 cup chopped pecans
    2 cups sifted powdered sugar
    1/4 cup butter or margarine, melted
    2 teaspoons grated orange rind
    1/4 cup orange juice

    Combine brown sugar and egg yolks in a large mixing bowl; beat until well blended. Sift together flour, salt, and cinnamon in a small mixing bowl. Gradually add two-thirds of flour mixture to creamed mixture alternately with water, beginning and ending with flour mixture. Stir well after each addition. Add chopped gumdrops and pecans to remaining flour mixture; stir to coat well, and set aside. Beat egg whites (at room temperature) in a small mixing bowl until stiff peaks form. Fold into batter alternately with reserved gumdrop mixture. Spread mixture evenly in a greased 15- x 10- x 1-inch jellyroll pan. Bake at 350° for 20 minutes or until a wooden pick inserted in center comes out clean. Set aside to cool in pan. Combine remaining ingredients in a small mixing bowl; beat until well blended. Spread evenly over cookies in pan. Allow glaze to set before cutting into 3- x 1-inch bars.

    recipe source here

    Find out how to make this gumdrop ornament here

    Kid Trax Battery Operated RIde On Giveaway

    My grandson who will turn 3 real soon would have a ball with this. He would love his nana forever (like he don't all ready) This would be a great gift for me as well watching him have a ball with this great new toy.

    Giveaway: Kid Trax Battery Operated Ride On ($250 value)
    Blog : MommyPoppins
    URL to Giveaway  http://mommypoppins.com/family/ride-on-giveaway

    Banana Split Cookies

    Are you like me and wish a bit of summer was still here? The ice and snow after a while begins to look less pretty and more and more like a never ending cold spell. As we all know the truth is that the snow and ice will be replaced in a bit with some warm weather but for the next few months (what Princess refers to as "The Long Cold Winter") perhaps you could enjoy one of my favorite flavors of summer in a cookie


    1 (15.25 oz) funfetti cake mix
    1 box (3.4 oz) instant banana pudding
    1/2 cup vegetable oil
    2 eggs
    1/2 cup semi-sweet chocolate chips
    1/2 cup maraschino cherries, roughly chopped

    Preheat oven to 350F.
    In a bowl, mix together the cake mix, pudding mix, oil and eggs. Stir in the chocolate chips. Gently fold in the cherries.
    Form the dough into balls just larger than a walnut and place at least 2 inches apart on an ungreased baking sheet. Bake in the oven for about 10 minutes, or until set.

    Saturday, December 14, 2013

    Rocky Road Brownies


    Rocky Road Brownies are one of my mamas favorites. While not a big fan of chocolate these brownies come together and taste delicious

    1/2 cup (1/4 lb.) butter
    3 ounces unsweetened chocolate, chopped
    1 1/3 cups sugar
    2 large eggs
    1 teaspoon vanilla
    1/2 cup all-purpose flour
    1 cup miniature marshmallows
    1/2 cup chopped walnuts 

    In a 2- to 3-quart pan over low heat, frequently stir butter and chocolate until melted and smooth. Remove from heat and stir in sugar, eggs, vanilla, flour, and marshmallows until well blended.
    Spread batter evenly in a buttered and floured 8-inch square baking pan. Sprinkle top evenly with walnuts. Bake in a 350° oven until deep brown, 30 to 35 minutes. Run a knife between pan rim and brownie. Let cool in pan on a rack, about 1 hour. Cut into 9 or 16 squares. Notes: Nutritional analysis is per small brownie. Store brownies airtight for up to 2 days.

    recipe source: My Recipes

    Big Mac Ornament and Sauce Recipe


    One of my favorite ornaments thus far. Yes the big mac is for Christmas as well. Just don't let santa real near because he may just want a bite after his long night of traveling you know he has to be a bit hungry

    Big Mac Sauce:
    1/4 cup Miracle Whip
    1/4 cup mayonnaise
    2 tablespoons French dressing
    1/2 tablespoon sweet relish
    2 teaspoons dill pickle relish
    1 teaspoon sugar
    1 teaspoon onion, minced
    1 teaspoon white vinegar
    1 teaspoon ketchup                            
    1 pinch salt       
     
    Mix everything very well in a small container.  Microwave 25 seconds, and stir well again.  Cover, and refrigerate at least 1 hour before using (to allow all of the flavors to "meld").
     
    recipe source: here

    Friday, December 13, 2013

    Moravian Tea Cakes

    One thing that I like to do with my grandkids and when my own children were growing up was to introduce them to different taste around the world. These European based cookies are perfect for Christmas time. Enjoy


    1/2 cup butter, softened
    1 cup sugar
    3 eggs
    1 1/2 teaspoons vanilla extract
    1/2 teaspoon lemon extract
    3 cups all-purpose flour
    2 teaspoons baking powder
    1/2 teaspoon salt
    3/4 teaspoon ground nutmeg


    Cream butter in a large mixing bowl; gradually add sugar, beating well. Add eggs, one at a time, beating well after each addition. Stir in vanilla and lemon extract.
    Sift together flour, baking powder, salt, and nutmeg in a medium mixing bowl. Gradually add to creamed mixture, stirring well after each addition.
    Roll dough to 1/8-inch thickness on a heavily floured surface; cut dough with assorted cookie cutters. Place cookies 2 inches apart on lightly greased cookie sheets. Bake at 350° for 8 minutes. Remove from cookie sheets, and cool on wire racks.

    Bit of HIstory : Salute To The Purple Aces


    I was yet a young girl when this happened in history but was told by an older friend how terrible this was. Oh my the whole team gone in a flash. Members of the team
    Seniors:...
    Kevin Kingston, John Ed Washington and Marion Anthony “Tony” Winburn
    Juniors:
    Stephen Miller, Bryan Taylor
    Sophomores:
    Keith Moon
    Freshmen:
    Warren Alston, Ray Comandella, Mike Duff, Kraig Heckendorn, Michael Joyner, Barney Lewis, Greg Smith and Mark Siegel
    Coach and Administrators:
    Head Coach - Robert “Bobby” Watson
    UE Athletic Business Manager - Bob Hudson
    UE Comptroller - Charles Shike
    Sports Information Director - Gregory Knipping
    Radio announcer - Marvin “Marv” Bates
    Two weeks after the crash, the only member of the basketball team who was not on the DC-3 was killed after being hit by a drunk driver, leaving all of the members of the 1977 Purple Aces Basketball team dead

    Thursday, December 12, 2013


    Do you remember making home made cards when you were a child? I sure do they were so fun to make. This year why no take some extra time and put a little love into the Christmas cards and make them for your friends and family. This would be a great project for the whole family to do together. You can find some wonderful Christmas Card resources here

    Wednesday, December 11, 2013

    Appetier Idea : Meatballs


    Looking for a festive dish to serve? Guest coming over? Holiday party? We love meatballs while we normally make with grape jelly the cranberry flavor will make it very festive.

    Meatballs
    1 lb lean (at least 80%) ground beef   
    1/2  lb ground pork 
    1  medium onion, finely chopped (1/2 cup)    
    1/4 cup Progresso® plain bread crumbs    
    1/2  teaspoon ground mustard  
    1/2  teaspoon seasoned salt  
    1/8 teaspoon pepper     
    1  egg                                                  

    Sauce

    1 cup barbecue sauce          
    1/2 cup cranberry-orange sauce (from 9.2-oz jar)                
    1/2  teaspoon ground mustard         
    1/2   teaspoon ground ginger                    
    1/2   teaspoon salt               
    2  tablespoons chopped fresh parsley                        
                 
     Heat oven to 375°F. Spray 15x10x1-inch pan with cooking spray. In large bowl, mix all meatball ingredients. Shape into 1-inch meatballs. Place in pan. Bake 15 to 20 minutes or until no longer pink in center and juice is clear.   In 2- to 2 1/2-quart slow cooker, mix all sauce ingredients except parsley until well blended. Add meatballs.  Cover and cook on Low heat setting 2 to 3 hours or until thoroughly heated. Stir in parsley. Serve meatballs with cocktail forks or toothpicks. Meatballs will hold on Low heat setting up to 2 hours; stir occasionally.

    recipe source here

    shared at
    The Taylor House

    Christmas Guest


    Have you ever thought about those that you meet along the way? If you take the time and listen to this you may change your mind on how you treat those that come along your path

    Snowman Craft

    This is a great craft that in my opinion is suitable for school age children and teens.


    White Buttons - Use buttons with only 2 holes
    Ribbon
    Craft Foam
    Magnets or Pin backing
    Paint Brush
    Acrylic Paint
    Craft Glue
    Scissors


    Secure the two buttons together as if in a snowman shape. This may be easier done with a glue gun but tacky glue will work as well. Use the ribbon to create a scarf that covers where the buttons were glued together. Create a nose for the snowman out of orange construction paper so that it resembles a carrot nose. Create a hat for the snowman out of construction paper as well. This is where creativity comes in as all hats do not have to look alike. Using acrylic paint create a face for the snowman. Be creative and decorate the snowman the way you want it to look. Here in this house I am sure we would have a football snowman somehow as my son is a football fan

    shared here and at
    Making Home Base
    Sweet Haute
    The Inspiration Gallery
    The Brambelberry Cottage


    Treasure Hunt Thursday
    All Things Thursday Blog Hop

    We Got Mention

    The post where I shared my hubbys favorite fritter has earned mention at a fellow blog on the blog hop What WE Accomplished Wednesday. So very cool.

    Tuesday, December 10, 2013

    Christmas Decorations You Can Easily Make Yourself

    These super cute Christmas tree ornaments are easy to make. Simply use green felt, a cookie cutter, pencil and scissors trace the cutter pattern onto felt and cut out. Then to add the colorful beads you can either glue, sew or attach however you would like

    Tissue Paper Snowman face is so very fun. Use construction paper to create the snowmans feature and glue onto the paper. The top hat can be created using cardstock You can even have fun create a bonnet for the mrs. Snowman.

    shared at
    What We Accomplished Wednesday
    thank goodness its monday
    Sew it cook it craft it
    Inspire Me Wednesday 

    DS2 Prize Pack Giveaway


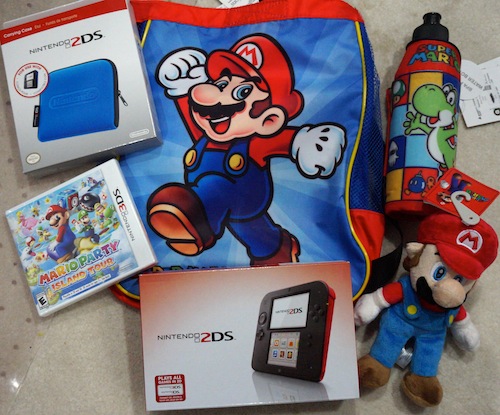
    There is going to be one lucky winner of this DS2 gift package that includes
  • Nintendo 2DS system
  • Mario Party: Island Tour
  • Nintendo 2DS travel case
  • A Mario plushie (fun “travel companion” for kids)
  • A branded Nintendo water bottle
  • Mini backpack

  • Enter the giveaway at Mom and More
    Giveaway ends 12/23/13


    Spicy Sausage Dip


    This would be a great dish to bring to that next get together holiday party. It would also be great to serve along with Christmas breakfast buffet. Yummy I found this recipe while doing a bit of blog hopping on the blog Cassie Craves. As always trying to bring you the best I find

    Spicy Sausage Dipsource: Annie's Eats
    1 pound spicy/zesty sausage
    1 15-ounce can diced tomatoes with green chiles, undrained
    2 8-ounce packages cream cheese
    Hot sauce, to taste

    1. In a large skillet over medium-high heat, cook the crumbled sausage until browned. Drain off any excess fat.

    2. Reduce the heat to medium and mix in the tomatoes, cream cheese, and hot sauce. Continue to cook, stirring frequently, until the mixture is warmed through and the ingredients are well blended. Taste and adjust seasonings as necessary. Serve warm.

    Monday, December 9, 2013

    Snowy Days


    The schools are closed again tomorrow in our area. It seems the snow and ice have made it a winter wonderland for the children. My niece and nephew had a great time getting out and playing in the snow the other day. Simply take a look and see if you can find their smiles. Building memories :)


    with all the fun they are having I truly would have only one wish and that is that we have a bit of the white stuff at Christmas

    Sunday, December 8, 2013

    Keeping Kitchen Cleaned During Holidays

    The holidays makes it very hard to keep the house organized and looking good. One thing that I hate is having guest over and my kitchen not being tidy. Here are some tips that may help you be prepared for guest with a clean kitchen:


    • One great idea to help keep the top of fridge from getting cluttered is to create a display on top of your fridge that takes up the entire space or placing a decorative item up there that does the same. I love vintage items so on top mine I have a beautiful old pitcher and glass set that I have spaced out to cover the top
    • Were you aware that the top of your microwave works better if not covered with mic... items? Well it does. If you insist on items being on the microwave or they end up there somehow then one thing that you can do is place a pedestal bowl on top of the microwave as sort of a catch all. this allows the microwave to still breathe as well
    • Organizing pantry space will not allow them to look neat but also help you put groceries away as often make it easier to find that ingredient when cooking. Separating items by use or variety are two great ways to set up your pantry.
    • One idea to keep counter space clear is to attach appliances such as coffee pot, can opener, etc... on the under neath side of the cabinet
    • One tip that I use all the time is to clean as you go. This takes less time because you have it all done as you cook and also makes kitchen look much better
    • One pet peeve of mine is when we save leftovers but for one reason or another do not label them. The best thing to do with left overs is to label them with date, and what it is. Remember these items have shelf life as well.
    I hope that these tips help you not only during the holidays but help to make life a bit easier. It seems to me that if my home is tidy I am happy. Do you have any tips to share would love to hear them please share in comments

    One of my dreaded jobs that seems like I do it more than my fair share is mopping the kitchen floor. I now can see why grandma would get so mad at us for spilling on the kitchen floor right after she got done mopping it.

    How to Mop a Floor:
    The best way to mop a floor is to start with the cleanest pallet possible so go ahead and sweep or vacuum that floor. Fill a bucket with hot water and add a small amount of cleaner to the water. Cleaners you can use include detergent, ammonia, or floor cleaner. The cleaner choice is up to you just read the directions on the container prior to using Now after the floor is clean and the water is ready it is time to start mopping the floor. First dip your mop into the bucket. Wring out the mop using your hands or if you have a mop that has a wringer you can use that as well. The best way to scrub (mop) is to go in a straight line if you are using a sponge mop or if you are using a rag mop then swirl the mop head in figure eight shapes. To remove hard stains you will have to apply pressure to the mop. Now that you have started mopping you will want to occasionally wring the pop out in the bucket One of the most important steps one that is not always possible for me is to let the floor dry before walking on it.

    Tips to help while mopping the floor
    1. Flip your mop over often to expose a clean side. If you use only one side you will have to rinse it more, wasting time.

    2. Before you mop your floor be sure to vacuum or sweep it first. Remove soil when it is dry before it turns into sticky mud.
    3. Use the correct amount of floor cleaner. If you try to be cheapo and use too little it will not work as quickly. if you use too much you will leave a residue on the floor making it get dirty quicker.
    4. Make at least two passes over each area. On your first pass you will wet the floor with cleaner. Give the cleaner time to work and then remove the soil on your second pass.
    5. Rinse your mop often to keep from spreading dirt around. If your floor is very soiled you may need to dump your mop water one or two times.

    Well having shared this information with you I am off to mop my floor. Hope you all have a great day.

    shared at
    party

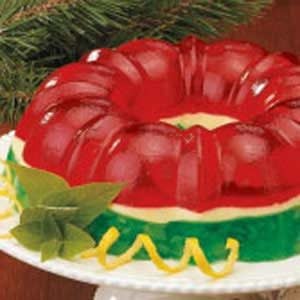
    Christmas Jello Recipe

      This recipe helped bring back awesome memories of my childhood Chrstmas' My mother loved recipes that included jello. This taste of home recipe would have been right there in the list of favorites I am sure


    1 package (3 ounces) cherry gelatin
    3 cups boiling water, divided
    1 can (29 ounces) sliced pears, undrained
    1 package (3 ounces) lemon gelatin
    1 package (8 ounces) PHILADELPHIA® Cream Cheese, cubed and softened
    1 package (3 ounces) lime gelatin
    1 can (20 ounces) crushed pineapple
    In a bowl, dissolve cherry gelatin in 1 cup boiling water. Drain pears, reserving 1 cup juice (discard remaining juice or save for another use). Stir pears and reserved juice into cherry gelatin. Pour into a 10-in. fluted tube pan or 3-qt. ring mold coated with cooking spray. Refrigerate until nearly set, about 1-1/4 hours. In a bowl, dissolve the lemon gelatin in 1 cup boiling water; refrigerate until slightly thickened. Beat in the cream cheese until blended. Pour over the cherry layer.  In another bowl, dissolve lime gelatin in remaining boiling water. Drain pineapple well, reserving juice. Add enough water to juice to measure 3/4 cup. Stir pineapple and reserved juice into lime gelatin; spoon over lemon layer. Refrigerate until firm. Unmold onto a serving plate. Yield: 12 servings.

    shared at