
Custom Search
Saturday, July 23, 2011
Sad News
Very Sad News!!! Amy Winehouse Dead at the young age of 27. SO very sad God bless her soul for this young gal was just a few years older than my oldest daughter and the same age as many of the girls that I work with.
Cook It On The Can Chicken

2 whole dried chiles, such as chipotle or New Mexico
2 tablespoons sugar
1 tablespoon salt
1 tablespoon ground cumin
1 tablespoon oregano
1 tablespoon ground cinnamon
1 3 1/2- to 4-pound whole chicken
1 12-ounce can of beer
In a blender, food processor, or spice grinder, combine the chilies, sugar, salt, and spices. Remove the neck and giblets from the chicken and discard. Rub the chicken inside and out with the spice rub. Cover with plastic wrap and refrigerate at least 4 hours or overnight. Light a charcoal grill and allow the coals to burn until covered with gray ash or heat a gas grill to medium. Drink half the beer; leave the other half in the can. Slide the chicken over the can and place in the center of the cooking grate, balancing the chicken on its two legs and the can, like a tripod. Cover grill. Grill about 1 1/4 hours or until an instant-read thermometer registers 170° F inserted in the breast and 180° F in the thigh, or until the juices run clear. Carefully remove the chicken and hot can from grill. Let the chicken rest 10 minutes before lifting it from the can.
recipe source: Real Simple
 Melt In Your Mouth Mingle Monday
Friday, July 22, 2011
Giveaways I entered

Aloha Friday

with the end of July all ready here it is sad to see that summer is quickly coming to an end. THis would be the time when I was a kid that I would give summer one more hand up just a bit more swimming, skateboarding or just hanging with friends.
My question this week is what is one thing that you loved to do when you were a child.
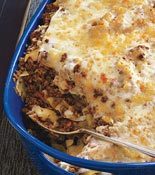
Lazy Bolognese-Style Lasagna
Salt and pepper
1 pound wavy lasagna noodles, broken into irregular pieces
2 tablespoons EVOO (extra-virgin olive oil)
1 1/2 pounds ground beef
1 onion, finely chopped
2 to 3 large cloves garlic, finely chopped
1 small carrot, finely chopped or grated
1 sprig rosemary, finely chopped
A sprinkle ground cloves
1/4 cup tomato paste
1 cup white wine
2 cups beef stock
3 tablespoons butter
2 rounded tablespoons flour
2 cups whole milk
Freshly grated nutmeg, to taste
Freshly grated parmigiano-reggiano cheese
Bring a large pot of water to a boil, salt it, add the pasta and cook until al dente.
In a dutch oven, heat the EVOO, 2 turns of the pan, over medium-high heat. Add the beef and brown well. Add the onion, garlic, carrot, rosemary, cloves and lots of salt and pepper and cook until tender, 7 to 8 minutes. Stir in the tomato paste for 1 minute, then stir in the wine for 1 minute. Stir in the stock and simmer for a few minutes longer.
Preheat the broiler and position a rack in the center of the oven. In a saucepan, melt the butter over medium heat. Whisk in the flour, then the milk, and let thicken enough to coat a spoon; season with salt, pepper and nutmeg.
Toss the pasta with the meat sauce and arrange in a casserole. Pour the béchamel sauce over the top in an even layer. Top with a layer of parmigiano-reggiano and broil in the oven to brown the top.
recipe source: rachael ray


 |
| http://wifeofasailor.com/ |
1. Do you eat raw cookie dough?
any chance I get however hubby is very food safety wise and gets on to me so I have to sneak it whenever possible
2. When you get online for the first time of the day… what site do you immediately head to?
well I have a game that I play, check email and then facebook
3. What was your favorite pet as a child and why?
cats we always had them mom loved them
4. If you had a snail that could magically grant wishes, what would you name it?
snailatious the snail
5. How many licks does it take to get to the center of a Tootsie Roll Pop?
one , two , threeee
Want to add some spice to your life My mom would always find great ways to stretch what we all ready had when I was growing up. Spices were a way to easily dress up a cheaper piece of meat. This mongolian beef recipe from My Recipes would have been a recipe she may have used.
 2 tablespoons lower-sodium soy sauce
1 teaspoon sugar
1 teaspoon cornstarch
2 teaspoons dry sherry
2 teaspoons hoisin sauce
1 teaspoon rice vinegar
1 teaspoon chile paste with garlic (such as sambal oelek)
1/4 teaspoon salt
2 teaspoons peanut oil
1 tablespoon minced peeled fresh ginger
1 tablespoon minced fresh garlic
1 pound sirloin steak, thinly sliced across the grain
16 medium green onions, cut into 2-inch pieces
Combine first 8 ingredients, stirring until smooth.
Heat peanut oil in a large nonstick skillet over medium-high heat. Add minced ginger, minced garlic, and beef; sauté for 2 minutes or until beef is browned. Add green onion pieces; sauté 30 seconds. Add soy sauce mixture; cook 1 minute or until thickened, stirring constantly.
Chocolate Peanut Butter Ice Cream Cake

4 cups rice cereal (such as Rice Krispies)
6 oz semisweet chocolate, chopped
3/4 cup creamy peanut butter (not natural)
3 pints chocolate chip or other ice cream
Place the cereal in a large bowl. In a small saucepan, combine the chocolate and peanut butter. Cook over low heat, stirring, until the chocolate melts and the mixture is smooth, about 2 minutes. Add the chocolate–peanut butter mixture to the cereal and mix to coat. Spread the cereal mixture onto the bottom and 1 1/2 in. up the sides of a 9-in. springform pan. Freeze until set, about 10 minutes. Let the ice cream soften at room temperature just until spreadable, about 10 minutes. Spread ice cream evenly into the chilled crust and freeze until firm, at least 4 hours and up to 2 days.
recipe source : womans day online


Corn Huskers Casserole

1 (14 1/2-oz.) can yellow or white hominy, drained and patted dry
2 cups frozen whole kernel corn, thawed and patted dry (one 10-oz. pkg)
8 ounces shredded sharp cheddar cheese (2 cups)
4 eggs, beaten
2 cups milk
2 tablespoon flour
1 clove garlic, minced
1/4 teaspoon salt
1/4 teaspoon ground red pepper
You May Also Like Huevos Rancheros See More Similar Recipes »
DIRECTIONS Preheat the oven to 350 degrees F. Combine hominy and corn in a greased 2-qt. souffle dish. Top with cheese.
In a medium bowl, whisk the eggs, milk, flour, garlic, salt, and ground red pepper together until combined. Pour milk mixture over the cheese. Bake for 50 to 55 minutes, or until a knife inserted off-center comes out clean. Let stand 10 minutes before serving.
Recipe Source: Cooking.com
shared on $5 Dinners , Mingle Monday It's A Blog Party


4 cups chocolate low-fat ice cream (such as Edy's), softened and divided
1 (6-ounce) reduced-fat graham cracker crust
1/4 cup fat-free chocolate syrup (such as Smucker's), divided
1/4 cup milk chocolate toffee bits, divided
2 cups fat-free frozen whipped topping, thawed
Spread 2 cups ice cream in bottom of crust; drizzle with 2 tablespoons chocolate syrup, and sprinkle with 2 tablespoons toffee bits. Spread remaining ice cream over toffee bits. Freeze 8 hours or until firm.
Top pie with whipped topping, and drizzle with remaining 2 tablespoons syrup; sprinkle with remaining 2 tablespoons toffee bits.
recipe source: My Recipes
Blueberry and Buttermilk Sherbert
2 cups fresh or frozen blueberries
1 cup granulated sugar
2 cups buttermilk
1 tsp. vanilla extract
Garnishes: fresh blueberries, lemon rind strips
Process blueberries in a blender until smooth, stopping to scrape down sides. Press blueberry puree through a fine wire-mesh strainer into a large bowl, discarding solids. Add sugar, buttermilk and vanilla extract to bowl, and stir until well blended. Pour blueberry mixture into freezer container of a 4-quart ice cream maker, and freeze according to manufacturer's instructions. Garnish and serve.
recipe source: My Daily Moment
Tasty Tuesday
Thursday, July 21, 2011
My blog was featured

My blog was featured along with many other great blogs at Confessions of a Stay At HOme Mom come check it out
Make This Year The Best
School year will soon start again and this year you can make it the best ever. There are a few things you can before school starts as well as during the school year that will make your life a bit easier. One is to set up a place where things belong like shoes, coats, books whatever is needed for school. This will not only help in the morning but also at the end of the day when you need to check to see what papers were brought home. In fact that is probably my second great idea is to set up a routine for morning as well as afternoon. Routines will help to make your life more organized
This tip has been shared while I am participating in a back to school event sponsored by Moms Blogger Club featuring Master Lock who also shares this advice
Master Lock can be found on facebook
This tip has been shared while I am participating in a back to school event sponsored by Moms Blogger Club featuring Master Lock who also shares this advice
Master Lock can be found on facebook
Hazelnut Raspberry Cake

•1 2/3 cups hazelnuts or filberts, toasted and cooled
•2 cups sugar
•1 cup all-purpose flour
•1 teaspoon baking powder
•1/2 pound (2 sticks) unsalted butter
•2 teaspoons pure vanilla extract
•12 large egg whites, at room temperature
For the raspberry buttercream:
•1 cup loosely packed fresh raspberries
•2 tablespoons raspberry liqueur
•2/3 cup plus 3 tablespoons sugar
•1/4 cup water
•3 large egg whites, at room temperature
•3/4 pound (3 sticks) unsalted butter, at room temperature
•1 1/3 cups seedless raspberry preserves, for filling
•2 cups fresh raspberries, for garnish
Position a rack in the center of your oven. Preheat the oven to 350 degrees F. Butter and flour two 9×2 inch cake pans. Line each pan with a 9-inch round of parchment paper.
Step 1: Toast the hazelnuts
Once your oven has reached 350 degrees F, spread the hazelnuts in a single layer on a cookie sheet. Bake for 10 to 12 minutes, or until lightly golden and you can smell them. Remove to a wire rack to cool.
Step 2: Make the cakes
In the bowl of a food processor fitted with a metal blade, combine the hazelnuts with 2/3 cup of the sugar and pulse grind until it is a coarse flour. Transfer the hazelnut flour to a large bowl. Add the all-purpose flour, an additional 2/3 cup of the sugar, and the baking powder, and whisk to combine.
Have ready a fine-meshed strainer. In a medium heavy-bottomed saucepan, brown the butter over medium heat. (The butter will melt first, and then the milk solids will settle to the bottom. After a little while, the milk solids will start to turn golden.) When the milk solids have reached a nutty brown color, immediately remove from the heat. Using the fine-meshed strainer, strain the butter into the flour mixture. Stir to combine. Discard the butter solids. Stir in the vanilla.
In the very clean bowl of an electric mixer fitted with a very clean whip attachment (make sure both are 100% DRY too), beat the egg whites on medium-high speed until they hold soft peaks. (Note: If there is even one speck of yolk in the whites they will not form soft peaks properly because the fats in the yolk will prevent the proteins in the whites from adhering to one another. To avoid this dilemma, I always separate my eggs into 3 bowls: one for the yolks, which will be frozen for later use; one for all the whites; and one for breaking the eggs. In this last bowl I separate the whites/eggs and make sure there is no yellow in the white before adding it to the other whites. I know this seems like a lot of work but I learned this trick from Alton Brown, and trust me, it works.) In a slow steady stream, with the mixer on medium speed, add the remaining 2/3 cup of the sugar. Increase the speed to high. Beat until there are firm – not dry – glossy peaks of meringue.
Using a rubber spatula, briskly fold one-third of the meringue into the bater to lighten it. Add the remaining meringue and gently fold in until just combined.
Divide the batter evenly between the prepared cake pans. Spin the pans or use an offset spatula to level the batter. Bake for 25 to 30 minutes, or until a wooden skewer inserted into the center comes out clean. Remove to a wire rack to cool in the pans for 20 minutes before turning the layers out onto the rack. Cool completely before filling or frosting.
The baked layers may be stored tightly wrapped at room temperature for 2 days. For longer storage, wrap tightly in plastic wrap and refrigerate for up to 5 days, or freeze wrapped in plastic wrap and then aluminum foil for up to 2 weeks. Do not unwrap before thawing.
Step 3: Make the buttercream
In a small bowl, combine the fresh raspberries with the raspberry liqueur. Set aside. In a small heavy-bottomed saucepan over medium-high heat, combine the 2/3 cup of sugar and the water and cook to 240 degrees F on a candy thermometer, about 7 minutes. Meanwhile, in the bowl of an electric mixer fitted with the whip attachment, beat the egg whites on high speed until they hold soft peaks. Slowly add the 3 tablespoons sugar and beat until there are medium stiff – but not dry – peaks of meringue.
When the sugar syrup reaches 240 degrees F, decrease the speed of the mixer to medium, and immediately but slowly pour the hot liquid sugar in a steady stream down the side of the bowl and into the meringue. (Or, if the syrup is not yet 240 degrees F when the meringue is ready, turn off the mixer until it is. Then turn on the mixer to medium and add the syrup.) Beat together until stiff glossy peaks form.
With the mixer on medium speed, add the butter in pieces to the meringue. The mixture will break, but just keep beating and it will come together beautifully. Pour the raspberries and the raspberry liquid into the buttercream and beat on medium-high speed until combined. If using the buttercream immediately, set aside at room temperature. If not, refrigerate in an airtight container for up to 2 weeks. If the buttercream has been chilled, let it reach room temperature before beating it with an electric mixer. The buttercream will break, but then it will come together again beautifully.
Step 4: Assemble the cake
Before you do anything, use a serrated knife to trim off any excess cake that has domed or risen up, and make your layers as flat and even as possible. Give the scraps to your kids or save them for something like trifle. To begin, cut 4 strips of wax or parchment paper about 12 inches by 3 inches wide. Place the bottom cake layer trimmed side up on your serving plate. Tuck the wax paper under the edges of your cake on all sides. Later, after frosting th cake, you can pull away the strips to reveal a nice clean serving plate. Using a metal offset spatula, spread the preserves across the top of the layer, but leave about 1/2 inch uncovered around the outside edges. (This leaves room for the filling to be squished down but stay inside the cake.) Place the second layer trimmed side down on top of the filling and press down gently with your hands.
You are going to frost your layer cake in two steps. The first step will be a crumb coat, which will keep most of the unsightly crumbs from ruining your finished frosting. To do this, simply apply a light, even layer of frosting on all sides of the cake. (Really, it doesn’t matter what it looks like; it will be underneath the final frosting.) Place the cake in the refrigerator to chill for a good 30 minutes.
After the crumb coat has chilled, smooth on your final layer of frosting. It does take a lot of time to get it really smooth and perfected, so I prefer to make the frosting all swirly and peaked – it looks more delicious this way as well.
If you must travel with your cake, finish it the night before, and refrigerate it overnight. Your layer cake will be a lot happier on the trip, and have the best odds of getting to the party in one piece.
Step 5: Garnish
After frosting the cake, garnish the top of the cake with the fresh raspberries. If you are making the cake a few days in advance, finish the cake to the point that it is frosted, but wait to buy the berries and put them on the cake until the day you will be serving. You want the fruit to be as fresh as possible.
Let the cake sit at room temperature for at least 1 hour before serving. This cake keeps very well in a cake saver at room temperature for 2 days. For longer storage, store in a cake saver in the refrigerator for up to 4 days. It should come to room temperature before serving.
recipe source: Baking & Books

Roasted Veggie Penne Bake

1 medium sweet red pepper, cut into 1-inch pieces
1/2 pound medium fresh mushrooms, halved
1 small onion, cut into 1-inch pieces
2 tablespoons olive oil
1-1/2 teaspoons Italian seasoning
2 cups uncooked penne pasta
1 can (15 ounces) crushed tomatoes, undrained
2 ounces provolone cheese, shredded
3/4 cup frozen peas, thawed
1/4 cup shredded part-skim mozzarella cheese
1/4 cup plus 2 tablespoons grated Parmesan cheese, divided
1/2 teaspoon salt
1/2 teaspoon pepper
1 tablespoon butter, cubed
Directions
In a large bowl, combine the zucchini, red pepper, mushrooms, onion, oil and Italian seasoning; toss to coat. Arrange in a single layer in an ungreased 15-in. x 10-in. x 1-in. baking pan. Bake, uncovered, at 425° for 20-25 minutes or until tender.
Meanwhile, cook pasta according to package directions; drain. In a large bowl, combine the pasta, roasted vegetables, tomatoes, provolone cheese, peas, mozzarella cheese, 1/4 cup Parmesan cheese, salt and pepper.
Transfer to a greased 11-in. x 7-in. baking dish. Sprinkle with remaining Parmesan cheese; dot with butter. Cover and bake at 350° for 10 minutes. Uncover; bake 10-15 minutes longer or until bubbly. Yield: 6 servings.
recipe source: taste of home

Dessert for Summer

2 pints blueberries, washed and sorted
2 pints strawberries, washed, hulled and cut into bite-sized pieces
Juice of 1 lemon plus 1 tablespoon of grated lemon rind
2/3 cup sugar, divided
2 teaspoons cornstarch
1 quart heavy cream
1/2 teaspoon almond extract
1 (11-ounce) jar lemon curd
1 pan Sister Schubert’s Blueberry Rolls, prepared per package directions
Combine berries in a large bowl; sprinkle with 1/3 cup sugar, lemon juice, lemon rind and cornstarch. Using a large saucepan over medium heat, simmer berry mixture until berries begin to soften and release juice, approximately 3 minutes. Set aside to cool. Using large bowl of mixer on high speed, whip cream with 1/3 cup sugar and almond extract until soft peaks form. Do not overbeat. Using a small bowl, combine a tablespoon of lemon curd with 2 tablespoons of whipped cream, stirring until well combined. Add remaining lemon curd and combine with whipped cream. Beat on high speed until somewhat stiffer peaks form and lemon curd is well combined. Remove Blueberry Rolls from pan and cut into 1-inch pieces.
To Assemble:
Spoon a layer of whipped cream filling into a large glass trifle bowl. Add a layer of Blueberry Rolls. Add a layer of berries with juice. Continue layering until you have used all of the roll pieces and berries with juice. Finish with a layer of filling. Cover tightly and refrigerate until ready to serve.
recipe source: Sister Schubert
Shared on
Ultimate Recipe Swap
grilling appetizer

Grilled red, green and/or yellow bell pepper strips
Keebler® Town House Toppers® Garlic & Herb crackers
Muenster cheese, thinly sliced
Halve pepper strips. Top KEEBLER TOWN HOUSE TOPPERS Garlic & Herb crackers with cheese and pepper pieces
recipe source : SnackPicks
Giveaways I Entered

Fun Frugal Craft Bubble Stamping
This is a fun frugal craft that anyone can do from the pre-schooler on up. Check it out while it is not actually done with bubbles it certianly does look like it may have been . I love crafts that are affordable and this one certianly is, are easy since I am not all that crafty of a person
 • Toilet paper roll(s)
• Tempera paint
• Paper plate or shallow dish
• Paper
Pour some paint into a paper plate or shallow dish. Your paint blob should be big enough to submerge the end of the TP roll. Dip your TP roll into the paint and you'll notice a 'bubble film' form on your roll. Stamp your "bubble" onto a sheet of paper and repeat. You'll need 1 TP roll for each color of paint (unless you want your colors to mix).
source: busy bee kids
Quick Strawberry Twinkie Cake

2 cups cold milk
1 (5 1/8 ounce) package vanilla instant pudding mix
1 (15 ounce) package Hostess Twinkies (cream filled sponge cakes)
4 cups fresh sliced strawberries
1 (8 ounce) carton frozen whipped topping, thawed
additional strawberry, halved for garnish
In a large bowl, whisk milk and pudding mix for 2 minutes; let stand for 2 minutes or until soft-set; set aside. Slice the Twinkies in half lengthwise; place filling side up in an ungreased 13x9x2 inch dish.
Spread the pudding over the top of the sliced twinkies. Arrange sliced strawberries over the pudding and then spread the whipped topping over the strawberries. Cover and refrigerate at least 1 hour before cutting.
Garnish with strawberry halves if desired. Refrigerate any leftovers.
recipe source Food.com


sharing sundays
Wednesday, July 20, 2011
Blog Hop

Lollipop Flowers
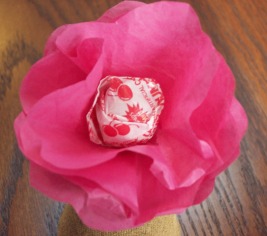
•One piece of tissue paper 16" square or four 4" square pieces of tissue paper
•Dum Dum lollipop
•Floral tape
Cut out four flower shapes from tissue paper and stack them on top of each other. Push the end of a lollipop stick through the center of the flower shapes going through all four layers of tissue. Slide the flowers all the way up the stick to the lollipop and adjust the flower petals so they look nice. Using floral tape, wrap the tape around the underside of the flower where the tissue and lollipop come together. Wrap the tape 2 or 3 times around this spot then continue to wrap the tape down the length of the stick and back up again ending with an additional two wraps around where you started. When using floral tape, you need to stretch it slightly as you wrap for it to adhere properly. At this point, you will still be able to adjust the inner three layers of tissue but do not try to move the layer with the tape on it as it will rip the tissue.
source: Craft Elf


Pork Chops With Melon Salsa

1 cup chopped seedless watermelon
1 cup chopped honeydew melon
3 tablespoons finely chopped sweet onion
1 tablespoon finely chopped jalapeño pepper
1 tablespoon chopped fresh cilantro
1 tablespoon fresh lime juice
1/8 teaspoon salt
Pork chops:
2 teaspoons canola oil
1 1/2 teaspoons chili powder
1/2 teaspoon garlic powder
1/2 teaspoon salt
1/4 teaspoon freshly ground black pepper
4 (4-ounce) boneless center-cut pork chops, trimmed
Cooking spray
To prepare salsa, combine the first 7 ingredients; set aside. To prepare pork chops, heat a grill pan over medium-high heat. Combine oil and next 4 ingredients (through black pepper) in a small bowl. Rub oil mixture over both sides of pork chops. Coat pan with cooking spray. Add pork to pan; cook 4 minutes on each side or until desired degree of doneness. Serve with salsa.
Recipe Source: My Recipes


Subscribe to:
Posts (Atom)