Custom Search

Thursday, July 30, 2015

Anywhere Labels giveaway ends 8/14

As parents we often have the fear of what if... We are protectors no matter what and as mothers if something happens then we become mama bear protecting our little cubs. Perhaps you were like me and tried to figure out the what ifs... before the scenario played out. One way that I protected my own children was with safety tats.

Safety tats have always been there just in case something happened. If your child got lost or perhaps you are in a large group and somehow you get separated from your child safety tat was there to help. How was it there to help because the information to get hold of you was on a tat that the child would wear. Awesome idea right, if you think so then you may just like the next idea I have to share.


Back to school season is here and that means children will be headed back to school with all their supplies. It also means that colleges are open and students will be packing up, leaving home and moving away to go to school. Yes, whichever level your child is at they will be taking supplies with them that we want them to take care of as if we were there. So to protect our items and help ensure that they will be returned if lost once again we turn to the same company that make safety tats. This time it is labels for our items or our children items. The new labels are called anywhere labels and can go anywhere that our children go. Just like safety tats the labels have a place to put information like a phone number to ensure that if item is lost the person finding it will know how to get it back to where it needs to go.


Be assured that these labels are different than others. First off they were made to be durable and are made out of a strong material. The labels can go an endless amount of places as they are dish washer safe, washing machine safe and stick well an any clean, dry solid surface. In addition to the labels are care tags that can be placed on surfaces that are not solid so that they can be labeled as well.


We reviewed the camp combo of anywhere labels. The kit contained 16 big and 26 small labels and 3 metal tags as well. One of annies home lucky readers will win a kit just like the one I was able to review. Want your chance to win?
 
To enter giveaway you must (this will be checked)
visit the anywhere labels website and let me know something that you find there of interest that I did not all ready share with you. 
 
Extra Entries:
subscribe to my blog annies home (located on the upper right hand corner)
 
subscribe to our sponsor safety tat ( 1/2 way down page on left side )
 
visit the safety tat facebook page and leave a message letting them know that you entered the giveaway here on annies home
 
like our facebook fan page (leave your facebook name in comment)
 
follow us on twitter  @shopannies (let us know in comment leave your twitter @ID as well)
 
Tweet about the giveaway leaving url in comment
 
comment on any of our facebook posts (leave url of where you commented in comments)
 
good luck thank you for entering our giveaway. As always email must be included in mandatory comment so that I can notify winner. Giveaway ends August 14th.

Delicious Southern Illinois Peaches and a bit of peach icecream


If you are in the mood for a juicy peach then head to southern Illinois. Here you will find orchards in spotted across the area. One of our favorites the Rendleman Orchards. Located in Union county Illinois the orchard sells both apples and peaches. The weather we have had this year is awesome for a great peach crop. The Rendleman family has been selling their farm goods for over 100 years. The delicious juicy peaches that can be found there are perfect to create into delicious recipes like peach ice cream.


1 1/3 lbs. ripe peaches (about 4 large peaches)
1/2 cup water
3/4 cup sugar
1/2 cup sour cream
1 cup heavy cream
1/4 teaspoon vanilla extract
a few drops freshly squeezed lemon juice
Peel the peaches, slice them in half, and remove the pits. Cut the peaches into chunks and cook them with the water in a medium, nonreactive saucepan over medium heat, covered, stirring once or twice until soft and cooked through, about 10 minutes. Remove from heat, stir in the sugar, then cool to room temperature. Puree the cooked peaches and any liquid in a blender or food processor with the sour cream, heavy cream, vanilla and lemon juice until almost smooth but slightly chunky. Chill the mixture thoroughly in the refrigerator (overnight is best) then freeze it in your ice cream maker according to manufacturer's instructions.

recipe source here

shared at
Creative Mondays
craftastic monday

Rustic Peach Crisp


Filling
  • 3 lg peaches (4-5 med) pitted and sliced
  • ¼ c. sugar (more if peaches are tart)
  • ¼ c. water
  • 1 tbs. corn starch
  • ½ tsp. fresh grated nutmeg (cinnamon?)
  • Topping
  • 1 stick (1/2 c.) butter melted
  • ¼ c. sugar
  • 1½ c. oatmeal (either quick or regular up to you)
  • ¼ c. flour

    1. Preheat oven to 380 degrees (less if using larger slices - see note) butter 9x7 baking dish.
    2. Slice peaches in half, remove pits and lay cut side down on board to slice to desired thickness. In mixing bowl add peaches, corn starch, sugar, water and nutmeg or cinnamon. (You can leave both these spices out if desired). Mix until coated and incorporated. Place mixture in bottom of baking dish and set aside.
    3. In mixing bowl add topping ingredients and mix by hand until crumbly and well incorporated together. Layer on top of peach mixture evenly.
    4. Place in preheated oven and bake about 45 minutes or until bubbly and browned on top. Take dish from oven and cool slightly on counter for about 1 hr before serving. Top with fresh whipped cream with just a hint of sugar in it or vanilla bean ice cream.
    recipe source here

    shared at
    happiness is homemade

    Wednesday, July 29, 2015

    Throwback Thursday


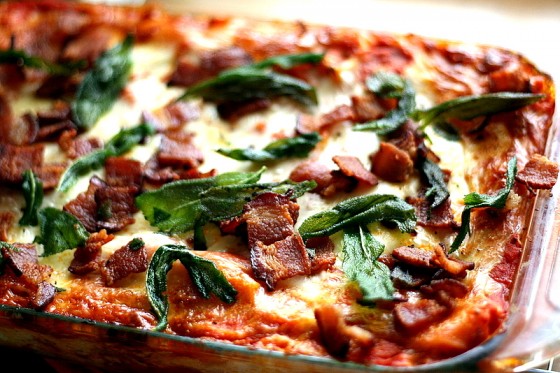
    Squash Lasagna with goat cheese, bacon and sage

    Roasted Butternut Squash Lasagna with Goat Cheese, Bacon, & Fried Sage


    Ingredients:

    6 slices of uncooked bacon
    1 1/2 cups smashed roasted butternut squash (see note)
    8 ounces goat cheese
    1/3 cup ricotta cheese
    1 egg
    2 T minced fresh sage or 1/2 tsp dried ground sage + 2 sprigs of fresh sage to fry for garnish
    1/4 tsp Kosher salt
    1/8 tsp coarsely ground black pepper
    3 cups marinara sauce (about 25 oz or so)
    9 no-boil lasagna noodles
    2 cups shredded mozzarella cheese

    Directions:

    Preheat oven to 375 degrees F.
    Fry the bacon (sliced or whole, whichever you prefer) in a medium saucepan over medium heat until it crisps up. Remove bacon with a slotted spoon and set aside.
    Meanwhile, remove leaves from the 2 sprigs of fresh sage and add to the hot bacon drippings after you remove the cooked bacon. Fry for about 45 seconds or so until they, too, crisp up. Remove fried leaves from skillet and set aside with cooked bacon bits.
    In a small bowl combine the goat cheese, ricotta cheese, egg, 2 T minced fresh sage, salt & pepper. Mix thoroughly. Set aside.
    Prepare an 11x7 inch casserole dish with nonstick spray and add spread a couple spoonfuls of marinara sauce in the bottom. Put a layer of lasagna noodles over the sauce. I used three, but I had to break one to make it fit. Spread about 1/2 cup smashed squash over noodles, followed by 1/3 of the goat cheese mixture, 1/3 of the marinara sauce and 1/2 cup shredded mozzarella. Repeat layering two more times with remaining ingredients and top with remaining mozzarella cheese.
    Cover with aluminum foil and bake for 30 minutes. Remove foil and continue to bake, uncovered, for another 15 minutes until everything is bubbly, heated through, and the cheese begins to turn golden brown. Remove from the oven and top with reserved bacon bits and fried sage. Allow to rest for about 10 minutes before slicing.
    Makes about 6 servings.
    Nat's Notes:
    1. This obviously goes much faster if the squash is roasted ahead of time. It also freezes well. To roast a butternut squash, preheat the oven to 400 degrees F. Slice the squash in half, discarding seeds and gunk from the center. At this point you can either place it face-up on a baking sheet and drizzle with olive oil or face-down in a casserole dish and fill the dish with about 1/2-inch of water. Bake for about 40-70 minutes, depending on the size of your squash. When it's done, it should easily pierce with a fork. Allow it to cool, then scrape the flesh from the skin, discarding the skin. Mash, then proceed with recipe. This method works for just about any type of squash.

    Dog Days of Summer Cupcakes

    When the temperature goes up in the 90s to 100s and Princess starts asking me to fix it because after all "nana I am hot" is all that she can say. We turn to each other and know that we are in the dog days of summer. So what can we do about it?? I believe I will make up a batch of these cupcakes to see what that will do for her

    Regular Nutter Butter cookies
    Mini Vanilla Wafers
    Wilton Eyes
    (the photo I saw had taken a miniature marshmallow and cut in half and put a dollop of frosting for eye, but I thought this was easier)

    Mini M&M's - these are NOT in bags, they come in a tube & at Walmart by the register

    Instructions Bake your cupcakes & let them cool.  While that is going on make the frosting, I used the frosting recipe off of the Hershey's unsweetened cocoa can.  The "mouth, nose link" is the only tricky part and I can save you some time and money by telling you to NOT buy the can of frosting with the different tips on the top of the can - it does not work unless you want all your little cupcakes to resemble Adolf Hitler doggies.  I was just trying to save a little time (code for I was being lazy).  Soooooo, I made one cup of Royal icing using Wilton meringue powder and I used Spectrum soft gel paste chocolate brown to tint the Royal icing and I also added some to the Hershey's icing to make it darker.  If you do not have this gel would highly recommend that you get a box with an assortment of colors.  I think it is the absolute best for food coloring that looks authentic. I used a #2 tip in my piping bag for the "mouth, nose link."  I did not pipe the frosting onto the cupcakes because you do not want lots of frosting, I just used a spoon''

    recipe source here

    Prepare Your Student Financially for College


    So it has come that wonderful day. Your child is ready to head off to college. They hold that diploma in their hand and are in search of another. You have them all packed up and ready to move. Did you remember some very important things to share with your child?? Don't forget to equip them with financial knowledge.


    As college students they will be bombarded with credit offers. Some of which may be very tempting. As they walk into that student hall or rec hall or hang out wherever students meet up for activity there may be some very thrifty deals. If your child is away from home they will definitely be needing a way to get money if needed. New banks offer real tempting credit offers that may sound really good to some students. The one thing that they must all keep in mind is that debt is not ok. They may think they have it figured out and how to get it paid back but the best plans are never fool proof. Student loans, car payments, credit cards and the list goes on there are so many things that we are responsible for. There is no good debt as any debt can add stress to ones life, and get us down for future years. Make sure that while it sounds good to get now and pay later the truth is that it is not.


    Make sure that your student knows how to budget and how to create a budget before they head off to college. Knowing where the money needs to go and where it goes is best before the money is spent. A budget helps to stop overspending for things like that night out with friends or a quick pizza.


    Have a goal of what they want to do while at school. Many kids enter college as an 18 year old with no idea of what major they want to have. This is fine but soon they should start discovering what they would like to do and what they are good at and what they are not. As soon as it is decided head off in the right path taking classes that will reach the goal and get there so that no more student  debt than they have to happens.


    shared at
    moms blog party


    Giveaways Entered on 7/29

    Giveaways for 7/29

    One thing our family seems to use a lot of is bread. While because of my diet restraints I eat little to none other members of the family will use bread to make a sandwich out of anything. I have recently found a great giveaway that featured nature's harvest bread and grilled cheese the Italian way. Now that I would enjoy bread on. The giveaway winner will receive a prize pack of
    One $25 Visa Gift Card with (1) coupon, valid for $5.00 off Nature’s Harvest® bread
    enter giveaway on the blog frugal and fun mom giveaway ends August 9


    Teach My Giveaway @ Saving 5 ends august 5

    we entered giveaway here

    Tuesday, July 28, 2015

    Native to Southern Illinois


    If you have visited our blog before then you know that I love to feature wildlife that can be found here in the Shawnee forest where I live. Today I feature a black crowned night heron. Here in southern Illinois you will find all types of land including forest, rock, and marsh. These stocky shorter than their cousin the long limbed heron are active at night or at dusk thus their name. These birds are social and breed in colonies of stick nests that are usually built over water. While common here they can also be found in fresh, salt and brackish wetlands. They are the most widespread heron in the world.


    shared at
    wild bird wednesday

    Banana Cream Cheesecake

    Banana Cream Cheesecake


    Makes 1 23-cm (9-inch) cheesecake
    **Please note – Instructions below are for preparing the 9-inch cheesecake. (If you would like instructions for the mini cakes please reach out through the comments and I will provide them to you.)
    To make the assembly of the cheesecake much easier I took the time to freeze the cheesecake and also the bavarian cream layer (after refrigeration) for about 30 minutes. This step is optional but recommended especially during the warm weather months.
    You’ll notice in the photos above for the larger cake the Bavarian Cream Layer is about 2½ to 4-cm high (1 to 1½-inches – forgot to measure) if you prefer the layer not quite so high, pour less Bavarian Cream into the mould and prepare some individual bavarian cream desserts in glasses and garnish with fresh fruit.
    • Stabilized-Whipped Cream 
    • Nilla Wafer-Cheesecake Crust
    • Banana Cream Cheesecake Filling
    • Vanilla Bean-Bavarian Cream

    Stabilized-Whipped Cream

    • 560 ml (2¼ cups) heavy (whipping) cream, 35%, well chilled
    • 1 vanilla bean, split and seeded
    • 1½ teaspoons unflavoured gelatine
    • 45 ml (3 tablespoons) cold water
    • 40 g (5 tablespoons) confectioners’ sugar, sifted
    1. Combine cream, vanilla bean and seeds in an airtight container; whisk together until vanilla seeds are evenly distributed. Cover and refrigerate until just prior to serving cheesecake.
    2. Chill stand mixer bowl and whip attachment in the freezer, 15 minutes.
    3. In a small saucepan, sprinkle gelatin over cold water; let soften 5 minutes. Place saucepan over low heat and stir until gelatin is dissolved. Remove from heat and let cool.
    4. Remove bowl and attachment from the freezer. Pour chilled cream into chilled bowl. Add the sugar and whisk at high speed until very soft peaks form.
    5. Continue to whisk, and gradually pour the gelatin mixture through a fine mesh sieve into the whipped cream; beat until stiff peaks form.

    Nilla Wafer-Cheesecake Crust

    If you would like the crust to come up the sides of the cheesecake I would recommend using about 2 to 2¼ cups wafer cookie crumb and also increase the melted butter to between 86 to 100 g (6 or 7 tablespoons).
    • 156 g (about 44) Nilla wafer cookies (about 1¼-cups crumb)
    • 57 g (¼ cup) unsalted butter, melted
    1. Preheat oven to 180° (350° F). For easier cheesecake removal, unlatch 23-cm (9-inch) springform pan and flip the base over (lip facing down). Line the base with a sheet of non-stick baking paper leaving a 5-cm (2-inch) border on all sides. Reattach sides of springform pan (making sure the lip is facing down).
    2. In the bowl of a food processor, process wafer cookies to a fine crumb.
    3. Gradually pour the melted butter through the feed tube and process until crumbs are evenly moistened.
    4. Press the crumb mixture evenly on the base of the springform pan. Transfer to a rimmed baking sheet lined with non-stick baking paper.
    5. Bake the crust on the baking sheet until set, about 8 minutes.
    6. Remove from oven and transfer to a wire rack. Let stand until completely cooled.

    Banana Cream Cheesecake Filling

    • 1000 g (4 x 8-ounce packages) cream cheese, room temperature
    • Seeds from 1 vanilla bean or 2 teaspoons pure vanilla extract
    • 225 g (1 cup) caster (superfine) sugar
    • 2 ripe bananas, mashed
    • 24 g (3 tablespoons) plain (all-purpose) flour, sifted
    • 4 large eggs, room temperature
    • 160 ml (2/3 cup) buttermilk
    • 60 ml (¼ cup) banana liqueur (substitute with 60 ml (¼-cup) heavy (whipping) cream, 35% + 1 teaspoon banana extract)
    • 1 to 2 tablespoons butter, room temperature
    1. Preheat oven to 160° C (325° F). Bring a teakettle of water almost to a boil. Prepare springform pan for water bath, cut heavy-duty aluminum foil into three 40-cm (16-inch) squares. Layer aluminum squares on a flat work surface, place the cooled springform pan in centre of square; wrap foil tightly around and up the sides of the pan. Place wrapped springform pan into a deep roasting pan (large enough to comfortably fit the size of the springform pan).
    2. In bowl of stand mixer fitted with paddle attachment, beat the cream cheese at medium speed until smooth, scraping down sides, bottom of bowl and attachment occasionally.
    3. Reduce mixer speed to low. Add the vanilla seeds (or extract) and gradually add the sugar, beat until smooth scraping down sides, bottom of bowl and attachment as needed.
    4. Add the mashed bananas and flour; beat to just combine.
    5. Add the eggs, one-at-a-time, beating to just combine scraping down sides, bottom of bowl and attachment after each addition.
    6. Add the buttermilk, banana liqueur and vanilla extract (if using instead of the vanilla seeds) beat to just combine.
    7. Remove the bowl from the mixer. Strain the filling through a fine mesh sieve into a pourable container and using flexible rubber spatula press through any solids. Stir the mixture with the spatula to combine well.
    8. Using pastry brush butter the sides of springform pan.
    9. Pour the filling into the cooled crust. Tap the springform pan gently on the counter to allow any air bubbles that may have formed to dissipate and transfer back to the prepared roasting pan.
    10. Pull out the middle oven rack slightly (just enough to comfortably fill the roasting pan with water); place roasting pan on rack. Carefully pour the hot water from the teakettle into the roasting pan filling about halfway up the side of the springform pan. Carefully push the roasting pan into the centre of the oven rack and then ever so carefully push the oven rack back into the oven.
    11. Bake until set around the edges and the centre of the cheesecake jiggles slightly when the springform pan is gently shaken, 1 hour 15 minutes.
    12. Remove from oven and transfer to a heatproof surface. Immediately remove springform pan from water bath and transfer to wire rack. Remove aluminum foil. Run a thin knife around the edges of the pan and let stand at room temperature away from drafts until cooled completely.
    13. Transfer cheesecake in springform pan uncovered or loosely covered to refrigerator to chill, at least 6 hours, preferably overnight or up to 2 days. (For best taste and texture, allow cheesecake to chill for 2 days.)
    14. Remove from the refrigerator, transfer cheesecake to freezer and chill, 30 minutes.

    Vanilla Bean-Bavarian Cream

    To prepare a quick dessert, serve Bavarian Cream in glasses garnished with fresh fruit.
    • 250 ml (1 cup + 1 tablespoon) whole milk
    • 1 vanilla bean, split and seeded or 2 teaspoons pure vanilla extract
    • 5 g (3 sheets) gelatine, gold extra (Dr. Oetker)
    • 3 large egg yolks
    • 57 g (¼ cup) caster (superfine) sugar
    • 375 ml (1½ cups) heavy (whipping) cream, 35%, well chilled
    1. In a small saucepan bring milk, vanilla bean and seeds just to the boil (small bubbles forming around the sides of the pan) over medium heat. Remove from heat, cover and let stand at room temperature allowing vanilla to infuse, 15 to 20 minutes.
    2. Line rimmed baking sheet with a sheet of non-stick baking paper. Place a sheet of plastic wrap on top of the baking paper. Centre an 18-cm or 20-cm (7-inch or 8-inch) ring mould (or sides of a springform pan) on the plastic wrap. Tightly wrap the plastic up the sides of the mould and secure with an elastic band (or tape wrap to mould). Make sure the plastic wrap is smooth on the base of the mould. Line the inside of the mould with acetate paper or non-stick baking paper.
    3. Soak the gelatin leaves in very cold water until softened, 15 minutes. Prepare an ice water bath, fill a large bowl half full with ice and cover the ice with cold water. Set aside.
    4. In a large bowl, using a large balloon whisk beat together the eggs and sugar until thick and pale.
    5. Gradually add the hot milk mixture into the egg mixture, whisking constantly until well combined.
    6. Return the mixture to the saucepan and cook over low heat until mixture is thick enough to coat the back of a wooden spoon and reaches a temperature of between 80° C to 82° C (175° F to 180° F), making sure the mixture does not boil.
    7. Remove from heat. Remove gelatin sheets from water, squeeze out any excess liquid and add the to the milk mixture, stirring until dissolved. If using vanilla extract, add to the mixture and stir to combine.
    8. Strain the mixture through a fine mesh sieve into medium-sized bowl. Place bowl over water bath and stir occasionally until cool and slightly thickened.
    9. Meanwhile, in a large bowl, use handheld electric mixture to beat the heavy cream to soft peaks.
    10. Remove the bowl from the water bath and fold the whipped cream into the milk mixture in two additions. Strain the cream through a fine mesh sieve into the prepared mould. Use an offset spatula to level and spread the cream to the sides. Cover the mould with plastic wrap and transfer to the refrigerator to set, 3 to 4 hours.
    11. Remove from the refrigerator, transfer bavarian cream layer to the freezer and chill, 30 minutes.

    Assembling Cheesecake

    For an extra special dessert you may want to serve the cheesecake slices with caramelized bananas. If you’ve never prepared caramelized bananas please reach out via the comments I will be very happy to share the technique.
    • Fresh bananas, cut on the diagonal, optional, to garnish
    1. Prepare whipped cream.
    2. Remove cheesecake and bavarian cream layer from the freezer. Working quickly, unlatch the springform pan and with the help of a large spatula slide the cheesecake off the baking paper onto cake stand or plate (the cheesecake will easily slide off because we took the time to flip the base over so that the lip is facing down).
    3. Remove mould from bavarian cream layer; remove acetate paper (or baking paper). With the help of a large spatula transfer bavarian layer to the top of the cheesecake, making sure the layer is centred.
    4. Transfer whipped cream to large pastry bag fitted with large decorative tip.
    5. Decorate cheesecake as desired. If desired, use fresh bananas to garnish.
    6. Buon Appetito!
    recipe source here

    shared at
    wow us Wednesday

    Tea Time

    I was blessed to have the love of a few grandmas and other adopted grandmas when I was a kid. One of the ladies who adopted me as their grand-child loved tea time. We would always meet at a certain time on Saturdays and enjoy a bit of a treat. This post was inspired by her may we always take a break in our day to enjoy a moment if not long enough for some tea

    Warm Strawberry Cakes Baked In A Teacup


    (from Cupcakes – Susanna Tee)
    Makes 6 cakes
    • 8 tablespoons unsalted butter, softened, plus extra for greasing
    • 4 tablespoons strawberry conserve
    • generous 1/2 cup superfine sugar
    • 2 eggs, lightly beaten
    • 1 teaspoon vanilla extract
    • generous 3/4 cup self-rising white flour
    • 1 pound/450 g small whole fresh strawberries
    • confectioners’ sugar, for dusting
    1. Preheat the oven to 350°F (180° C).  Grease 6 heavy, round teacups with butter.  Spoon 2 teaspoons of the strawberry conserve in the bottom of each teacup.
    2. Put the butter and sugar in a bowl and beat together until light and fluffy. Gradually add the eggs, beating well after each addition, then add the vanilla extract.  Sift in the flour and, using a large metal spoon or spatula, fold it into the mixture.  Spoon the batter into the teacups.
    3. Line the bottom of a roasting pan with a tea towel.  Stand the cups in the roasting pan, then pour enough hot water to come one-third up the sides of the cups.  Bake the cakes in the preheated oven for 40 minutes, or until well risen and golden brown, and a skewer, inserted in the center, comes out clean.  If over-browning, cover the cakes with a sheet of foil.  Leave the cakes to cool for 2-3 minutes, then carefully lift the cups from the pan and place them on saucers.
    4. Place a few of the whole strawberries on each cake , then dust them with sifted confectioners’ sugar.  Serve warm with the remaining strawberries.''
    shared at
    beauty of roses tea time
    show and tell party

    giveaways on 7/28

    I entered at the blog Tales From A Southern Mom

    entered at here we go again


    I love my iced tea in the summer time. If you are like me then you will want to check out trade winds Jimmy Buffets Island  Tea. The flavors sound awesome and I will be looking for this on our next shopping trip. For now I entered the giveaway on the blog We Heart Family and Friends. Details of the giveaway
    Two lucky winners will win a Tradewinds “Sip & Sing Your Way to Paradise” Swag Box, filled with must-haves like shirts, cozies, sun glasses and of course this new brew!  This giveaway will end on 8/7

    Orange Kool Ade No Bake Cheesecake

    ORANGE KOOL-ADE No Bake CHEESECAKE


     Dreamy…Creamy….Tastes like and Orange 50/50 ice cream bar!!!!!...

    1 graham cracker pie crust (homemade tastes best…store bought is still ok)
    2 packages unsweetened Kool-Aid Orange powdered drink mix
    1 8 oz softened cream cheese
    1 14 oz can sweetened condensed milk
    1 8oz container Cool Whip
    Whip Cream


    1. In a large bowl combine cream cheese and Kool-Aid
    Add sweetened condensed milk (I used a hand mixer to make it nice and smooth)
    2. Fold in Cool Whip
    3. Stir with spoon until mixture is well mix ….. the mixture will be thick and you will
    have to spoon out into the crust.
    4. Smooth out top of pie with back side of spoon.
    5. Place in refrigerator for 1-2 hours and serve chilled and top with whipped cream.
    * Pie can be made in advance and frozen. Place pie in zip-lock freezer bag ….make several in different flavors. Enjoy


    shared at
    cooking and crafting with J J
    creative monday

    Adult Beverage : Jello Shots for Adults


    1 box of JELL-O powder
    1 cup of boiling water
    1 cup of ice cold alcohol (the colder, the better)
             
    a) A big bowl
    b) Any kind of container you want to serve your shots in. (I recommend plastic shooters or plactic cups).
    c) A measuring cup that can measure at least 1 cup


    empty jello pouch into a big bowl. Add 1 cup boiling water. Stir til completely dissolved. Add 1 cup ice cold alcohol Mix   


    Monday, July 27, 2015

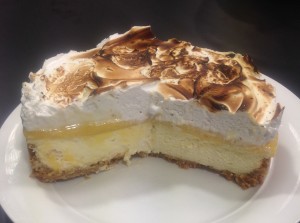
    Lemon Meringue Cheesecake


    Lemon Meringue Cheesecake recipe
     
    One of my hubbys favorite desserts is lemon meringue pie. When this pie comes with an alternative cooler smoother side I believe it is worth a try. Check out this delicious cheesecake perfect for a summer time gathering. Yummy!
     
    • 375g butternut snap biscuits
    • 100g butter
    Filling:
    • ¼ cup water
    • 4 tsn powered gelatin
    • 280g jar lemon butter
    • 500g cream cheese
    • ¾ cup thickened cream
    • 110g white sugar
    • ½ lemon zest
    Meringue:
    • Extra 80g water
    • Extra ¾ cup white sugar
    • 3 egg whites

    Method:Line a 20cm cake tin with baking paper. Add the biscuits and butter into a food processor and process until well combined. Spoon mix into the cake tin and line the walls and base with the biscuit mix. Refrigerate for 30 minutes to set. Put the water and gelatin into a bowl and whish with a fork until well combined. Microwave for 30 seconds or until dissolved, cool. Whisk lemon butter until smooth. Add 4 tsn of the gelatin mix to the lemon butter and whisk.
    Beat together the cream, cheese, sugar and zest into a bowl with an electric whisk for 5 minutes until smooth. Add the gelatin to the cheese mix and beat (if set microwave for 10 seconds). Pour cheese mix over the base. Spoon the lemon mix over the cheese layer. Place cake in the fridge for 3 hours minimum. Put extra water and sugar into a saucepan on medium heat cook stirring until the sugar has dissolved. Increase to high and place a candy thermometer in the sugar mix. Cook until the temperate hits 120 degrees then remove off the heat. With electric beaters whisk the egg whites on medium until soft peaks form. Increase speed to high, while beating in the sugar syrup in a steady stream. Beat for 10 minutes or until thick and glossy. Remove the cake from the tin and place onto a plate. Spoon the meringue onto the cake and blow torch the meringue until golden brown on top, serve.

    recipe source here


         shared at
    amaze me monday
     

    Sunday, July 26, 2015

    Strawberry Lemonade cupcakes

    Strawberry Lemonade Cupcakes With Fresh Strawberry Buttercream


    You will love this easy, quick, super-moist strawberry lemonade cupcakes recipe! Includes directions on how to prepare a fresh strawberry buttercream frosting.

    Ingredients:

    • 1 (18.25 oz.) strawberry cake mix
    • 3/4 cup buttermilk
    • 1/2 cup vegetable or canola oil
    • 1/4 cup (4 Tbsp.) lemon juice
    • 4 eggs

    Frosting Ingredients:

    • 1/2 cup (1 stick) butter, softened
    • 1/4 cup pureed strawberries (made from fresh or frozen strawberries)
    • 1 tsp. lemon juice
    • 1 tsp. vanilla
    • 3 - 4 cups powdered sugar (adjust to achieve desired consistency)

    Directions:

    Preheat the oven to 350 degrees. Line 24 muffin cups with paper liners.
    Add the cake mix, buttermilk, oil and lemon juice to a large mixing bowl. Beat with an electric mixer on low to medium speed until moistened, about 30 seconds. Add eggs one at a time, until the batter is well-mixed. Increase speed to high and beat until thick and fluffy, 2 minutes longer.
    Pour or scoop the batter into the paper liners until they are 2/3 full. Bake for 15-20 minutes, or until a toothpick inserted in the middle comes out clean. Remove from oven and let cupcakes cool on a wire rack.

    To Make Frosting:

    Cream butter in an electric mixer on medium-speed until smooth and fluffy, about 2-3 minutes. Then add in the strawberries, vanilla and lemon juice, and mix on low-speed until combined. Gradually add in the powdered sugar and mix until combined. Then beat on medium speed until light and fluffy, another 3-5 minutes. (Add in more powdered sugar if consistency is too nifthin.)
     
    ***To frost 24 cupcakes as I did (pictured above), I’d recommend making a double batch of the frosting. But if you’re just spreading it on with a knife, one batch should be plenty! :)

    Italian Pressed Sandwiches


    Salami and Provolone Italian Pressed Sandwiches

    This delicious Italian inspired sandwich is one that I love to take when traveling. It is very easy to prepare and includes lots of delicious goodies. Start with ciabatta bread. If you can not find this then use a delicious Italian bread. Top the bread with freshly made or purchased pesto. (I saw some delicious pesto in the deli and produce section of our local store plan to try one of these soon) add garlic and herb roasted tomatoes. Top with some great tasting salami and provolone. Fresh basil will be a delicious addition as well  


    To make this a pressed sandwich is very easy. Simply assemble all ingredients wrap the whole life tight with plastic wrap and weigh it down in the fridge overnight. This helps to infuse the flavors and creates a tight compact sandwich where none of the ingredients will fall out and make a mess. Once pressed you can slice into sandwiches or leave them large if you prefer.


    1 loaf of ciabatta bread
    1/4 lb very thinly sliced good-quality salami
    1/3-1/2 lb sliced provolone cheese
    8 oz roasted tomatoes, purchased (or use this recipe, minus the thyme)
    About 3 tbsp pesto, purchased (or use this recipe, or your own) 
    1 large bunch, or 2 small bunches of basil, leaves torn from the stems


    Slice the ciabatta loaf horizontally to make two large halves.  On the top half, evenly spread the pesto in a very thin layer (don't over saturate the bread).  On the bottom half, first place the roasted tomatoes in a single layer, then top with a layer of sopressata.  (Place the thin slices of meat on top of each other to form a thicker layer.)  Top the sopressata with the sliced provolone, and then place a layer of basil leaves over the top of the cheese.  Place the top slice of bread over the basil layer, and press down to bring all the layers flat.  Continue pressing down, and wrap the entire loaf tightly in plastic wrap.  Place the wrapped loaf in the fridge overnight (or for at least 3 hours), and put something heavy on top of the loaf to compress it.  I used a cast iron skillet and placed a couple of soup cans on top of the skillet. 


    The next day, unwrap the loaf and slice into large sandwiches or small squares, depending on your preference.  Serve immediately, or keep chilled until needed.


    recipe source here

    We Found A Friend at the Park


    While at a park in the big KY state (Kentucky) we found a silly little toad. This toad had us all baffled and acted as if playing games as they tried to catch it. It was hopping around and then would sit still but for just a second then to hop again. What a fun game this was finally he was caught. The cute little toad ended up being as we found out later was a fowlers toad


    Fowlers toad is normally only 2.5 to 5 inches long. Our toad was brown with a blotched back but others are yellow or green but must all have a light stripe down the middle of their backs. Makes a sound that is similar to that of a sheep with a cold. They are normally found in sandy areas near marches, backyards and temporary pools. Normally nocturnal and breed in march to august when they lay strings of eggs.