Custom Search

Saturday, February 9, 2019

Chocolate Panettone French Toast Sandwich Recipe

Chocolate Panettone French Toast Sandwiches Recipe


6 thick slices of panettone, or other stale bread
2 free-range eggs
grated rind & juice of half an orange
1/4 cup milk
1-1/2 teaspoons maple syrup
lashings of Nutella
1-1/2 tablespoons butter
mascarpone
2 or 3 Ferrero Rocher chocolates, crushed

Put eggs, orange juice and zest, maple syrup and milk in a wide, shallow dish, and whisk lightly to combine. Set aside.
Spread Nutella on three of the panettone/bread slices. Spread as thickly as you can without breaking the bread. Place the other three bread slices on top to make sandwiches.
Drop butter into a frying pan, and set over medium-high heat. Meanwhile, put sandwiches into the egg bath, coating both sides separately. Once the pan is hot and the butter is melted, add the sandwiches to the pan, and cook until browned on both sides.
Remove to a serving plate. Place a dollop of mascarpone cheese on top and sprinkle with the crushed chocolates.
Enjoy!

Do you have a favourite way to enjoy Nutella? - I'd love to hear about it.

retweet post here 
shared on facebook here

shared on these blog hops, linkups and parties
Terrific Tuesday

shared on these facebook group linkups
twitter marketing ---- 2 rt ---- 2/17

Homemade Peppermint Patty #recipe


2 tablespoons + 1 teaspoon cold water
1 tablespoon light corn syrup
1 teaspoon fresh lemon juice (I happened to have a real lemon on hand and I used a teaspoon of juice from it- I don’t think it would have a significant negative impact to use the bottled kind)
1 teaspoon peppermint extract
1 1-lb box powdered sugar (about 3 3/4 cups)
1 tablespoon shortening
12 oz semisweet chocolate chips (I definitely needed the full bag and, in truth, my last couple of patties weren’t super well-coated. If you want them all to be uniform and pretty, you may want an extra couple of ounces!)
6 starlight peppermint candies, crushed (totally optional, but pretty!)

Using electric mixer, beat together 2 tablespoons water, corn syrup, lemon juice, and peppermint extract. Add half of the powdered sugar. Add shortening. Beat on medium and slowly ad the remaining powdered sugar until well combined. If mixture seems too stiff or crumbly, add additional teaspoon of water (<--i did.="" p="">
Form into ball and place between sheets of waxed paper. I used a rolling pin to roll into a disk about 9″ in diameter and 1/4″ thick. Lay disk on cookie sheet and put in freezer for about 15 min.

Place disk on flat surface and cut out circles. They recommend a small cookie cutter and, if you have one, that’s great. I did not, so I used the rim of a very small cordial glass and that worked splendidly! Look around your house before you go out buying things, that’s my motto. Anywho, cut out as many circles as you can and lay them on a parchment lined cookie sheet. Gather the scraps into a ball (just like you would cookie dough) and re-roll. Cut out more circles. Repeat this process until all the filling is gone. Put circles in freezer.

Melt your chocolate. I do mine in the microwave, on medium, stirring every 30 seconds or so. Using a fork, dip each patty and let the excess chocolate run off. Place on waxed paper. (While “ball” candies like peanut butter balls or coconut balls will just “roll off” the fork, patties will not. You may find it helpful to use a butter knife to gently push it off onto the waxed paper.) Sprinkle each patty with a bit of crushed mint candy- you’ll want to do this after every 5 or so that you dip so the chocolate doesn’t set up too much on you…

Harden the finished patties in the refrigerator for at least an hour. It’s best to store them airtight in the fridge, layered with waxed paper or parchment. These will keep up to a month but, really, I highly doubt this is going to be an issue! ;)

Yield: 5 dozen,

originally appeared in family fun magazine 2010
<--i did.="" p="">
<--i did.="" p="">retweet post here
shared on facebook here

shared on these blog hops, linkups and parties
dare 2 share

shared at these fb group linkups
RT tweet ---- 2/13 ---- rt 1

Make Your Own Ice Cream easy


1/2 cup sweetened condensed milk
1 teaspoon of vanilla extract
pinch of salt
1/4 cup of sour cream
1 1/4 cups of heavy cream

Mix condensed milk, vanilla, salt and sour cream until well combined.  To it add…

for CHOCOLATE variation: add 5-6 tablespoons {or more to your liking} of chocolate syrup

for MOCHA variation:  mix 1 heaping teaspoon of instant coffee powder with 1 tablespoon of boiling water. Add instant coffee mixture, along with a generous squirt of chocolate syrup to the condensed milk mixture

Mix your heavy whipping cream on high {it would love a cold bowl and cold whisk too} until stiff peaks form {3 or so minutes}. Whisk some of the whipped cream into the condensed milk mixture until incorporated and then gently fold the rest of the whipped cream in. Place in an airtight container and freeze 6 hours before serving!

recipe resource here

retweet post here
shared on facebook here 

shared at these blog hops, linkups and parties
saturday sparks 

shared at these facebook group linkups
RT club ---- 2/11 ---- 2 rt
twitter marketing ---- 2/20 ---- limit 30

Sweet Potato Cake


Cake:
2 medium or 1 large sweet potato (12 ounces)
3 cups (12 ounces) cake flour
1 tablespoon baking powder
1½ teaspoons ground cinnamon
¾ teaspoon ground nutmeg
¼ teaspoon ground cloves
5 eggs, separated
2¼ cups (15.75 ounces) sugar
½ teaspoon table salt
10 tablespoons unsalted butter, at room temperature
1½ teaspoons vanilla extract
1¼ cups milk, room temperature

Frosting:
10 ounces cream cheese, room temperature
8 tablespoons (1 stick) butter, room temperature
3 cups (12 ounces) powdered sugar, sifted
3 tablespoons maple syrup

1. Heat the oven to 400 degrees. Prick each sweet potato with a fork in 5-6 places; place on a baking sheet and bake for 1 hour or until the potatoes are very soft. Remove from the oven and cool slightly. When the potatoes are cool, peel off the skin and remove any dark spots. Cut the potatoes into chunks and puree in a food processor until smooth. Measure out one cup of potato puree; discard the rest or save for another use.

2. Reduce the oven temperature to 350 degrees. Butter and flour the bottoms and sides of three 8- or 9-inch pans, or spray with baking spray. Line the bottom of the pans with parchment paper; grease the paper. In a small bowl, combine the flour, baking powder, cinnamon, nutmeg, and cloves; set aside.

3. In the bowl of electric mixer fitted with the whisk attachment, beat the egg whites on medium speed until frothy. Increase the speed to high and gradually add ¼ cup sugar. Continue to beat until the egg whites are moderately stiff. Transfer the egg whites to a separate bowl.

4. In the same bowl (no need to wash it), with the mixer fitted with the paddle attachment, combine the sweet potato, butter, vanilla, remaining sugar, and salt; beat on medium speed until light and fluffy, 3-4 minutes. Add the egg yolks one at a time, scraping the sides of the bowl after each egg yolk is added. Reduce the mixer speed to low and add one-third of the dry ingredients, followed by half the milk, another one-third of the dry ingredients, the remaining milk, and the remaining dry ingredients.

5. With a large spatula, fold in one-fourth of the egg whites into the batter to lighten it. Fold in the remaining egg whites until no streaks remain, making sure to not over mix. Divide the batter evenly between the prepared pans.

6. Bake for 25-35 minutes or until a toothpick inserted into the center of a cake layer comes out clean. Let the cake layers cool in the pan for 10 minutes, then turn out onto wire racks. Cool completely before frosting, at least 1 hour.

7. For the frosting: In a stand mixer fitted with the paddle attachment (or in a large bowl with a hand mixer), beat the cream cheese and butter on medium speed until smooth, about 1 minute. Stop the mixer, add the sugar, and mix on low speed until the sugar is incorporated; increase the mixer speed to medium and beat until light and smooth, 2-3 minutes. Mix in the maple syrup.

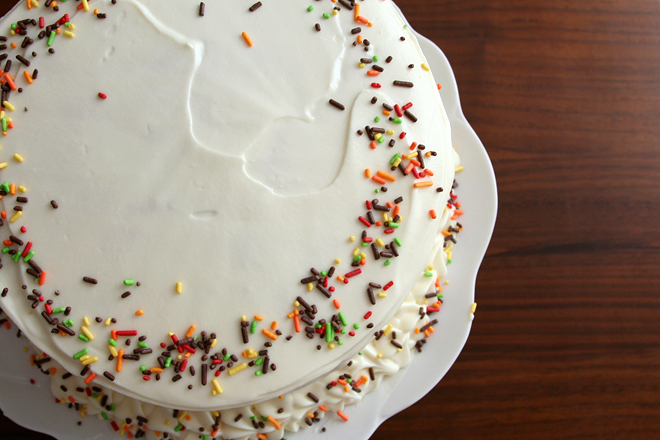
8. To assemble: Transfer one cake layer to a serving platter. Evenly spread ⅛-inch frosting over the top. Top with a second cake layer and another layer of frosting, then the third cake layer. If you have time, spread a very thin layer of frosting over the top and sides of the cake; chill, uncovered, for 30 minutes; this step will reduce crumbs in your final layer of frosting. Spread the remaining frosting evenly over the top and sides of the cake.

recipe resource here

retweet post here
shared on facebook here

shared on these blog hops, parties and linkups
Reader Tip Tuesday

shared on these facebook group linkups
twitter marketing ---- 2/18 ---- ct 

This Pizza Treat is Popping

While looking for something on the internet for an activity to do with my grandchildren this weekend I came across this cute pizza project


Now, I know that the recipe makers do not need me to tout their creativity. They have been snap, crackling and popping for some time. But you can go here to find the how-tos of this fun pizza

retweet post here
shared on facebook here 

shared at these blog hops, linkups and parties
Anything Goes Pink Saturday

shared at these facebook group linkups
Grow Your Blog --- 2/11 ---- mix thread 

Molasses Cake Bars

Molasses Cake Bars


     ½ Cup Shortening -- 3 1/4 oz
     ½ Cup Sugar -- 3 1/2 oz
  1     Large Egg
     ½ Cup Molasses -- light - 5 1/2 oz
  1 ½ Cups Sifted All Purpose Flour -- 6 oz
     ½ Teaspoon Salt
  1 ½ Teaspoons Baking Powder
     ¼ Teaspoon Baking Soda
  1      Teaspoon Instant Coffee Powder
  1      Teaspoon Cinnamon
     ½ Teaspoon Cloves -- ground
                        Icing
  2      Cups  Powdered Sugar -- 8 oz
          Dash  Salt
  1      Teaspoon  Vanilla Extract
          Light Cream -- as needed

Cream shortening and sugar; add egg; beat well.  Mix in molasses and 1/2 cup water.
Sift together remaining ingredients.  Stir into creamed mixture.
Pour into greased 13 x 9 x 2" pan.
Bake at 350° for 25 minutes.
While warm, frost with Powdered Sugar Icing.  Mix icing ingredients for a thin glaze.
Cut into 24 squares.

This recipe is from the “Better Homes and Garden New Cookbook 1968"

retweet post here
shared on pinterest here

shared at these blog hops, linkups and parties
pin junkie pin party


shared at these facebook group linkups
grow your blog --- 2/11 --- ct

Italian Sausage and Tortellini Soup

Italian Sausage and Tortellini Soup


4 links sweet or hot Italian-style sausage, casings removed (see photos below)
1-2 onions, chopped
3-4 garlic cloves, pressed or finely chopped
6 cups water
3 beef bouillon cubes
3/4 lb chopped fresh tomatoes (we usually use plum tomatoes)
1 8-ounce can plain tomato sauce
1 large zucchini, cut into chunks
3-4 carrots, peeled and sliced
1 green bell pepper, chopped coarsely
1/2 cup dry red wine
1 Tbsp dried basil
1 Tbsp dried oregano
-----------------
8-16 ounces frozen cheese tortellini
Freshly grated Parmesan cheese

Remove casings from the sausages, then fry in a large pot with a little oil until cooked through, breaking up the sausages with a spatula as you fry them. Transfer sausage to a separate bowl and pour off most of the sausage fat left in the pot (leave ~1 Tbsp of fat or so).

[CK note: If you really want to go low fat, you can drain all the fat from the pot and strain the sausage under hot water, then add a Tablespoon or so of olive oil back to the pan before the next step.] 

Saute onion and garlic on medium heat in the remaining sausage oil for ~5 minutes. Then, add back the sausage, and add all of the remaining ingredients except the tortellini and Parmesan cheese (water, bouillon cubes, tomatoes, tomato sauce, zucchini, carrots, green pepper, red wine, basil and oregano).

Bring to a boil, reduce heat, and simmer for ~40 minutes, until vegetables are tender.

Then add tortellini to the soup and simmer for another 8 minutes.

Serve in soup bowls, sprinkled generously with parmesan cheese.

Serves 6+ easily.

recipe resource here

retweet post here
shared on facebook here

shared at these blog hops, parties and linkups
saturday sharefest 

shared at these facebook group linkups
RT club ---- 2/18 ---- 1 rt

Friday, February 8, 2019

February is Potato Month

February is Potato Lover's month. The potato is considered by many to be their favorite type of produce. At any given time an estimated 10+% of the U.S. population is eating potatoes. Potatoes are the third top seller in the produce category as well. For years the potato has been considered frugal food that packs a punch. It is historically one of the least expensive sources of calories in the produce department.


Potatoes in many families have a permanent fixture on holiday tables, as well as nearly every meal. The versatility and the convenience of the potato makes it an all around ingredient. The vast varieties of potatoes allows the average consumer, foodies, home cooks and chefs to cook in a great variety of ways. Therefore it is up to the individual to help the potato reach its full potential.


Whether you prefer a starchy potato or a waxy variety they all have their best uses. The starchy potato is best for frying , baking and roasting while the waxy variety allows for more boiling and mashing, a great addition to soups, stews, casseroles and salads. Potatoes have  a grand amount of ways they can be prepared.

  • baking
  • mashing
  • frying
  • boiling
  • sauteing
  • roasting
  • pureeing
Potatoes are noted for their great taste, vesaility, convenience and nutrition. 

What is your favorite way to make potatoes??

retweet post here 
shared on facebook here

shared at these blog hops, linkups or parties
snickerdoodle Sunday
Shared at these Facebook group linkup
 rt club === 3/14 === 1 rt

Chocolate Whoopie Pies


For the Batter
½ cup unsweetened cocoa (we used Nestle’s Special Dark)
2 cups all-purpose flour
1 ½ teaspoons baking soda
½ teaspoon baking powder
½ teaspoon salt
½ cup vegetable shortening (we used Crisco)
1 cup sugar
1 egg
1 cup whole milk
2 teaspoons vanilla extract
For the Filling
8 ounces marshmallow fluff (half of a 16-ounce container)
1 cup confectioners’ sugar
½ cup vegetable shortening (we used Crisco)
¼ teaspoon vanilla extract
Approximately 1 tablespoon milk (to get filling to good consistency)

Preheat the oven to 450 degrees. Line two cookie sheets with parchment paper.
In a medium bowl, combine cocoa, flour, baking soda, baking powder and salt. Stir to mix. Set aside.
In the bowl of a stand mixer with the paddle attachment, cream together the shortening and sugar. Add egg, milk, and vanilla extract and mix well.
Slowly add dry mixture to the mixing bowl with the wet mixture and mix well.
Using a medium (1½ ounce) scoop, place scoops of the batter onto the prepared cookie sheets (about 12 per sheet).
Bake one cookie sheet at a time for 6-7 minutes (they may look a little bit wet on top but that is OK). With a spatula, remove immediately to cool on a wire cooling rack.
Once the cake mounds have cooled completely, prepare the filling by combining the marshmallow fluff, confectioners’ sugar, shortening and vanilla extract in the bowl of a stand mixer and mix until completely combined. Add milk as necessary to get to a soft (but not too soft consistency.)
Using a scoop, place a dollop of the filling in the center of the flat side of one cake. Place a matching piece of cake against the filling and push to spread the filling evenly between the two halves. Repeat until all of the pies have been filled.

retweet post here
shared on facebook here 

shared at these blog hops, linkups and parties
amaze me Monday
Shared at these Facebook group linkup
Twitter marketing ---- 1 rt ---- 3/14.  
          

Chicken Fettuccine Alfredo


1 lb skinless, boneless chicken breasts
1 egg, beaten
1 cup milk
1 tablespoon lemon juice
1 1/2 teaspoons garlic powder

FOR THE BREADING MIX
1 cup all-purpose flour
1/3 cup seasoned bread crumbs
1 teaspoon kosher salt
1 teaspoon baking powder
1 tablespoon steak seasoning

FOR THE CHICKEN AND PASTA
2 tablespoon butter
2 tablespoon olive oil
1 lb linguine noodles
1 tablespoon salt

FOR THE SAUCE
1 cup chicken broth
2 cups heavy whipping cream
1 cup grated parmesan cheese
2-3 cloves minced garlic
2 tablespoon cornstarch
1/2 teaspoon salt
1/2 teaspoon pepper
8 basil leaves, chopped
1 tablespoon fresh parsley, chopped


FOR THE MARINADE
Layer chicken between wax paper and pound breasts to even thickness. In a small bowl, mix the egg, milk, lemon juice and garlic powder. Pour mixture into ziploc bag with chicken. Seal and refrigerate 2 to 4 hours.

FOR THE BREADING MIX
After marinating, whisk together flour, bread crumbs, salt, baking powder, and steak seasoning in a medium bowl. Remove chicken from milk mixture, shake off excess, and coat in flour mixture.

FOR PASTA
Add 1 tablespoon of salt to a large pot of water and bring to boil. Boil noodles according to package.

FOR THE SAUCE
In a medium saucepan, heat chicken broth over medium high heat, bringing to a boil. Reduce heat to medium, and stir in heavy cream, cornstarch, and garlic. Bring to a soft boil and stir for one minute. Reduce heat to low, add parmesan cheese, salt and pepper. Let simmer for about 10 mins to melt cheese, let thicken, and incorporate flavors.

FOR THE CHICKEN
Meanwhile, heat butter and olive oil in a large skillet over medium heat. When butter just starts to turn brown, arrange chicken in skillet. Cook 4-5 mins each side until juices run clear and chicken is cooked through. While chicken is cooking, chop fresh herbs and stir into Alfredo sauce right before serving. Serve sauce over pasta and chicken.

retweet post here
shared on facebook here

shared at these blog hops, parties and linkups
diy showoff 

Shared on these great Facebook groups
Twitter marketing ----- click thru ---- 3/14

White Chocolate Macadamia Nut Blondies

White Chocolate Macadamia Nut Blondies
From Emeril Lagasse


1 cup (2 sticks) plus 1 teaspoon unsalted butter, at room temperature
1½ cups packed light brown sugar
2 large eggs
1 tablespoon vanilla extract
3 cups plus 1 tablespoon all-purpose flour
1 teaspoon baking powder
2 cups white chocolate chips
1 cup macadamia nuts, toasted and roughly chopped

Preheat oven to 350°F.
In the bowl of an electric mixer fitted with the paddle attachment, cream 2 sticks of butter and sugar on medium speed until light and fluffy. While machine is running, add eggs and vanilla and mix until incorporated.
Sift together 3 cups flour and baking powder. Slowly add flour mixture to batter and mix on low speed just until a dough is formed. Very gently, by turning the mixer on and then off, fold chips and nuts into dough.
Once dough is blended, grease a 9x9-inch baking pan with remaining 1 teaspoon butter and dust with 1 tablespoon flour. Pour batter into pan and place in preheated oven. Bake for 25 to 30 minutes, or until set yet still moist.
Set aside to cool completely before cutting into squares.

retweet post here

shared at these blog hops, linkups and parties
silver pennies sunday

shared at these facebook group linkups
twitter marketing --- 2/18 ---- 1 rt

Cooking for Weight Loss ==== Stuffed Mushrooms

Stuffed mushrooms seem to be a favorite of nearly everyone. Even dieters love them. So get ready for those super cute outfits this warm weather and enjoy stuffed mushrooms along the way. This low cal, no-guilt, incredibly delicious version of stuffed mushrooms will help to make all that dieting worthy.


If you are not used to cooking with mushrooms you should know that they are filled with water. This is a sign that you should recognize that mushrooms are like sponges they soak up liquid. A good tip here is to place the mushrooms in the pan with about 2 Tbsp of water or stock of your choice. The liquid will keep the mushrooms from sticking to the bottom of the pan allowing the mushrooms to to render off the liquid that was inside of them. When the liquid is all gone add olive oil it will then spread out so that it touches all rather than just a few places.


After roasting the mushrooms they should have a bit of liquid that you will use to start cooking the filling for your stuffed mushrooms offering it an extra layer of mushroom flavor.


Mushroom-Stuffed Mushrooms


20 large button mushrooms, rubbed clean with a damp cloth
4 shallots, sliced thin
2 cloves of garlic, minced
2 tbsp chopped chives
2 tbsp olive oil, plus more for brushing
1/2 cup parmesan cheese, freshly grated, plus extra for garnishing
Salt

1.  Preheat the oven to 400 degrees.
2. Detach the stems from the mushroom caps and set aside (they should pop right out when you pull them).  Brush the mushrooms caps with olive oil and salt lightly.  Place the mushroom caps on a baking sheet and roast for about 10-12 minutes.
3.  While the mushroom caps are roasting, chop the mushroom stems into small pieces.
4.  When the mushroom caps come out of the oven, drain off the liquid and reserve it.  Remove the mushroom caps and set aside.
5.  Place the mushroom liquid, chopped mushroom stems, shallots and garlic in a saute pan and sauté on medium-high heat for about 5 minutes.  After liquid has cooked off, add chives, olive oil and Parmesan, and sauté on low heat for about 3 more minutes.
6.  Spoon the sauteed mushroom mixture into the roasted mushroom caps.  Garnish with grated parmesan cheese, and serve.

Makes 20 stuffed mushrooms.

recipe resource here

retweet post here 
shared on facebook here

shared at these blog hops, linkups and parties
Create, Grow, Bake and Gather 

shared at these facebook group linkups
grow your blog ---- mixed thread --- 2/17

Easy Recipe for Giant Lollipops


Here is a candy recipe that takes bits of candy to make giant suckers. This treat would be perfect to make for valentines day with the kids. 


Make your selection of hard candies, Jolly Ranchers work well. Place the candy on a baking sheet lined with baking parchment paper. The pieces do not have to touch but should be close. The candy will melt down together in the oven. Melt the candies in a 275 degree oven for 5 to 10 minutes They should be melted but not runny or bubbly around edges. Place a sucker stick immediately into the sucker when you pull it out of the oven. Roll the stick in the candy to cover Allow suckers to cool.

retweet post here 
facebook share here

shared at these blog hops, linkups and parties
snickerdoodle sunday

shared at these facebook group linkups
twitter marketing ---- 2/18==== twitter and comment 

Cheesecake Swirl Brownies


Brownie
3/4 c  butter
1 c dark chocolate, around 60-70%
1/2 c sugar
1 tsp vanilla essence
2 eggs
1/4 c flour
1 tsp. oil
2 tsp cocoa powder
½ tsp baking powder

Cheesecake
150g cream cheese
1 tsp vanilla extract
1/4 c sugar
1 egg

Preheat the oven to 350F. Grease and line the base and sides of a square cake pan and set to one side.
To make the cheesecake layer, place the cream cheese into a small bowl and beat with a spatula until soft and smooth. Add the vanilla and sugar and mix to incorporate. Beat in the egg until well combined and set to one side. It will be quite runny, this is fine.

To make the brownies, break the dark chocolate into pieces and place into a large bowl along with the butter. Melt gently over a pan of simmering water until smooth. (The water should not touch the base of the bowl)
Remove the bowl from the heat and stir in the vanilla and the sugar. Beat the eggs in one at a time until glossy.
Sift over the flour, tapioca starch, cocoa powder and baking powder and beat with a spatula until no flour streaks remain.
Pour three-quarters of the batter into the tin and smooth into an even layer.
Pour all of the cheesecake mixture over the top. Use a spoon to place dollops of the remaining brownie batter in random blobs over the top of the cheesecake layer. Use a skewer or tip of a sharp knife to drag it into swirls. You want the cheesecake layer to still show through.
Bake in the oven for 40-45 minutes until the top looks set but the cheesecake still has a slight wobble to it.
Allow to cool almost completely in the tin before removing. Transfer the brownie to the fridge and chill for at least 2 hours before cutting into squares. It can be made the day before.
Store in the fridge and eat within 5 days. Serve with warm salted caramel sauce for extra indulgence.

Note: Eat straight from the fridge for a dense ultra fudgy brownie or allow it to come to room temperature for a softer eat. Slices can also be gently heated in the microwave which transforms it into a soft gooey molten chocolate dessert

retweet post here 
shared facebook here 

shared at these blog hops, linkups and parties
sunday features

Shared at these Facebook group linkup
RT  club ---- 2 rt --- 3/14

Thursday, February 7, 2019

Help the Birds ::: Make Your Own Pinecone Bird Feeder

This is a great way to help our children become stars by helping them help the wildlife. Currently we are in the middle of winter, spring will be here sooner or later. Either way our birds will need a bit of help finding food until nature gets over the cold chill.


Hang these bird feeders where the kids can see the birds dining on the treat they helped create. This area of time often leaves our winged friends without food that they can find on their own.


By feeding the birds you are in sense making them feel welcome. When the birds feel welcome they will come back to help with things like

  • insect control
  • weed control
  • cross pollinating between flowers and plants
You will need:


  • Several large pinecones (bought, or better yet, found on an outside adventure)
  • Peanut butter (vegetable shortening for people with nut allergies)
  • Birdseed 
  • String, pipe cleaners or wire
  • Scissors (if using string) 
  • Butter knife
  • 2 or more plates 
  • A place to hang your bird feeder (a tree or bird feeder hanger work nicely)


Check your pinecones. If they’re tightly closed up, let them sit inside the house for several days so they can “bloom,” or bake them in a 300° oven for about 10 minutes to get them to open up.
Caution: Some pinecones have sharp points on the tips of their petals, so be sure you and your kids handle them with care to avoid getting poked


Once you have open pinecones, you can attach a pipe cleaner or a length of string or wire to the tip Now it is time to spread the peanut butter Be sure to get it into all the cracks and crevices to fully coat your pinecone in peanut butter.


Once the pine cone is covered with peanut butter it is time to pour birdseed onto a plate so that it is ready to roll the pine cone in as the next step. 


completely cover the pinecone with bird seed. It is now time to hang your feeder


retweet post here
shared on facebook here 
pin post

shared at these blog hops, linkups and parties
create, bake, grow and gather 

Carrot, Red Lentil and Thyme Soup with Tortilla Croutons


For the soup
1 onion
3 medium carrots
1 c dried red lentils
1 clove garlic
2 tsp dried thyme or 2 fresh sprigs
2 pints vegetable stock
Salt and pepper to season
1 tbsp olive oil
2 T butter


Heat the oil and butter together in a large saucepan. Peel and roughly dice the onion and carrots and add them to the pan.
Crush the garlic and add to the pan along with the thyme. Cover with a lid and allow to sweat over a low heat, stirring occasionally to prevent sticking, for 10 minutes until the carrots are just beginning to soften.
Rinse the lentils under cold water and add to the pan along with the vegetable stock.
Cover and leave to simmer for 15-20 minutes until the carrots have softened and the lentils have become soft and mushy. (If using fresh thyme sprigs, remove them at this point).
Blitz the soup either with a hand blender or in a liquidiser until thick and smooth.
Season to taste with salt and pepper and serve with the tortilla croutons and a drizzle of cream.
Serves 3 – 4 depending on appetite.

For the croutons
1 flour tortilla
1 tsp olive oil
1 tsp dried thyme
Pinch of salt

Brush the tortilla with the olive oil and sprinkle over the dried thyme and a pinch of salt.
Cut into 1-2 cm squares and place on a baking tray.
Bake in the oven at 200oC for 3-4 minutes until crisp and golden.

retweet post here 

shared at these blog hops, linkups and parties
inspired designs

shared at these facebook group linkups
twitter marketing --- 2/18 ---- 2 rt

Creamy Sweet Potato and Candied Ginger Soup


2 pounds sweet potatoes (2-3 pounds maybe)
1 teaspoon olive oil
1 shallot — minced
1 clove garlic — minced
3 cups skim milk
1 cinnamon stick — 2″
4 pieces candied ginger root — chopped
4 tablespoons pine nuts (pignolia) — toasted
salt to taste

Bake your sweet potatoes in the microwave and allow to cool a bit before you peel them. In a saute pan fry your shallot and garlic for a couple of minutes then add your milk. Add the ginger and cinnamon stick and allow the mixture to steep about 10 minutes. Remove the cinnamon stick. Put your peeled sweet potatoes in a food processor and pour the milk mixture slowly through the tube while running. Process until smooth and creamy. Salt to taste. Toast your pine nuts in a dry pan on the stove top and then garnish the soup in serving bowls while still warm. You can add a bit more milk if too thick before serving.

recipe resource here 

retweet post here
shared on facebook here

shared at these blog hops, linkups, and parties
flaunt it friday

creamy tomato soup


2 tablespoons unsalted butter
1 medium onion, finely chopped
3 cloves garlic, minced
3 26 1/2-ounce boxes vacuum-packed crushed tomatoes, or 10 cups canned crushed tomatoes
5 1/4 cups Homemade Chicken Stock , or canned low-sodium chicken broth, skimmed of fat
3 sprigs fresh oregano, plus more for garnish (I omitted this - didn't have any)
1/2 cups half-and-half
Salt and freshly ground black pepper

1. Melt butter in a medium saucepan over medium-low heat. Add onion and garlic, and cook, stirring, until translucent, about 6 minutes.
2. Add tomatoes, stock, and oregano, and bring to a boil. Reduce heat, and simmer gently until thickened, about 45 minutes. Remove oregano sprigs.
3. Slowly add half-and-half, stirring constantly. Season with salt and pepper. Garnish with oregano, if desired. Serve hot.

recipe resource here

retweet post here
shared on facebook

shared at these blog hops, linkups and parties
friday at fire station

shared at these facebook group linkups
RT club ---- 3 rt weekend --- 2/24

Hot Breakfast Month ==== Crockpot Apple Pie Oatmeal

National Hot Breakfast month occurs every February. The month of February is often very cold and the perfect time to start your morning with something warm. Home cooked breakfasts are likely to be healthier than prepared food that can be bought at other places. One complaint often when making a hot breakfast comes up is time limit. However, there are many meals that can make your morning a more pleasant experience.


Make sure you have the ingredients for the meal you want to fix the night before you go to bed. The right type of breakfast is one that you look forward to making and offers great nutrition as well. While cereal and toast are often easy enough they may not be the choice you want to truly eat. A few ideas include oatmeal or maybe some eggs.

Save time by preparing breakfast the night before with some boiled eggs or fry up some meat the night before to reheat in the morning. Try this overnight oatmeal that will help you get a head start.


Crockpot Make Ahead Apple Pie Oatmeal
recipe source here 

2 large Granny Smith apples, seeds removed and coarsely chopped (no need to peel them)
2-3 T Stevia in the Raw or other sweetener (depending on how sweet you like it)
1 T brown sugar (or use 1 more tablespoon of sweetener)
3/4 tsp. cinnamon
1/2 tsp. salt
3 – 3 1/2 cups water (depending on how thick you like your oatmeal)
1 1/2 cup rolled oats (I used Bob’s Red Mill Extra Thick Rolled Oats)
milk or soy milk for serving (I used a combination of milk and vanilla soy milk, which is what I always use to eat on cereal.)

Cut apples into pieces and remove the core with the seeds; then chop apples into pieces. I made the pieces different sizes so some apples would dissolve slightly while others stayed chunky. (No need to peel them.)
Spray the CrockPot crockery container with nonstick spray. Then add the apples, sweetener of your choice (I usedStevia in the Raw), brown sugar (or more sweetener), cinnamon, and salt.
Add from 3 to 3 1/2 cups of water, depending on how thick you want the finished oatmeal to be.
Stir together and cook on high for 1 hour and 15 minutes.
Add oatmeal (I used Bob’s Red Mill Extra Thick Rolled Oats) and stir ingredients together, then continue to cook on high for an additional 45 minutes to 1 hour and 15 minutes, depending on how soft you’d like the finished oatmeal to be. (I would start checking after 45 minutes.)
Serve hot, with milk or soy milk.
This oatmeal can be stored in the fridge overnight and reheated in the morning. You may want to add a little water when you reheat it, then microwave for about 1 minute or heat for a few minutes in a small pan on top of the stove.


Do you have any tips for making a hot breakfast in the morning?? Would love for you to leave them in the comments below

retweet post here

shared at these blog hops, linkups and parties
friday favorites

shared at these facebook group linkups
twitter marketing --- 2/18 ---- 2 rt

Grapefruits are Healthy

In 1929 on a farm in South Texas the Ruby Red grapefruit was discovered. The color of these grapefruits is a natural mutation. Early grapefruit varieties were sour and tart but the red grapefruit is the exact opposite sweet and tangy. While the white and pink grapefruit varieties have been around longer the Ruby red grapefruit has become a popular favorite world wide.


All grapefruits are good for you the Ruby red grapefruits are also better for you than the original grapefruits. What a great thing to have both taste and health to go hand in hand. Like most citrus vitamin C is found in all varieties of grapefruits. Vitamin C works as a powerful antioxidant battling harmful free radicals. Without vitamin C these free radicals would do damage to healthy cells.


Grapefruits also contain flavonoids. Flavonoids are antioxidants with anti inflammatory properties. Those who suffer from painful chronic conditions like arthritis will benefit from grapefruits. In addition, grapefruits are a great source of salicylic acid that works to alleviate the painful symptoms associated with arthritis.


Fiber can be found in both white grapefruit as well as the Ruby Red variety. The fiber can help promote healthy bowel movements and improves the health of the digestive system. However, while white grapefruits offer vitamin A the ruby red variety offers 28 times more Vitamin A helps treat common skin conditions like acne or rashes.

retweet post here 
shared on facebook here

shared at these blog hops, linkups and parties
TFT party

shared at these facebook group linkups
RT club --- 2/24 --- 3 rt weekend

Cherry Coffeecake with Crumb Topping


2 cups all purpose flour
2 teaspoons baking powder
1/2 cup butter melted
1/2 cup milk
3/4 cup sugar if you prefer less sugar use 1/2 cup
1/2 tsp salt
2 eggs slightly beaten
1 can cherry pie filling or flavor of your choice

1. Preheat oven to 325 degrees. Grease a 9x13 baking pan with shortening.
2. Place the flour ,sugar, baking powder, salt and melted butter in a large mixing bowl,stir together with a fork until crumbly. If you have large clumps get your hands in there and break them apart. Your hands are your best kitchen tool.
3. Take 1/2 cup of the crumbs out of the bowl. If you're using nuts in the topping, add 1/4 cup of finely crushed nuts now, set a side.
4. In a small bowl whisk the slightly beaten eggs and milk together, add milk mixture to the large bowl of crumbs and stir until incorporated. There will be small lumps in the batter.
5. Pour the batter into your prepared 9x13 inch baking pan. Spread the cherry pie filling over the cake. Sprinkle the reserved crumb topping over the pie filling. Bake at 325 degrees for 40 to 45 minutes. Start checking cake at 35 minutes. Remove from oven, place on a cooling rack.

recipe resource here

retweet post here

shared at these blog hops, linkups and parties
blogger pit stop 

shared at these facebook group linkups
grow your blog --- retweet --- 3/4

Surf and Turf Remix: Pork Rind Oven Fried Salmon


/2 cup Southern Recipe Small Batch Spicy Dill Pickle Pork Rinds, crumbled
1 small salmon filet
1 Tbsp Parmesan cheese, grated.
1/2 tsp black pepper
1 pinch pink salt
1/2 tsp garlic powder
2 Tbsp yellow mustard
3 Tbsp avocado oil
Slice of lemon


Preheat oven to 425°.
Add 2 tablespoons of avocado oil to the skillet and set to medium heat.
Place crumbled pork rinds, Parmesan, all the seasonings (except mustard) in a bag and shake well.
Rinse salmon, pat dry, and add mustard on top.
Add mustard salmon to the bag of seasonings and shake until completely coated.
Place coated salmon in skillet, skin side down. Pan fry for 4 minutes, do not turn the filet over.
Drizzle the top of the filet with remaining avocado oil.
Place the skillet with filet in preheated oven and bake for 10 minutes.
Make sure the thickest piece of salmon has turned pale.
Remove from oven and squeeze fresh lemon on top.

recipe resource here 

retweet post here 
shared at facebook here 
shared on pinterest here 

shared at these blog hops, linkups and parties
full plate thursday

shared at these facebook group linkups
RT club ---- 2/25 --- monday 2 rt 

Pickles and what they can do for you ---- Plus a Pickle #Recipe

Many will be looking to lose a bit of weight in prep for the warmer months. The trick to losing weight is to burn more calories than you take in. Eating pickles have been known to help in weight loss, having a calorie controlled diet and offers properties that might help lose weight as well. However, pickles are normally high in sodium


Pickles are low in calorie count with a cup of dill pickles either regular or low sodium containing about 17 calories. Take note that sweet pickles like bread and butter pickles have many more calories per cup. 


The vinegar in pickled mix provides a sour taste as well as acetic acid. Acetic acid can help with weight loss Vinegar can also help keep your stomach fuller after eating

The major drawback of pickles is the sodium in them. Sodium can help your body retain water that is not wanted. This could result in gaining a few pounds. Low sodium pickles are available as well.


Pickles and other pickled veggies are a delicious way to add probiotics to any meal. These foods add both zest and health to every bite. Both pickles and pickled veggies can be made at home or bought at many food stores.


No Cook Refrigerator Pickles
4 c sugar
4 c vinegar
1/2 c salt
1 1/3 t turmeric
1 1/3 t celery seed
1 1/3 t mustard seed (I usually use 1 t ground mustard)
3 onions, sliced thin (I just use 1)
cucumbers, sliced thin (or thick, or cut into spears)
Mix sugar, vinegar, salt, and spices together.  Do NOT heat, this is a cold syrup.  Prepare your jars.  The original recipe says 3- 3 pound peanut butter jars.  I used a gallon jar and 2 quarts.  Divide the onion evenly amongst your containers.  Add cucumbers to each jar to fill.  Cover with syrup (mix well!) and put on the lids.  Refrigerate at least 5 days before using.  They’ll keep in the fridge forever, just get stronger flavored.   We had some make it almost 2 years in a no-cucumber year.  I’m not sure how they lasted that long, as usually they’re eaten up in a hurry!  Our supply usually makes it about 9 months and we have to go without until we get more fresh cukes.

retweet post here
shared on facebook here

shared at these blog hops, linkups and parties
friendship friday

shared at these facebook group linkups
RT club ---- 2/25 ---- 1 rt

Baked Chicken Supreme and Sweet Potato Oven Fries


4 whole chicken breasts, halved (I used 5 chicken drumsticks, skin on and bone in.)
1/4 cup shortening (I used Extra Virgin Olive Oil, because it’s much healthier.)
1 small garlic clove
1/3 cup chopped onion
1  1/2 tsp salt
1/2 tsp sugar
1/2 tsp oregano
1/4 cup flour
1 cup tomato juice (I didn’t have this, worked fine without it.)
1 can (about 10  1/2 oz) tomato soup
1 cup sour cream (I used low fat plain yogurt.)
1/4 cup milk
2 Tbsp grated Parmesan cheese
Hot cooked rice (I used long grain brown rice–it’s better for you.)
Directions

Brown chicken breasts in shortening (or olive oil), using more if needed.  Remove from frying pan and place in 9×9-inch baking dish.  Pour off all but 2 Tbsp drippings.  Add garlic and onion to skillet; cover and cook until soft but not brown, about 5 minutes.  Blend in salt, sugar, oregano, and flour.  Add tomato juice and tomato soup; heat to boiling, stirring constantly.  Remove from heat and blend in sour cream.  Stir vigorously.  Add enough milk to thin sauce a little.   Add Parmesan cheese.  Pour over chicken in baking dish.  Cover and bake at 325 degrees for about 45 minutes, or until meat is fork tender.  Serve with cooked rice.  Makes 8 servings.

For the sweet potato oven fries you just need one sweet potato per person, peel and cut them into fry sized pieces, toss with some olive oil (I used a little too much olive oil, so go easy on it) and bake at 400 for 10-20 minutes, checking for doneness.  They are delicious!

retweet post here
shared on facebook here
pin post 

shared at these blog hops, linkups and parties
home matters

shared at these facebook group linkups
twitter / pinterest fans === repin === 4/26

Tuesday, February 5, 2019

Pork Loin Medallions in Balsamic Honey Glaze over Potato Pancakes


1 lb lean pork loin
10-15 new potatoes (any potato will do in a pinch)
1 egg white
½ c honey
¼ c balsamic vinegar
2 T olive oil
½ c vegetable oil for frying
¼ t salt
1/8 t ground pepper
Extra pinches of salt & pepper (for potatoes)
Parsley or cilantro for garnish

Make the glaze by combining the balsamic vinegar and honey in a bowl and mixing together well until completely smooth. Set aside.

Peel and shred the potatoes into a large bowl. Since the shredding process will extract quite a bit of liquid from the potatoes, you may need to drain them in a colander. Some moisture is okay, but you want to make sure that they’re as dry as possible. Season with a couple pinches of salt & pepper. Lightly beat the egg white and add to the shredded potatoes, mixing together until completely coated. This will act as a binder to make sure they stay together during the frying process. In a large frying pan, heat the vegetable oil over medium high heat until it becomes iridescent. You can test the oil’s heat by flicking a couple drops of water (carefully!) and if it starts to pop, you're good to go. Take a small handful of the potato mixture and arrange into a “pancake” about 3” in diameter. Gently place the pancake into the oil and fry for about 3 minutes on each side or until both sides are a nice golden brown (like hash browns). Once cooked, remove from oil and place on a plate with plenty of paper towels for draining excess oil. Depending on the size of your pan, you can probably make 3 or 4 of these at a time.

Cut the pork loin into medallions about ¾” in size. Season both sides of each medallion lightly with salt & pepper. In a skillet, heat the olive oil over medium heat. When pan is heated, add a couple of pork medallions and cook for about 3-4 minutes on each side or until the meat is no longer pink on the inside. Do not overcook! When all the pork is cooked, add about half the glaze to the pan and scrape up any brown bits. If you like, you can place the pork back in the pan with hot glaze to coat lightly for extra flavor.

Arrange 3 or 4 potato pancakes on a plate. Top with 3 pork medallions, drizzle dish with remaining glaze, garnish with parsley or cilantro, and enjoy!

recipe resource here 

retweet post here 
shared on facebook here

shared at these blog hops, linkups and parties
cooking and crafting with J&J

shared at these facebook group linkups
grow your blog ---- 2/18 ---- comment

National Return Shopping Carts to Supermarket

The month of February sure does have a lot going on. If you are like me you may be spending hours of shopping for the goodies to make on those special days. There is one holiday you should keep in mind while shopping as well.... "Return Shopping Carts "


The goal is to bring awareness to the fact that every year shopping carts go missing. Anthony Dinolfo was the first to start the day in 1969. A frustrated grocer he was tired of having shoppers not return the shopping carts. Each time someone walked off with a shopping cart it cost him $$. However, even more than the money loss was the fact that the shopping carts were stolen.


The issue of shopping carts not being returned became a matter of importance in Tuscon Arizona. The city council there created a shopping cart task force. Authorities in Maryland wanted to fine individuals who stole the shopping carts. The grocery chain ALDI created a pay as you go cart where shoppers have to insert a quarter to get a shopping cart. The system cut down on the need of cart roundups as well as carts did not disappear.


The point of all this is to remind you to return you shopping cart to the proper place

retweet post here
shared on facebook here 

shared at these blog hops , linkups and parties
encouraging hearts & home

shared at these facebook group linkups
twitter marketing --- 2/5 ---- twitter like


Old Fashioned Chocolate Chip Cookie Jar Cookies

I recall the good old days at grandmas and her cookie jar fondly. One never quite new what we would find. From home-made to store bought cookies grandma would make sure the jar stay filled. Chocolate chip cookies was a favorite I hope you enjoy them as well 


1 cup (packed) golden brown sugar
1/2 cup sugar
1/2 cup solid vegetable shortening, room temperature
1/2 cup (1 stick) unsalted butter, room temperature
2 large eggs
1 teaspoon vanilla extract
3 cups all purpose flour
1 teaspoon baking soda
1 teaspoon salt
1 12-ounce package semisweet chocolate chips
Directions

Preheat oven to 350°F. Using electric mixer, beat both sugars, shortening and butter in large bowl until light and fluffy. Beat in eggs and vanilla. Mix flour, baking soda and salt in large bowl. Add dry ingredients to butter mixture and mix until blended. Stir in chocolate chips.

Drop dough by heaping tablespoonfuls onto heavy large baking sheets, spacing 2 inches apart. Bake until golden brown, about 12 minutes. Transfer baking sheets to racks; cool 5 minutes. Transfer cookies to racks; cool completely. Makes about 42 cookies.

retweet post here 
shared on facebook here

shared at these blog hops, linkups and parties
tickle my tastebuds tuesday

shared on these facebook group linkups
grow your blog --- 2/7 --- mix

Frugal Recipe ===== Tuna Stuffed Avocados


Tuna Stuffed Avocados (serves 1-2; cost per serving: $2.99)

1 large avocado
1 can of chunk light tuna in water
1/2 medium tomato
2 green onions, chopped
2 T Italian dressing

Chop the tomato and green onions and place in a bowl. Drain the tuna and add it to the chopped veggies. Add the Italian dressing and mix together well. Slice the avocado in half, peel, and seed. Place a couple generous spoonfuls of tuna in the hole left by the seed, drizzle with a bit of extra dressing if you like, and enjoy!

recipe resource here 

retweet post here

shared at these blog hops, linkups and parties
wonderful wednesday

shared at these facebook group linkups
Retweet the words ---- 2/9 ---- rt

Simple Fruit Salad Full of Fiber


1 mango, cored and sliced
1 pint strawberries, tops removed
1 pint raspberries
4 large ripe plums, cored and diced
4 large apricots, cored and diced
1 vanilla bean
2 limes, juiced and zested
1/4 cup coconut water
1 tablespoon pomegranate molasses (or grape must syrup or good balsamic vinegar)
3 tablespoons sugar (vanilla sugar, if you have it)
1 teaspoon nutmeg
½ cup crème fraiche

Wash all the fruit. Cut the mango and strawberries into half-inch cubes. Put the cut fruit into your favorite bowl. Add the raspberries, plums, and apricots.
Pour in the coconut water and stir it in with the fruit.
With a small, sharp knife, cut down the center of the vanilla bean, then peel back the skin. Scrape the gritty innards into the bowl. Toss well.
Add the lime juice, lime zest, pomegranate molasses, sugar, and nutmeg to the fruit. Stir gently.
For the fullest taste, allow the fruit salad to marinate in the refrigerator overnight before serving.
Dollop each serving with a large spoonful of crème fraiche and serve.

Feeds 4.

retweet post here

shared at these blog hops, linkups and parties
beautifully made 

shared at these facebook group linkups
grow your blog --- comment ---- 2/8
RT Club ---- 2/23 ---- 1 tweet